
Its only the first part of January and I have a zillion and one projects on the go already. As far as pattern testing goes, it seems every designer i test for has one coming out very soon. I tried to change the theme on my blog for a fresh colour and new look but alas, it was disastrous as it didn’t seem to integrate into my existing content so well. I’ll get it done, but sometimes I wish it was easier. Here are some fun things I’ve worked on lately.
I guess I’m getting a bit Carried Away….
Perhaps you have heard or read about a brand new Pattern Collection?
It’s called The Carried Away Pattern Collective, and it’s brought to us by none other than Alicia Miller of Swoon Patterns along side Celine Allaert of Blue Calla Patterns. For bag makers discovering this partnership for the first time, it must be akin to discovering Peanut Butter Cups for the first time. How did anyone ever get by without this perfect pairing? …and why didn’t they think of it years ago?! We (as bag makers) can NEVER get enough of a trendy and well written bag pattern and the pattern market is flooded with them, but these 2 designers are the cream of the crop. They consistently produce well written and thoroughly tested bag patterns.

The Carried Away Collective is comprised of a 6 month subscription for bag patterns. On the 15th of each month from August 2018-January 2019 subscribers will receive a new pattern in their accounts to download. This pattern will have been kept a secret until it is released into the download accounts. The theme to this collection “Every Day Bags” bags. To become a member, it is a cost of $35USD. This is a 1 time fee. You get the all 6 patterns for this price. You can join anytime in the 6 months, and upon joining the already released patterns you will receive immediately..with the others following on the 15th of each future month until January.
There is even a dedicated Facebook group for support and showing off your bags of course!
I’m so excited to show you my tester for the first pattern in the Collective. August was a Swoon bag and so this is Sierra Zip Top Bag. It’s got a pocket inside as well as an exterior slip pocket for a phone. There’s an optional cross body strap that can added as well.
Approx size: 13″ long x 10″ tall x 6″ deep
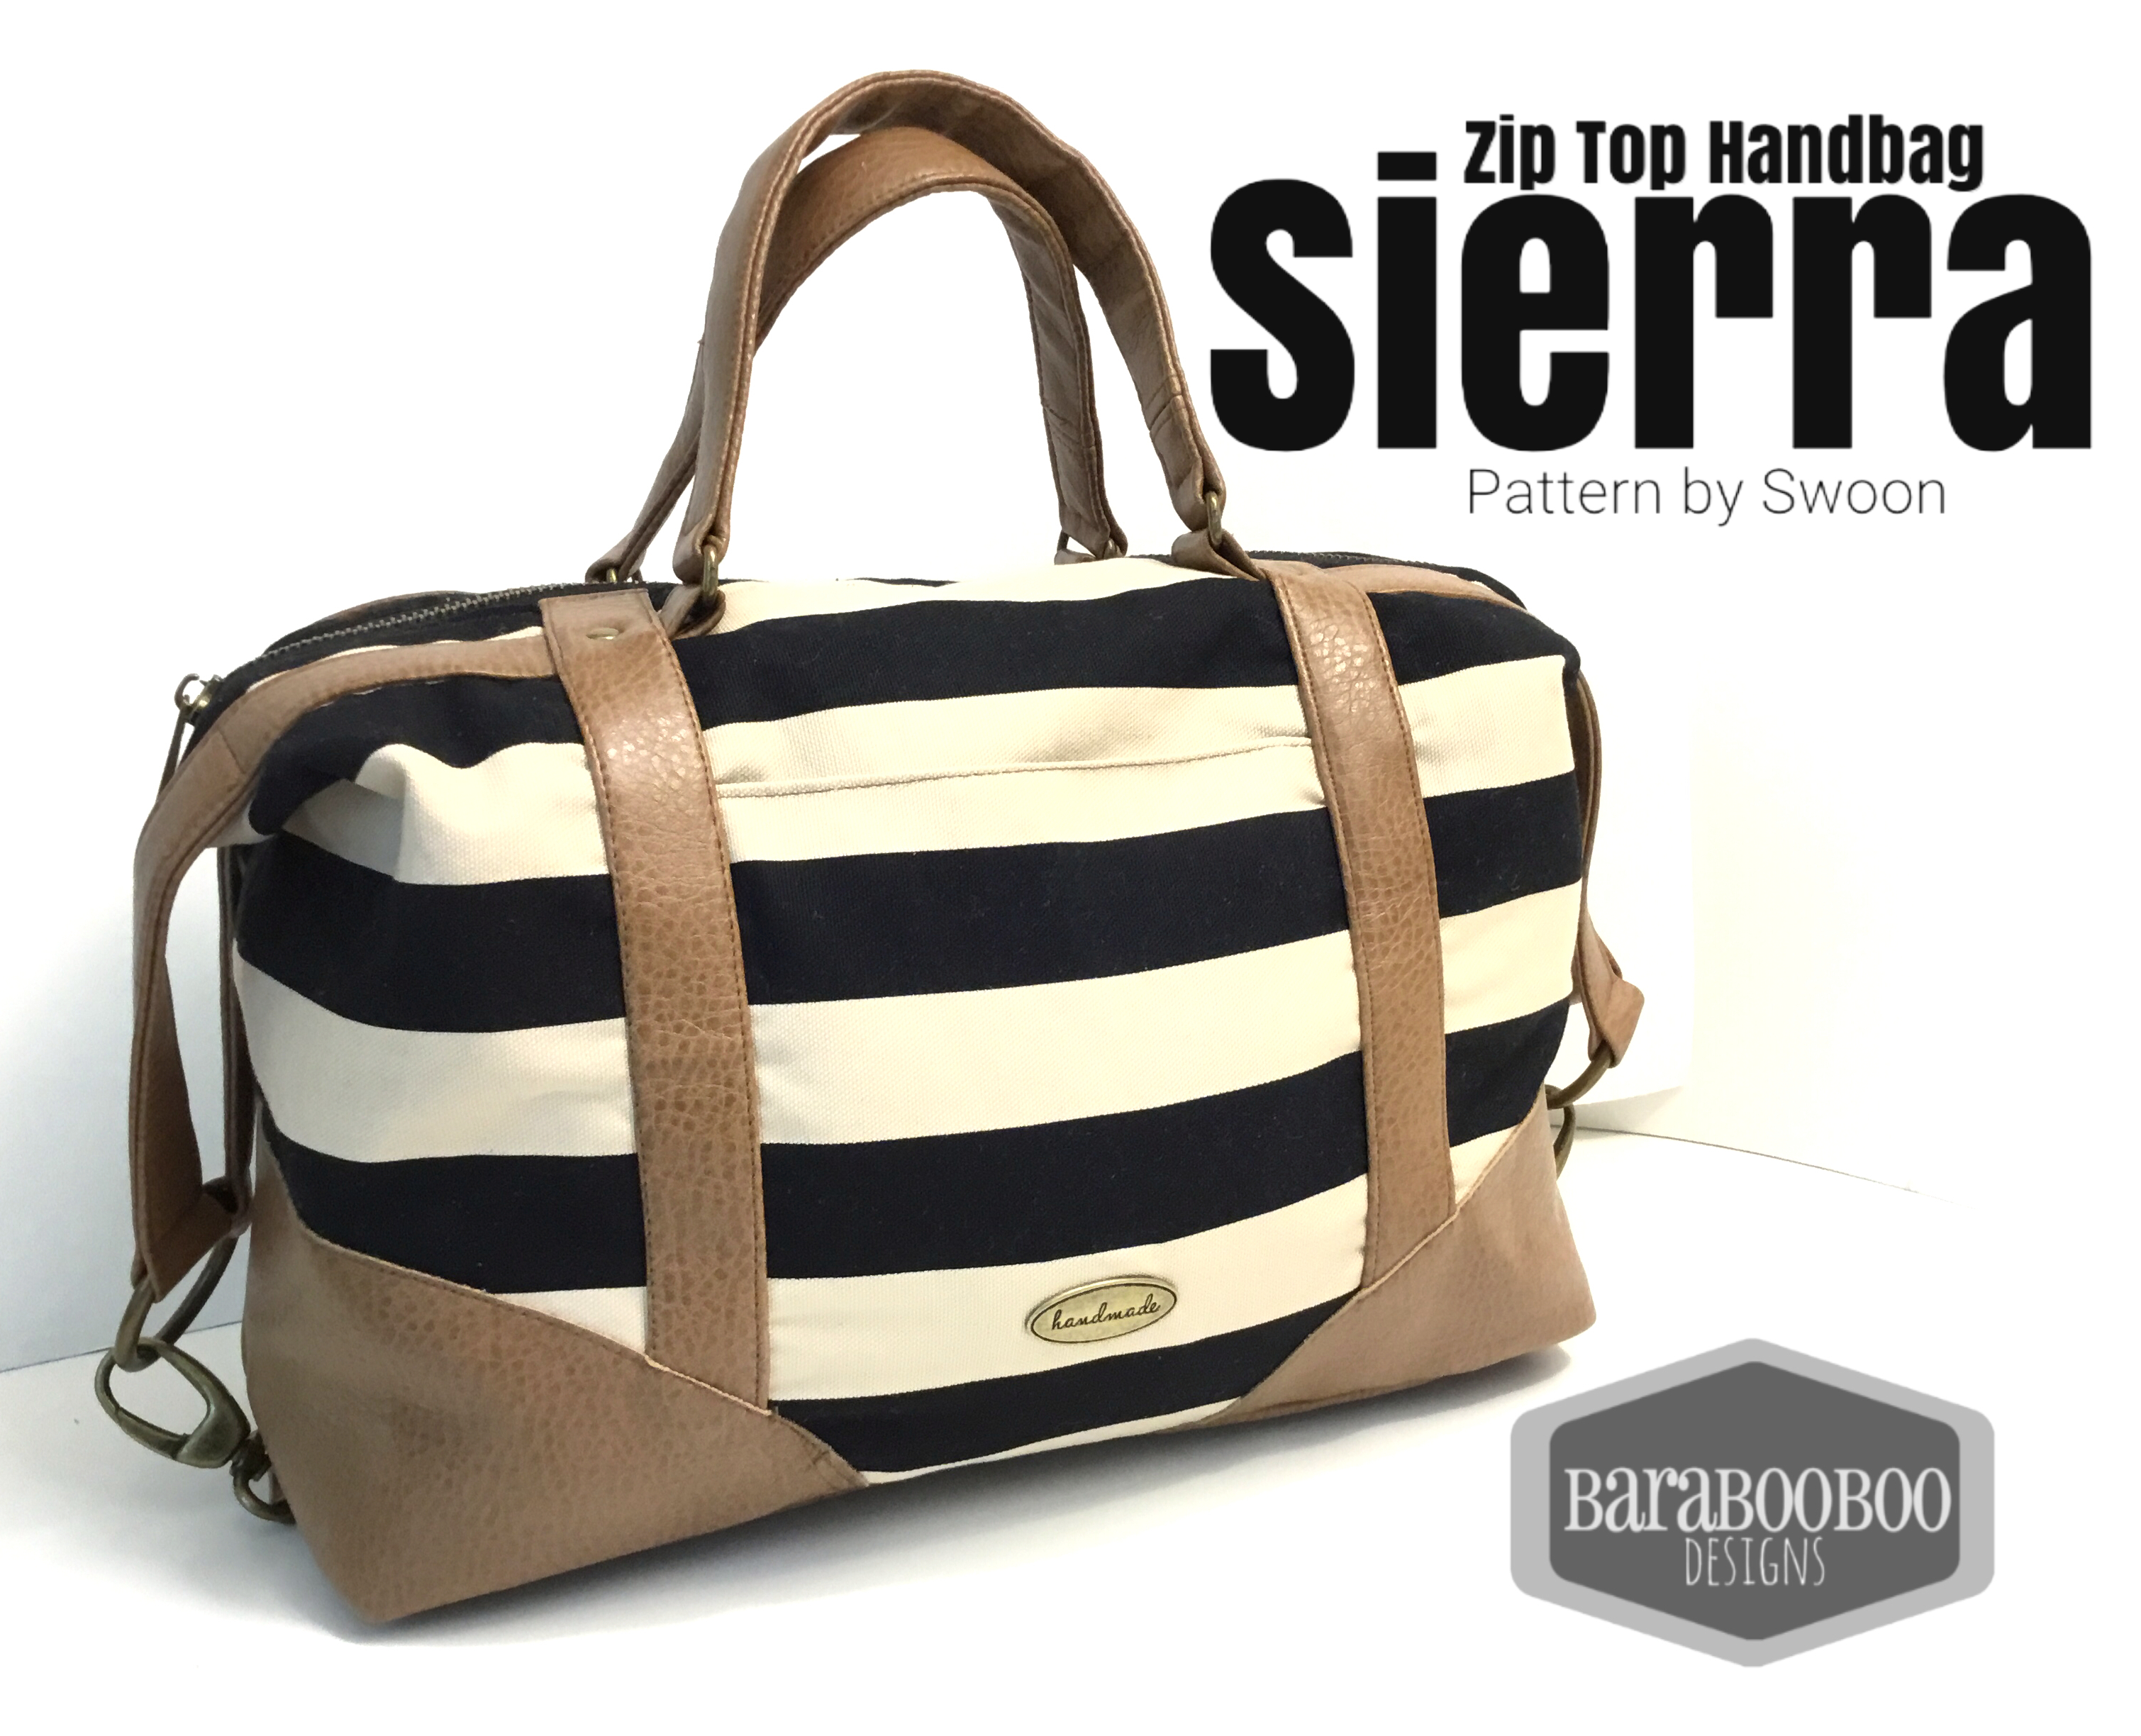
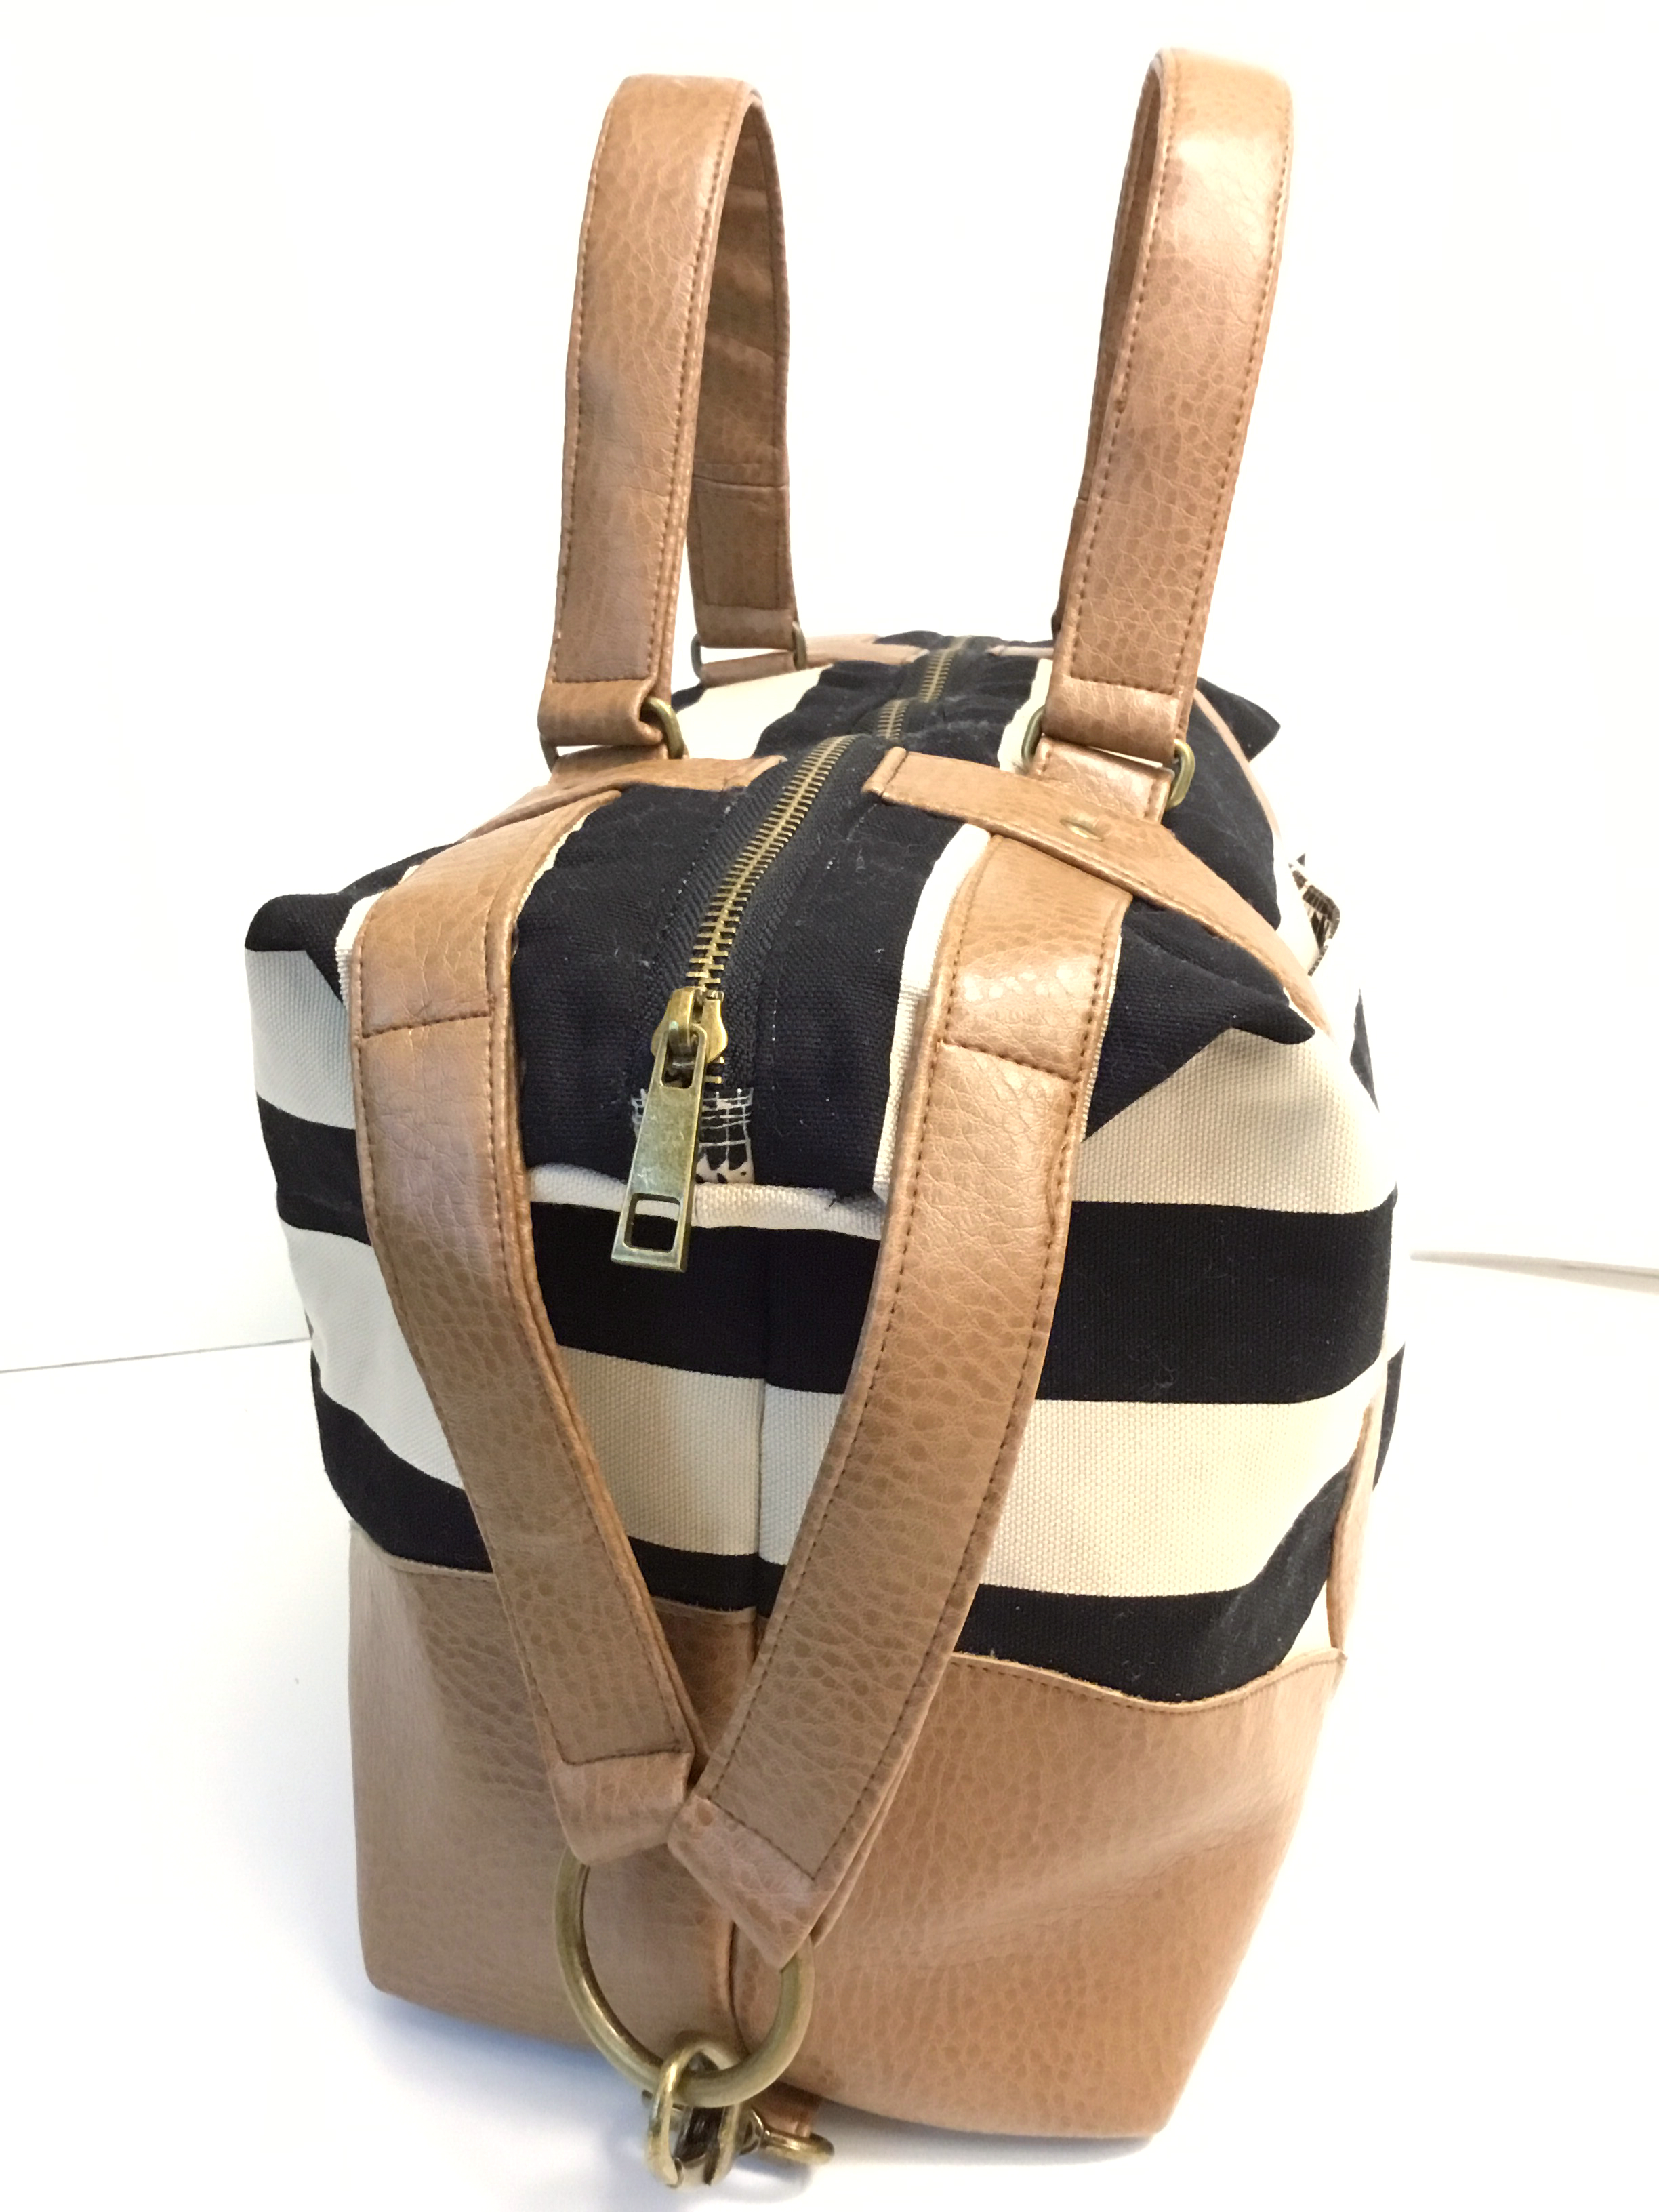
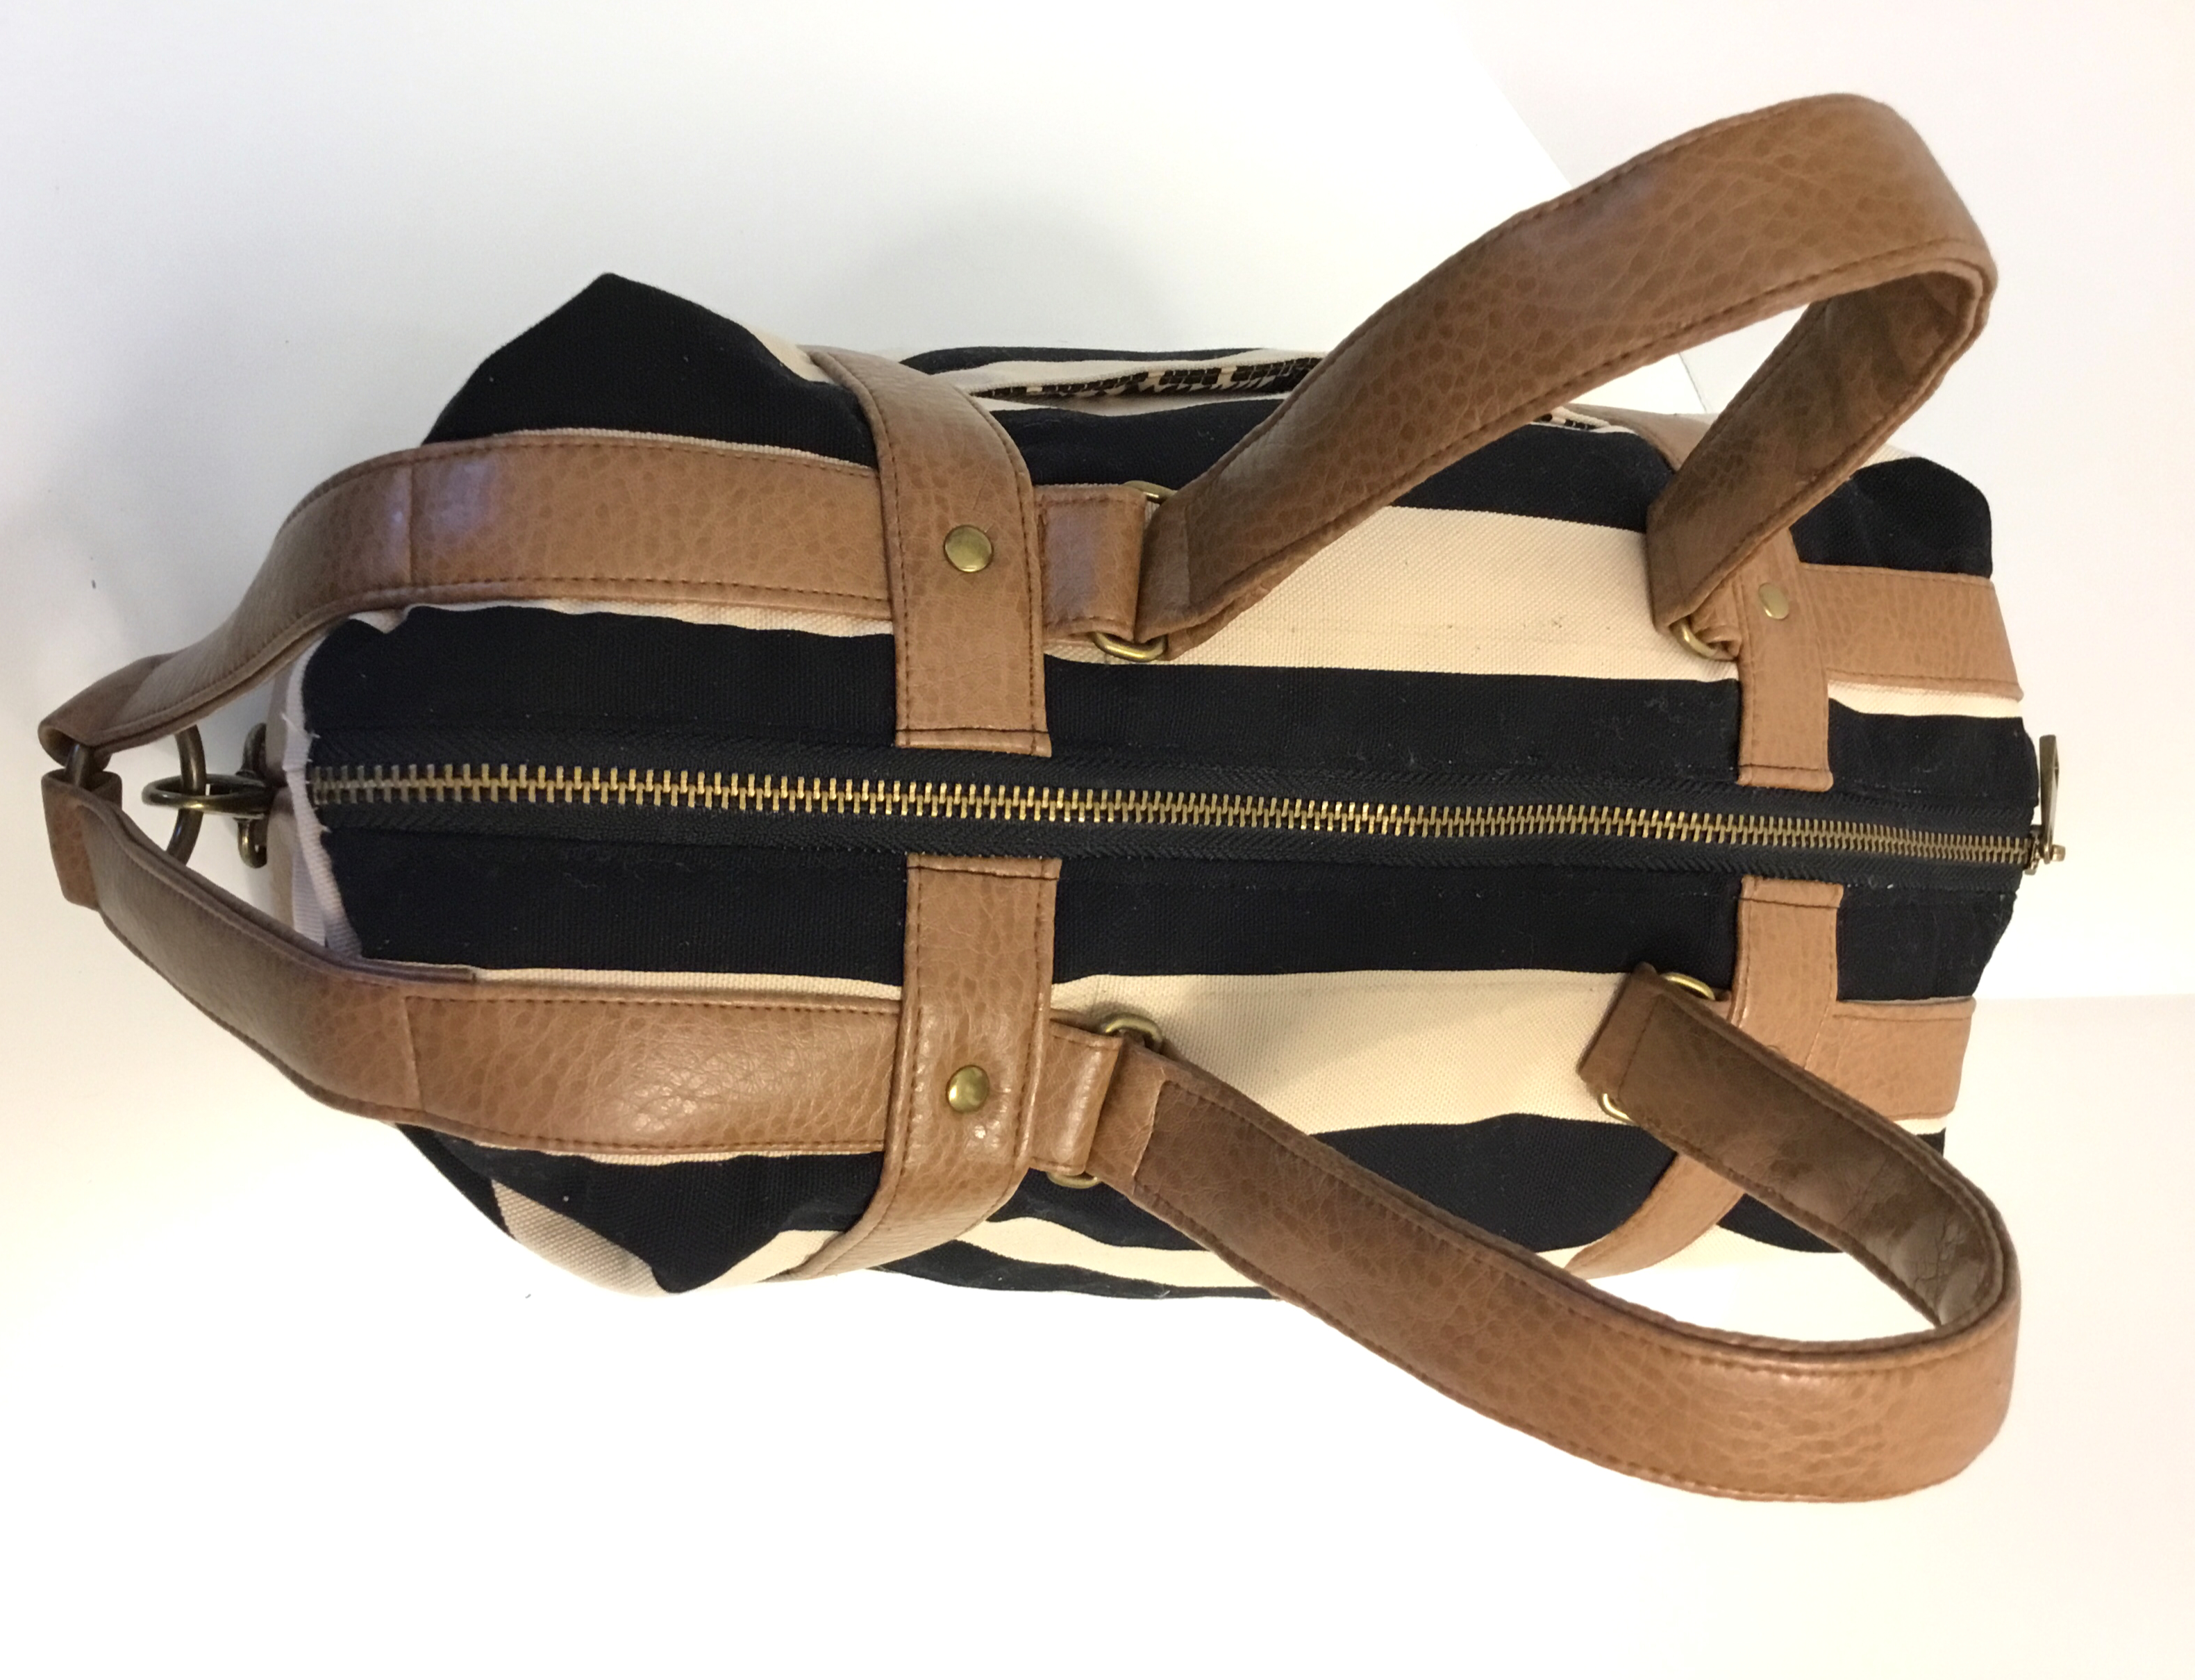

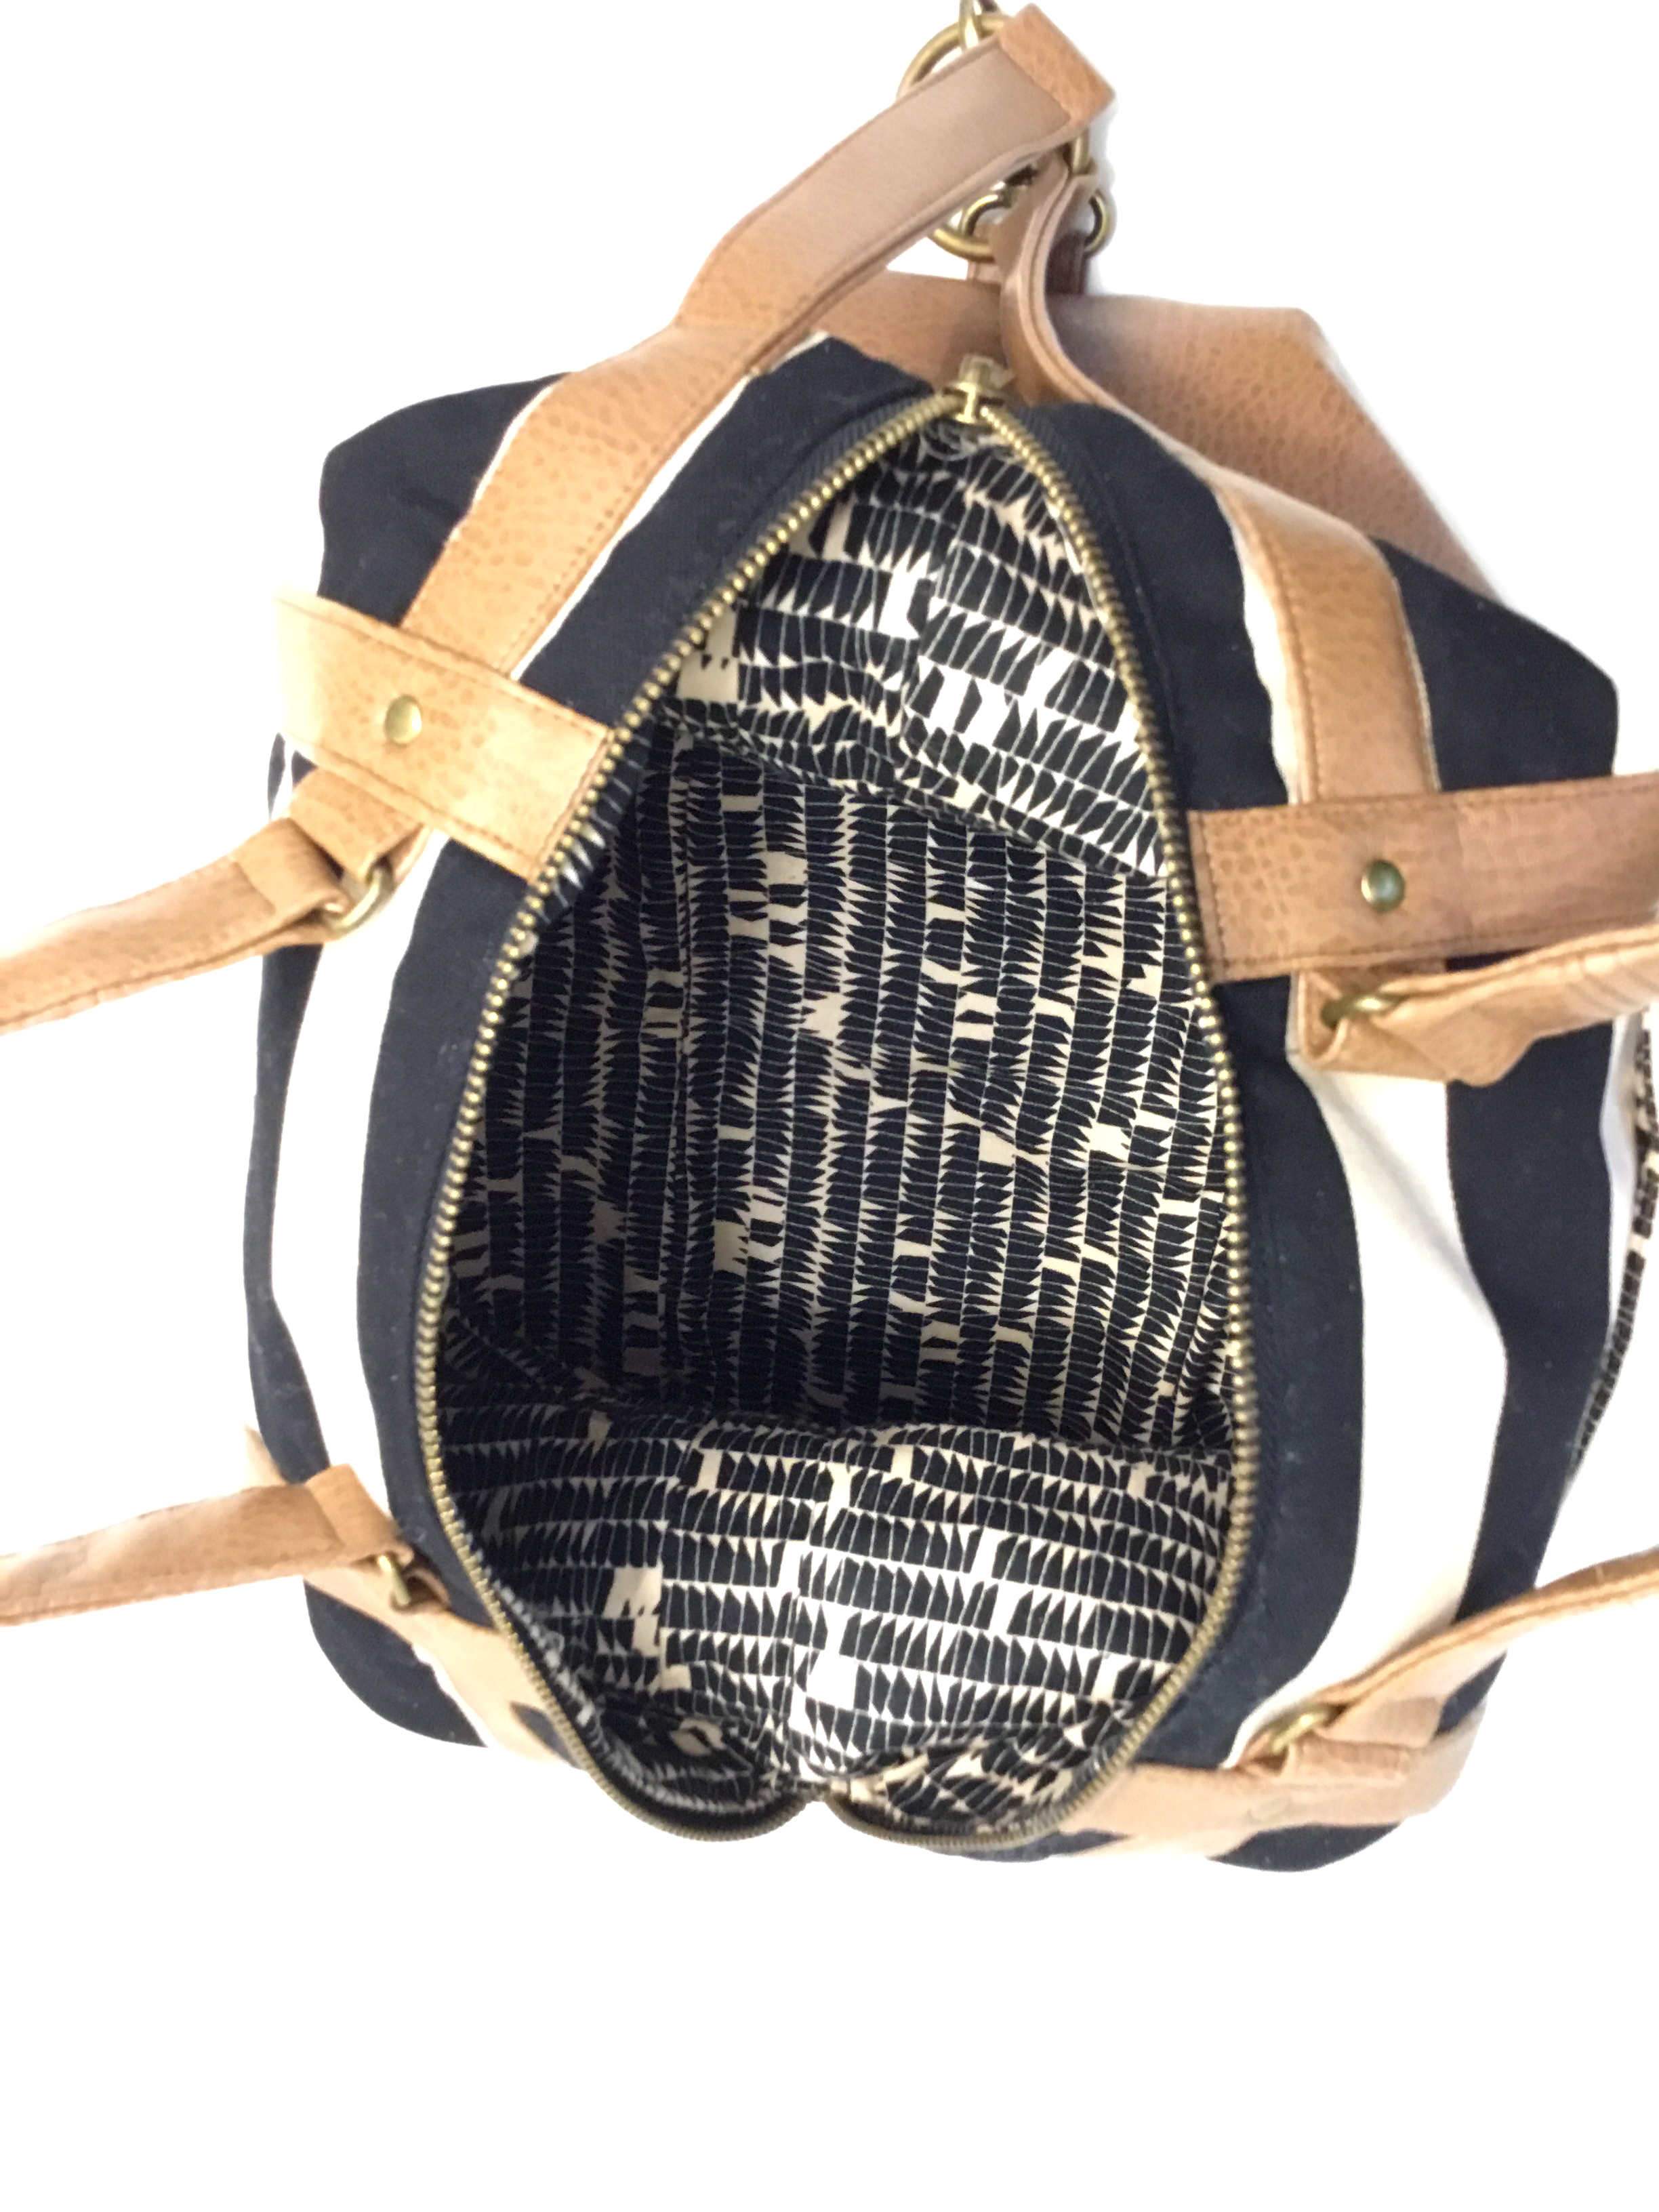
My bag is done in Faux leather with a black and beige twill fabric. It has a slightly slouchy feel to it, but it could be firmer if one chooses to beef it up with foam or additional layers of fusible woven interfacing. This bag is quickly done once you have finished your strapping! I do recommend Double Sided Tape to do those= Total time saver!
So, what are you waiting for?? Go get your subscription! Stay tuned for September’s release by Blue Calla.
–Michelle
Creating a Buckle Closure on Hollyhock’s Side Panel
The pattern links in this tutorial are Affiliate links, I receive a small commission if you purchase a pattern. Thank you, as that helps me pay for this blog! (BTW, I only recommend patterns I really like!)
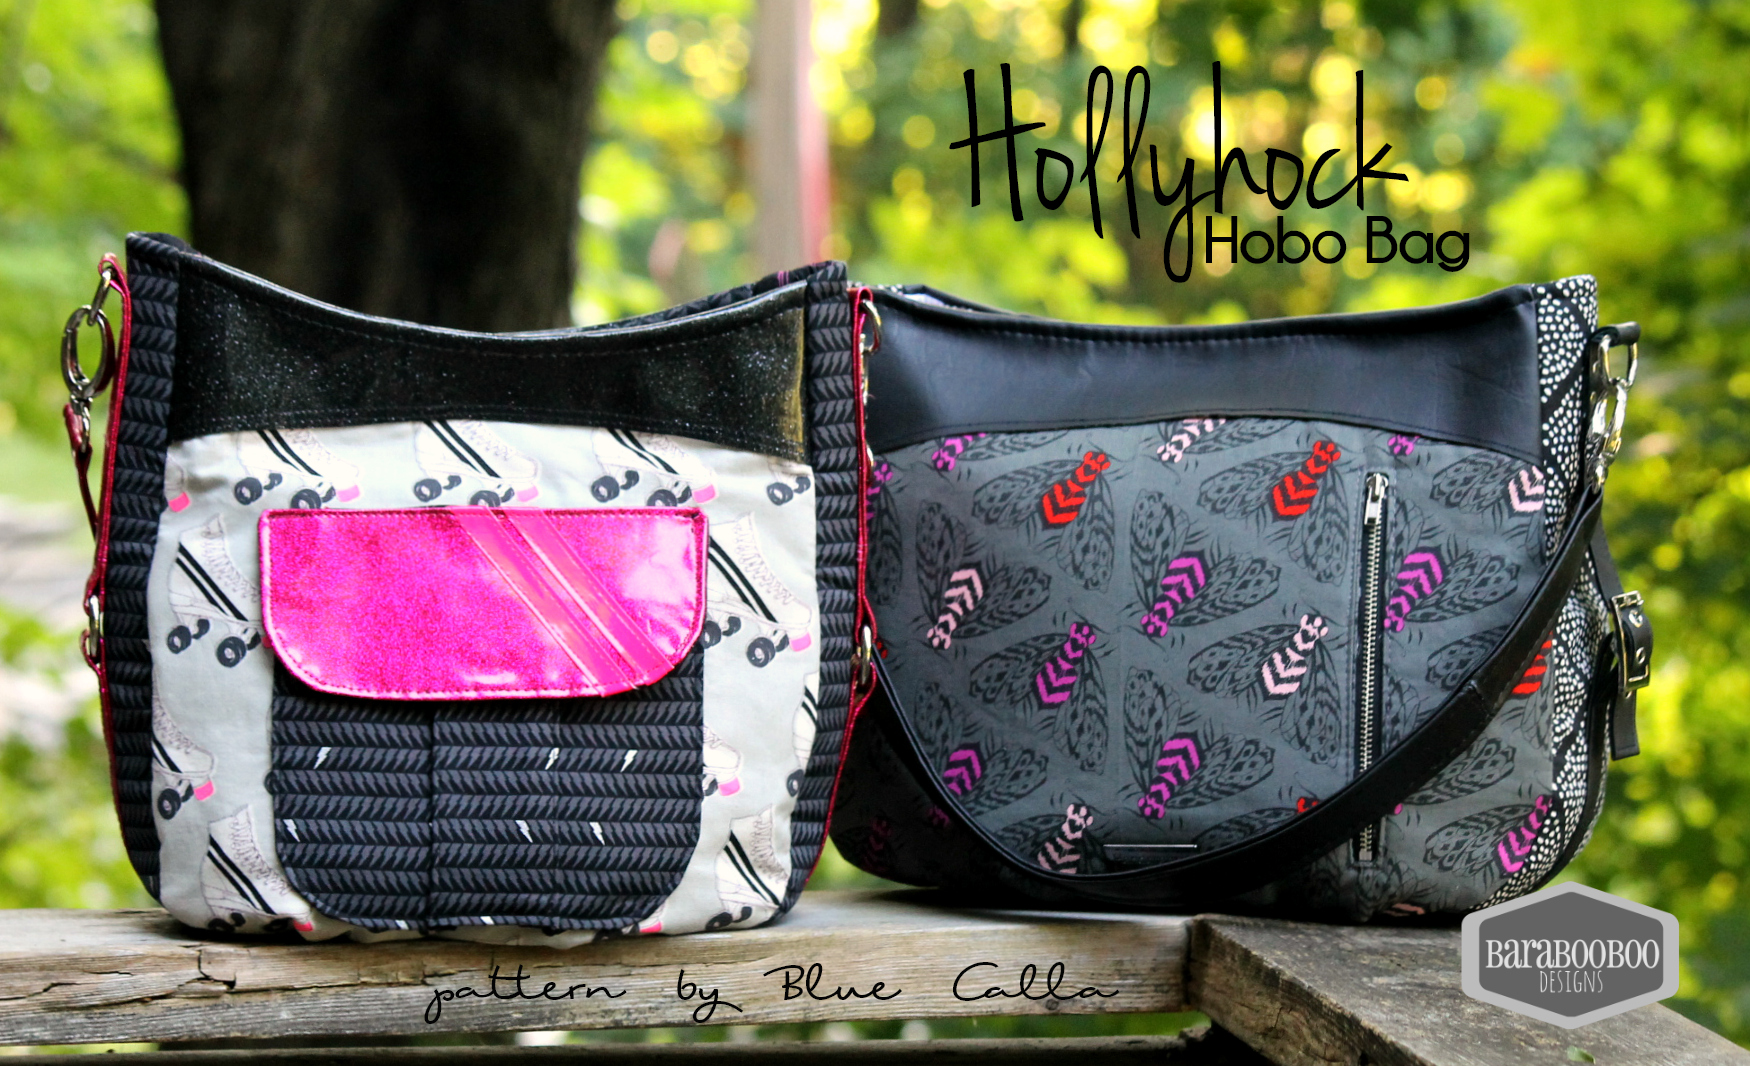
I have just finished testing Blue Calla’s newest pattern called the Hollyhock Hobo Bag. This amazing pattern comes in 2 sizes with loads of details that you can totally customize. The “front” exterior has a vertical zippered pocket and the “back” has an awesome cargo styled flap pocket. The bag gains lots of real estate inside because of the pleated main panels. It comes with instructions for a shoulder strap as well as a Cross Body strap. On the inside, there’s a slip pocket as well as a zippered pocket. You’ll be happy to know that the method for installation of the zipper will make it easy to avoid the “WAVY” zips so commonly seen on Hobo bag curved zipper styles.
As soon as I saw the side panel strap embellishment, I knew I wanted to do one of my tester bags with a Pin Buckle embellishment. That is not in the pattern so that’s why I have written this tutorial. (I did it on my WIDE version of the bag, so please keep that in mind when cutting the strap lengths for the size you choose). This tutorial will require you to purchase the Hollyhock pattern, and you will need to have a some sewing and hardware knowledge. Please keep in mind, I do not profess to be an EXPERT, this is just the way I do it!
First of all you will need to gather some supplies.
You will need:
2 Pin Buckles, preferably 1″ but 3/4″ is what I could find. I bought these from Emmaline Bags
Eyelets and a tool to install them
Fraycheck if you are using fabric that frays
If possible, 2 D rings that are the same width as your pin buckles. (I used a 3/4″ pin buckle and a 1″ D ring because I had no 3/4″ ones…it’s not the end of the world but I would have preferred both to be 3/4″)

CUTTING:
For the side straps on the WIDE version I cut as follows:
My Top strap piece I cut at 16″ long, you may need to go a bit longer for the TALL version. It was 1.5″ wide (since my buckles were 3/4″….it’s just buckle width X 2 for that measurement). So, if you have 1″ buckles, then cut 2″ wide strap pieces, or if your buckles are 1/2″ then cut 1″ wide strap pieces.
My Bottom strap piece, I cut at 10″ long x 1.5″ wide. (again adjust the strap width for your buckle width, and if you are making the TALL version maybe add an inch to the length.) There will be excess strap that will be trimmed when it’s done.
Construction
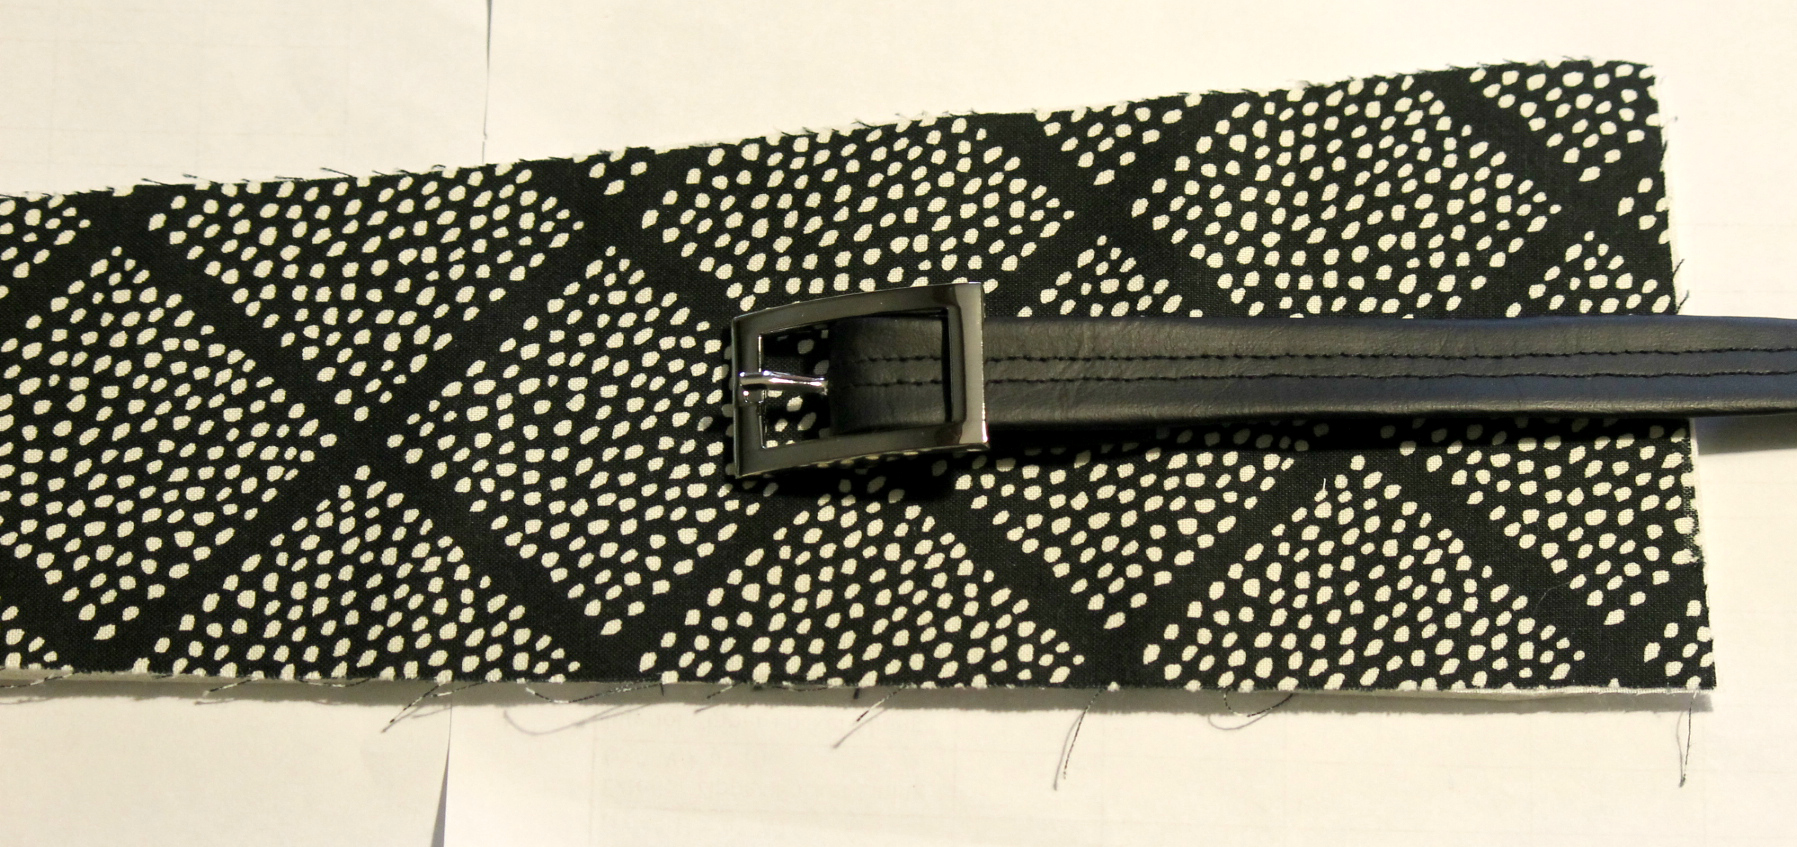
Follow step 51 in the pattern to fold and stitch your Bottom Strap piece. (Make sure your stitching down the centre allows enough room for a hole to be cut in the very middle between the stitching lines). Add the Pin Buckle:
You may need to lengthen your pin hole a bit to ensure your pin can move around freely.
Fold under the end a bit. I added a small dab of glue to hold it in the folded position. Make sure your folded end goes beyond the end of the buckle so later when you stitch down the strap, it will be secured within the stitching.
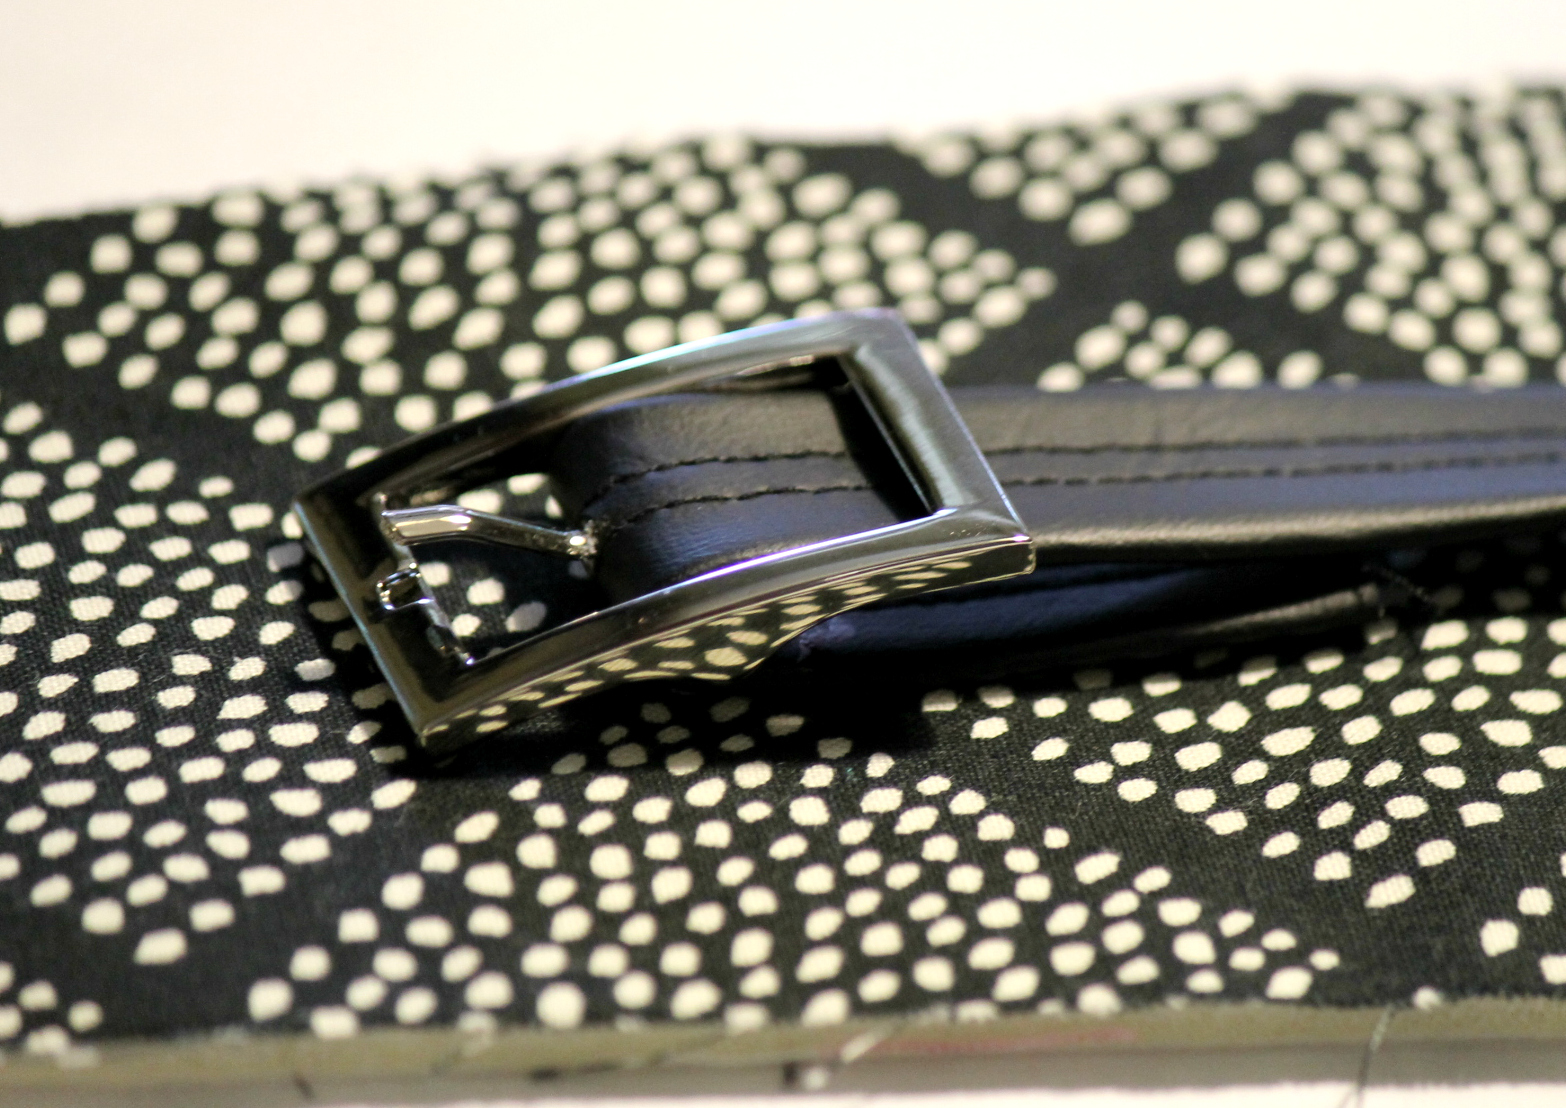
Be sure you have also installed your buckle correctly, it should look something like this…with the pin coming to rest on that small divot in the metal.
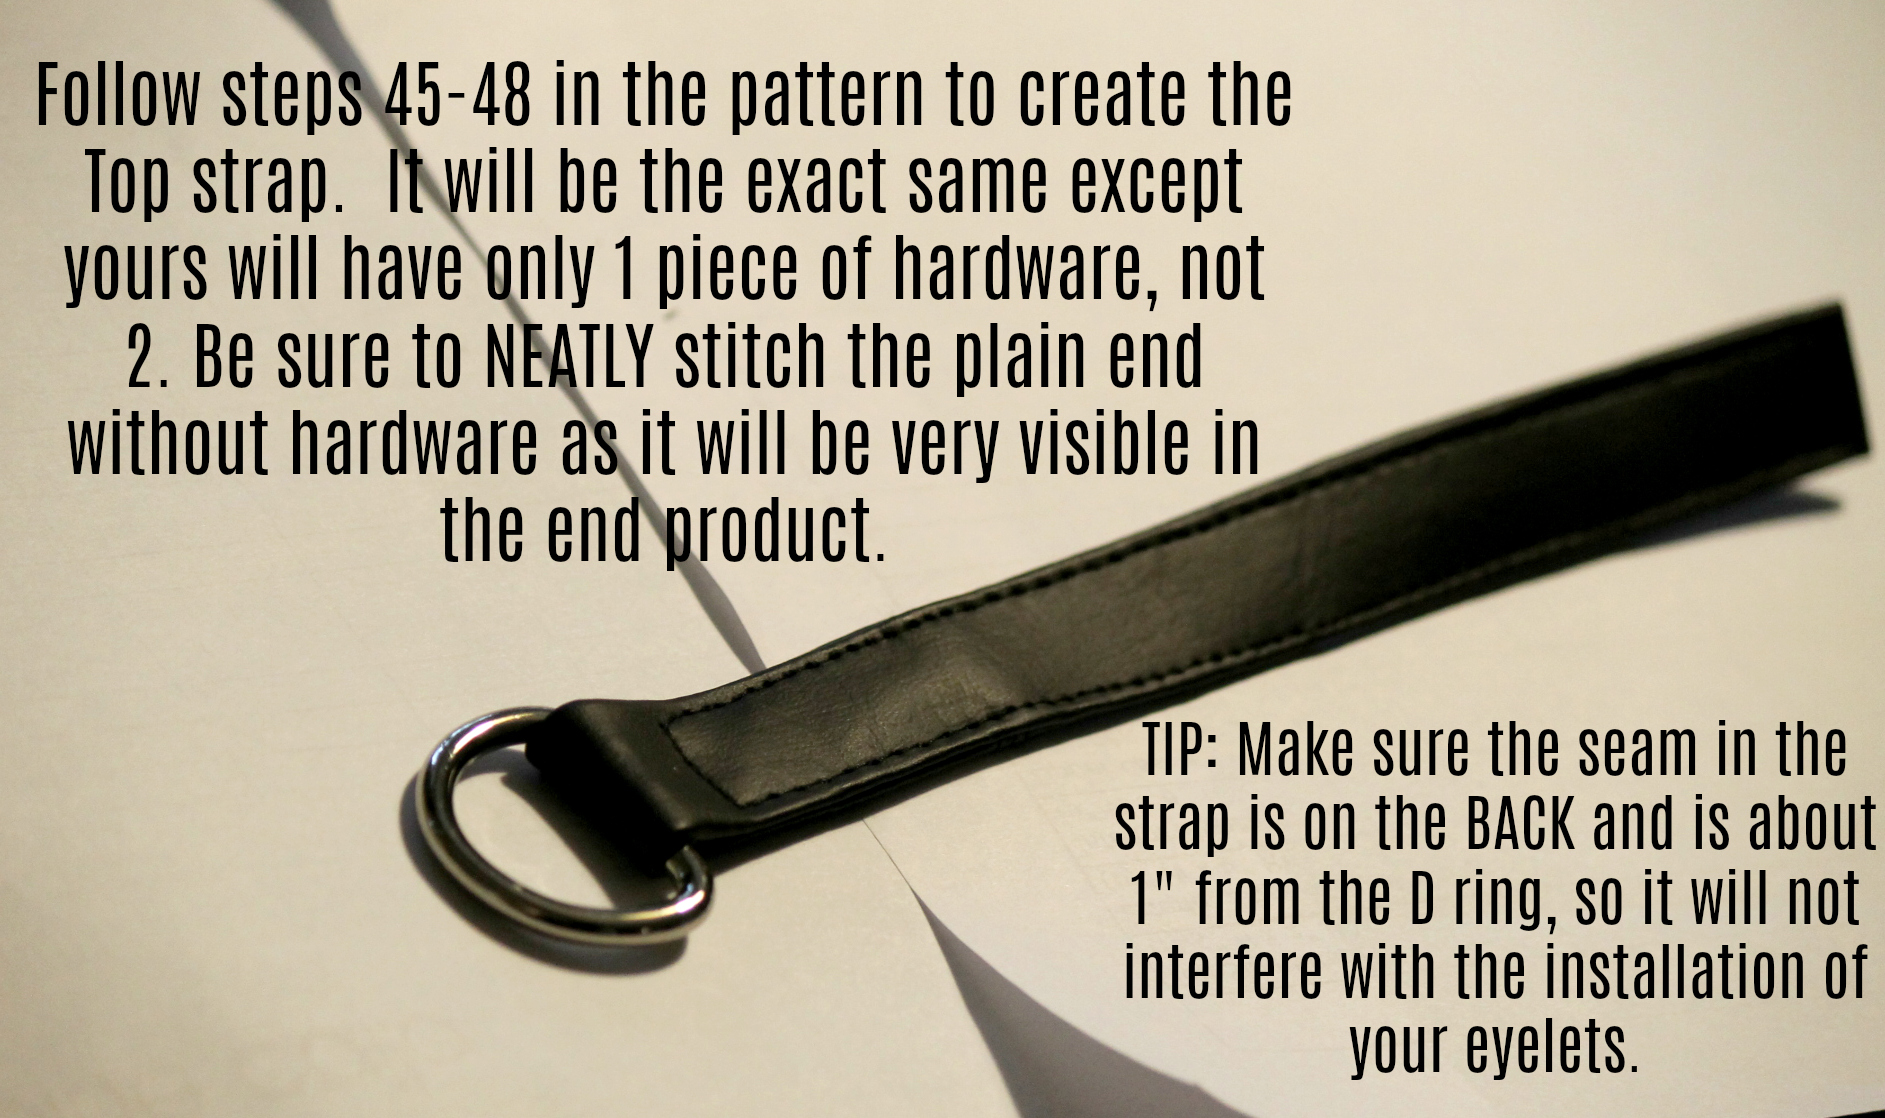
Put that aside, and find your TOP strap piece. Thread your D ring onto it. DO NOT add any other hardware.
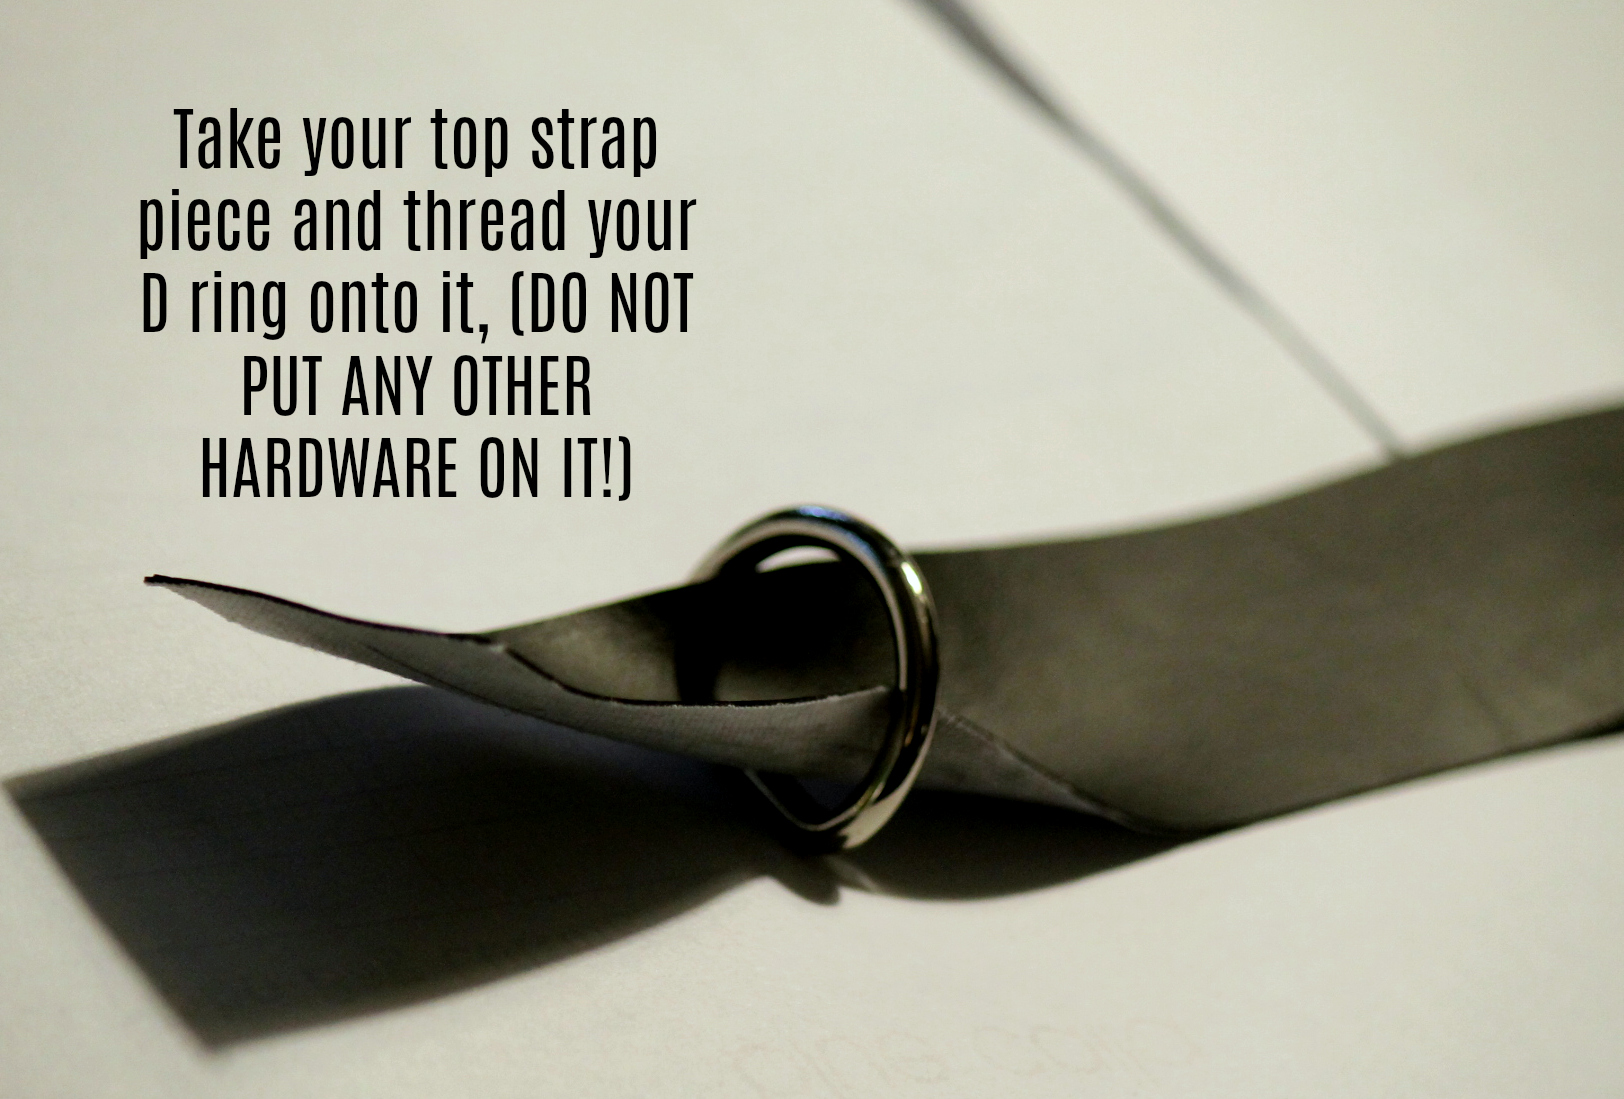
Make your Top Strap piece.

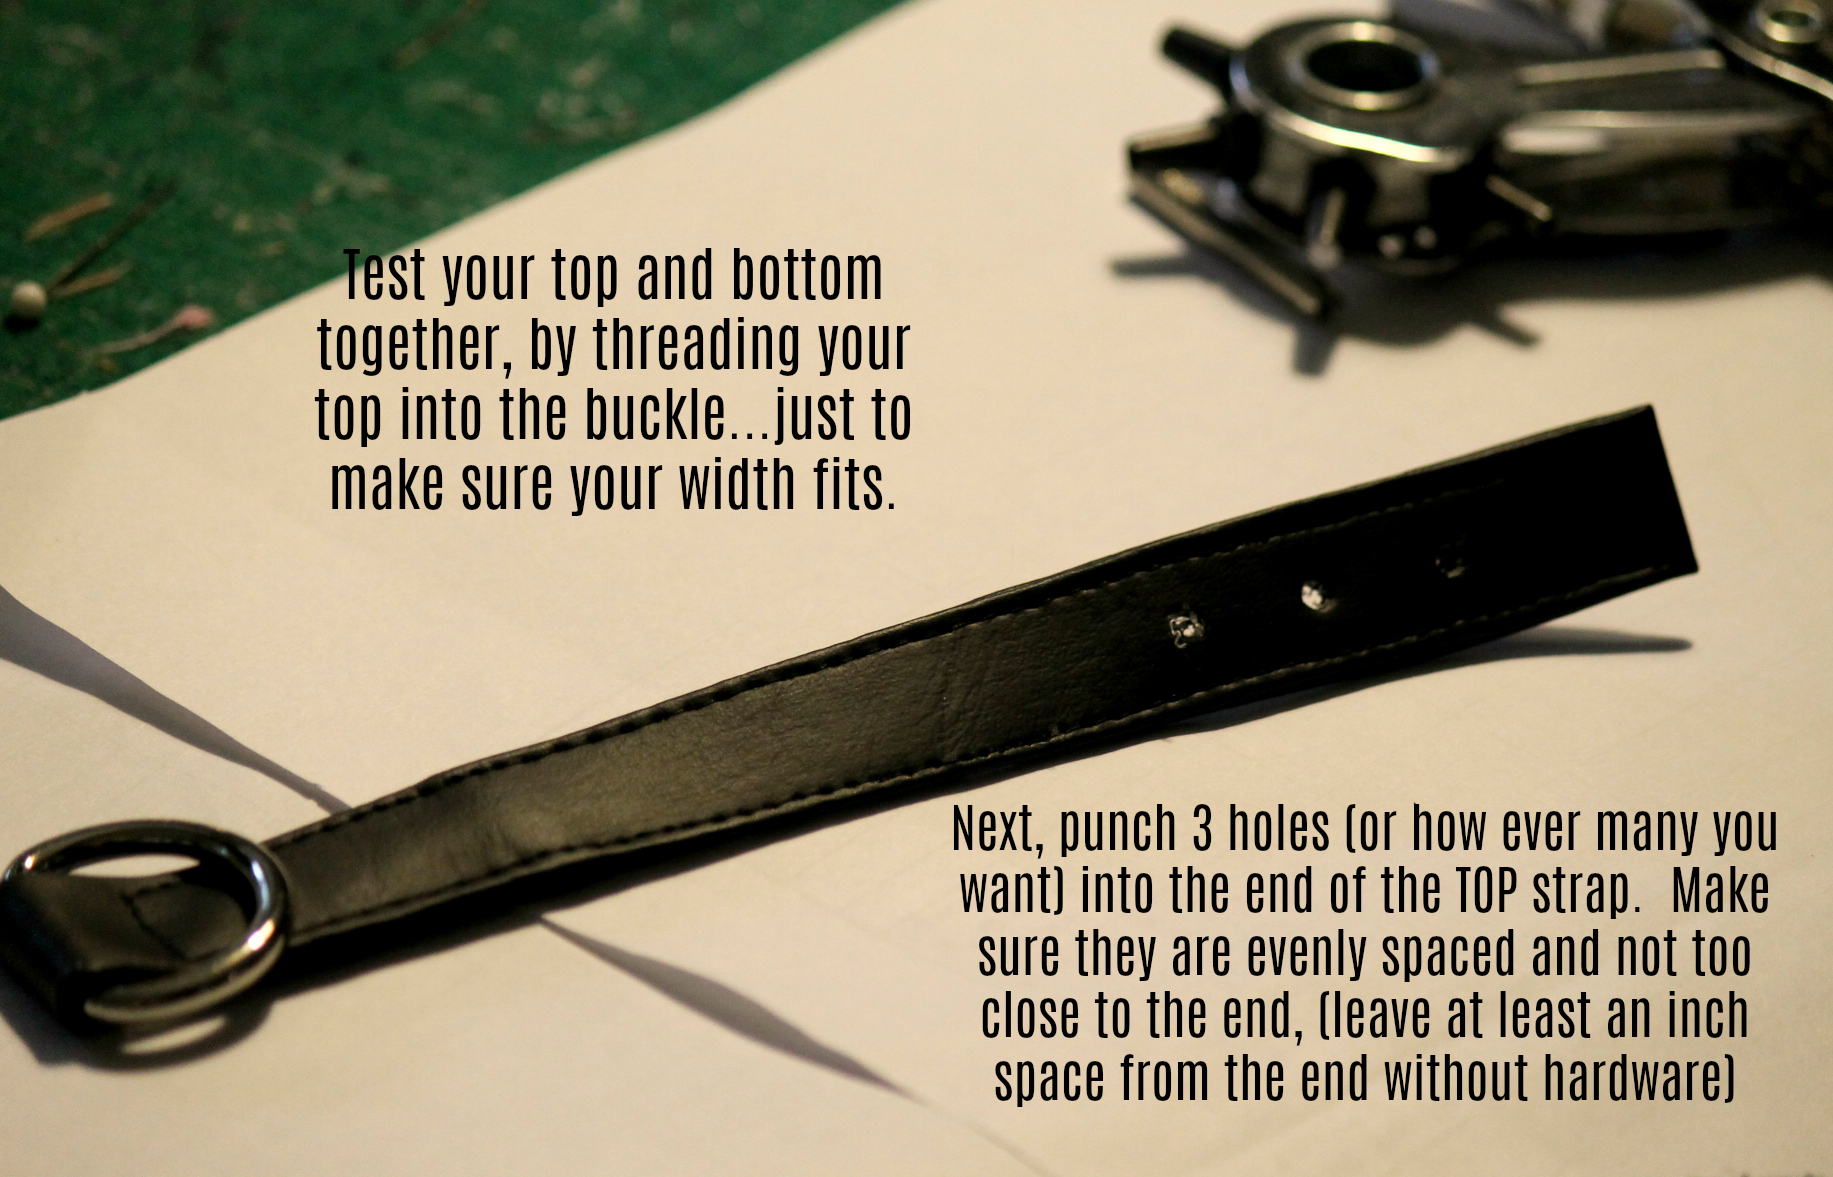
Next, punch your holes. Be sure to use a punch hole size that corresponds to the size of eyelets you will be installing.
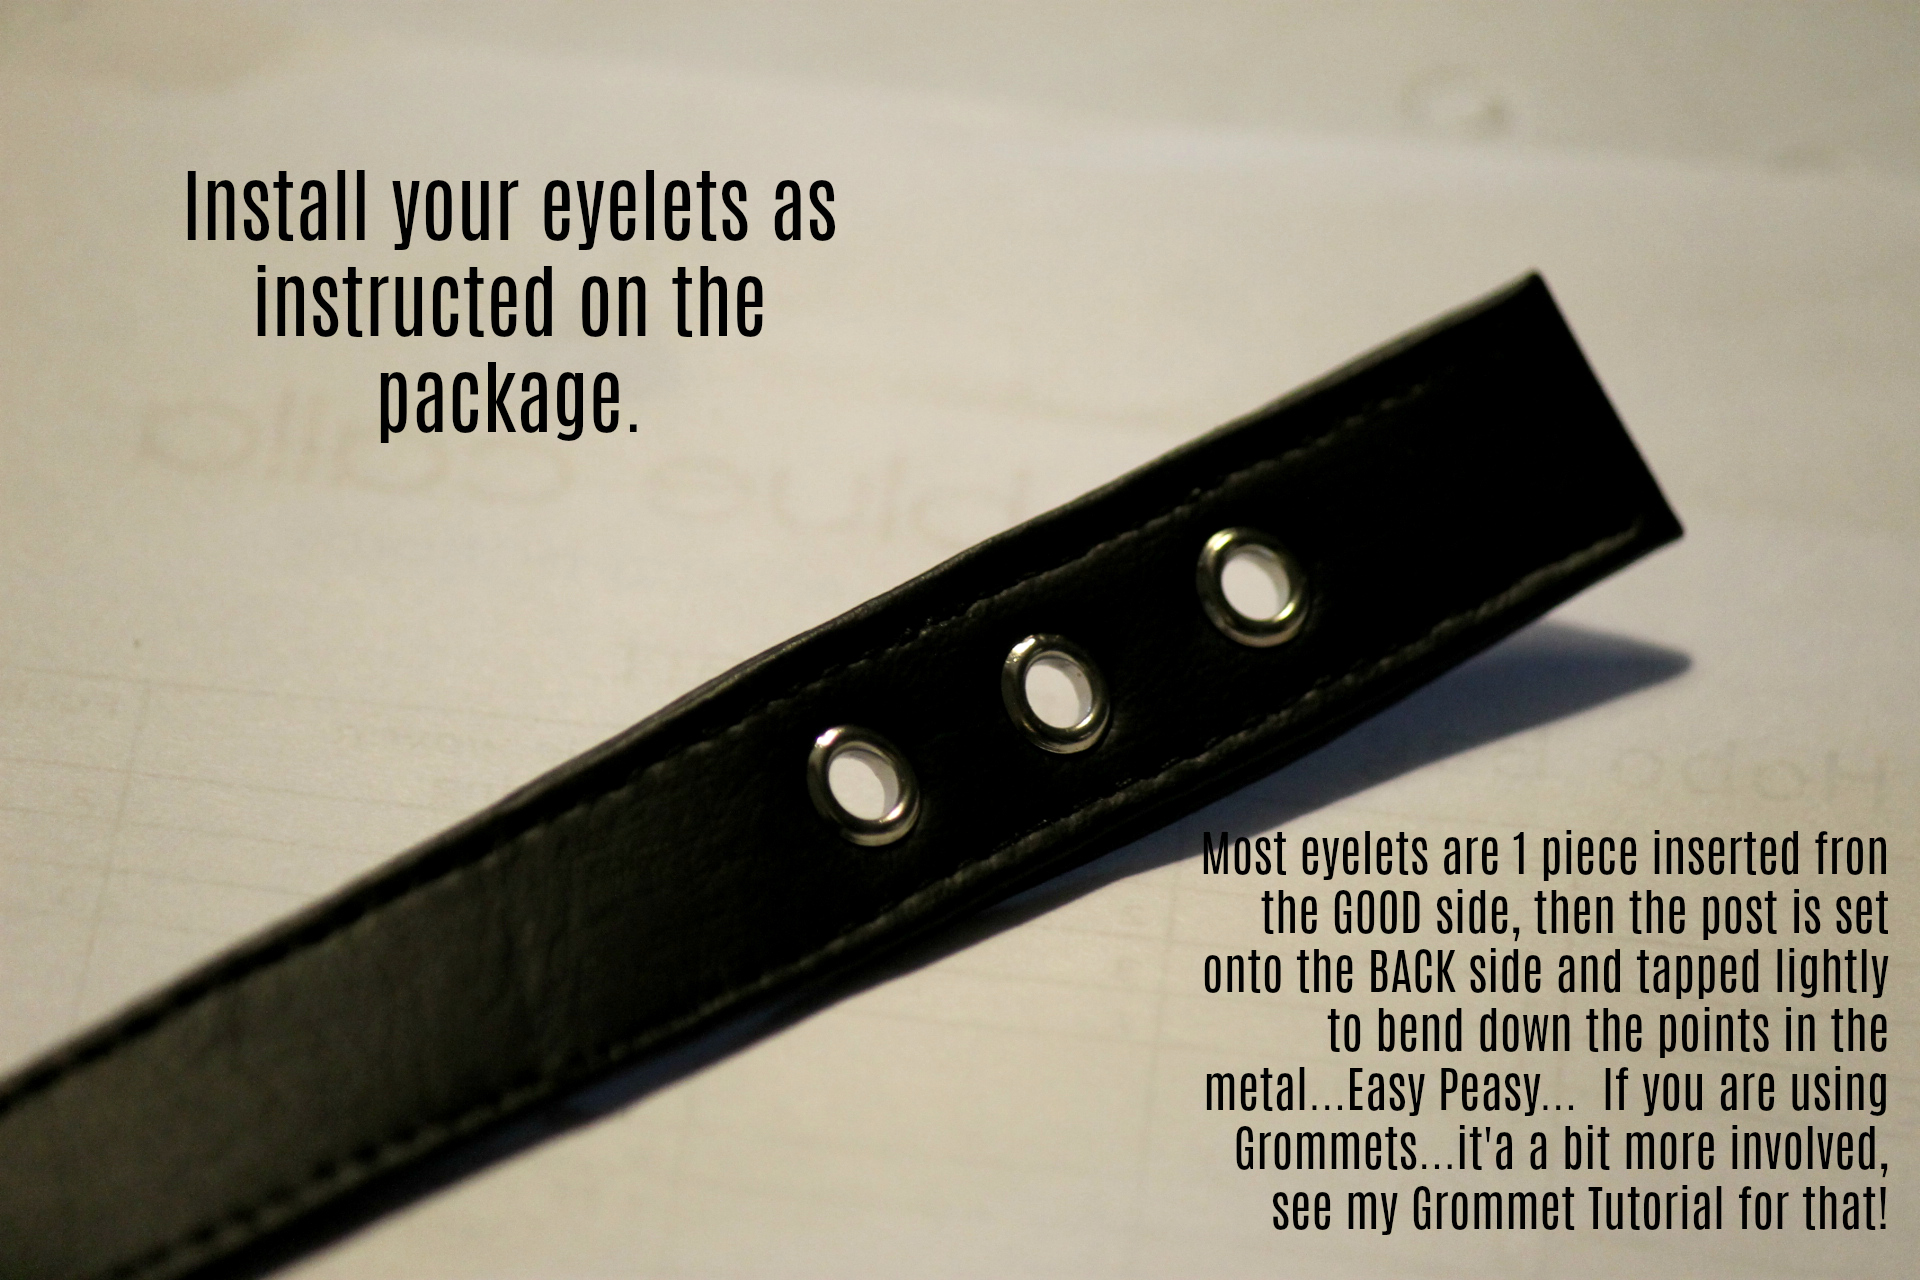
Install your eyelets. (if you have grommets which are generally larger and 2 pieces…then refer to my Grommet Installation post here.)
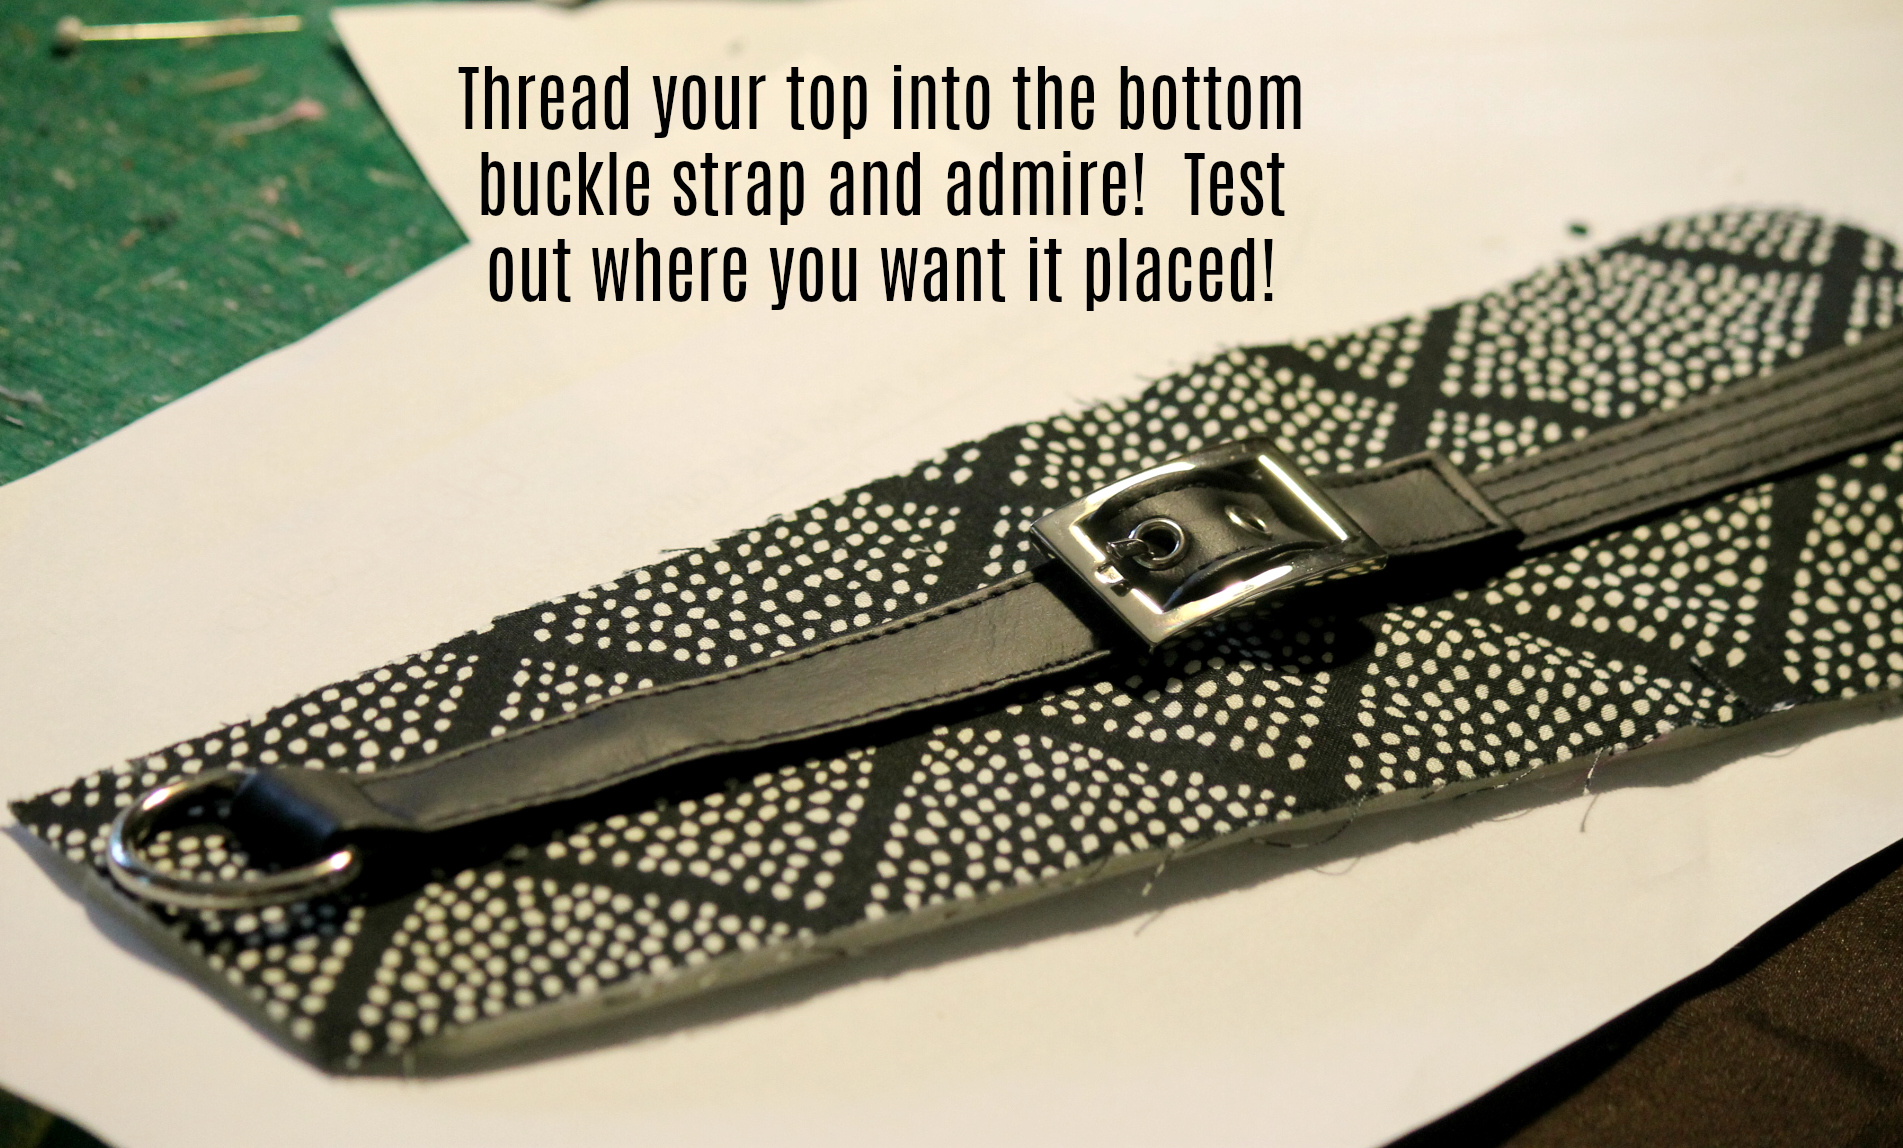
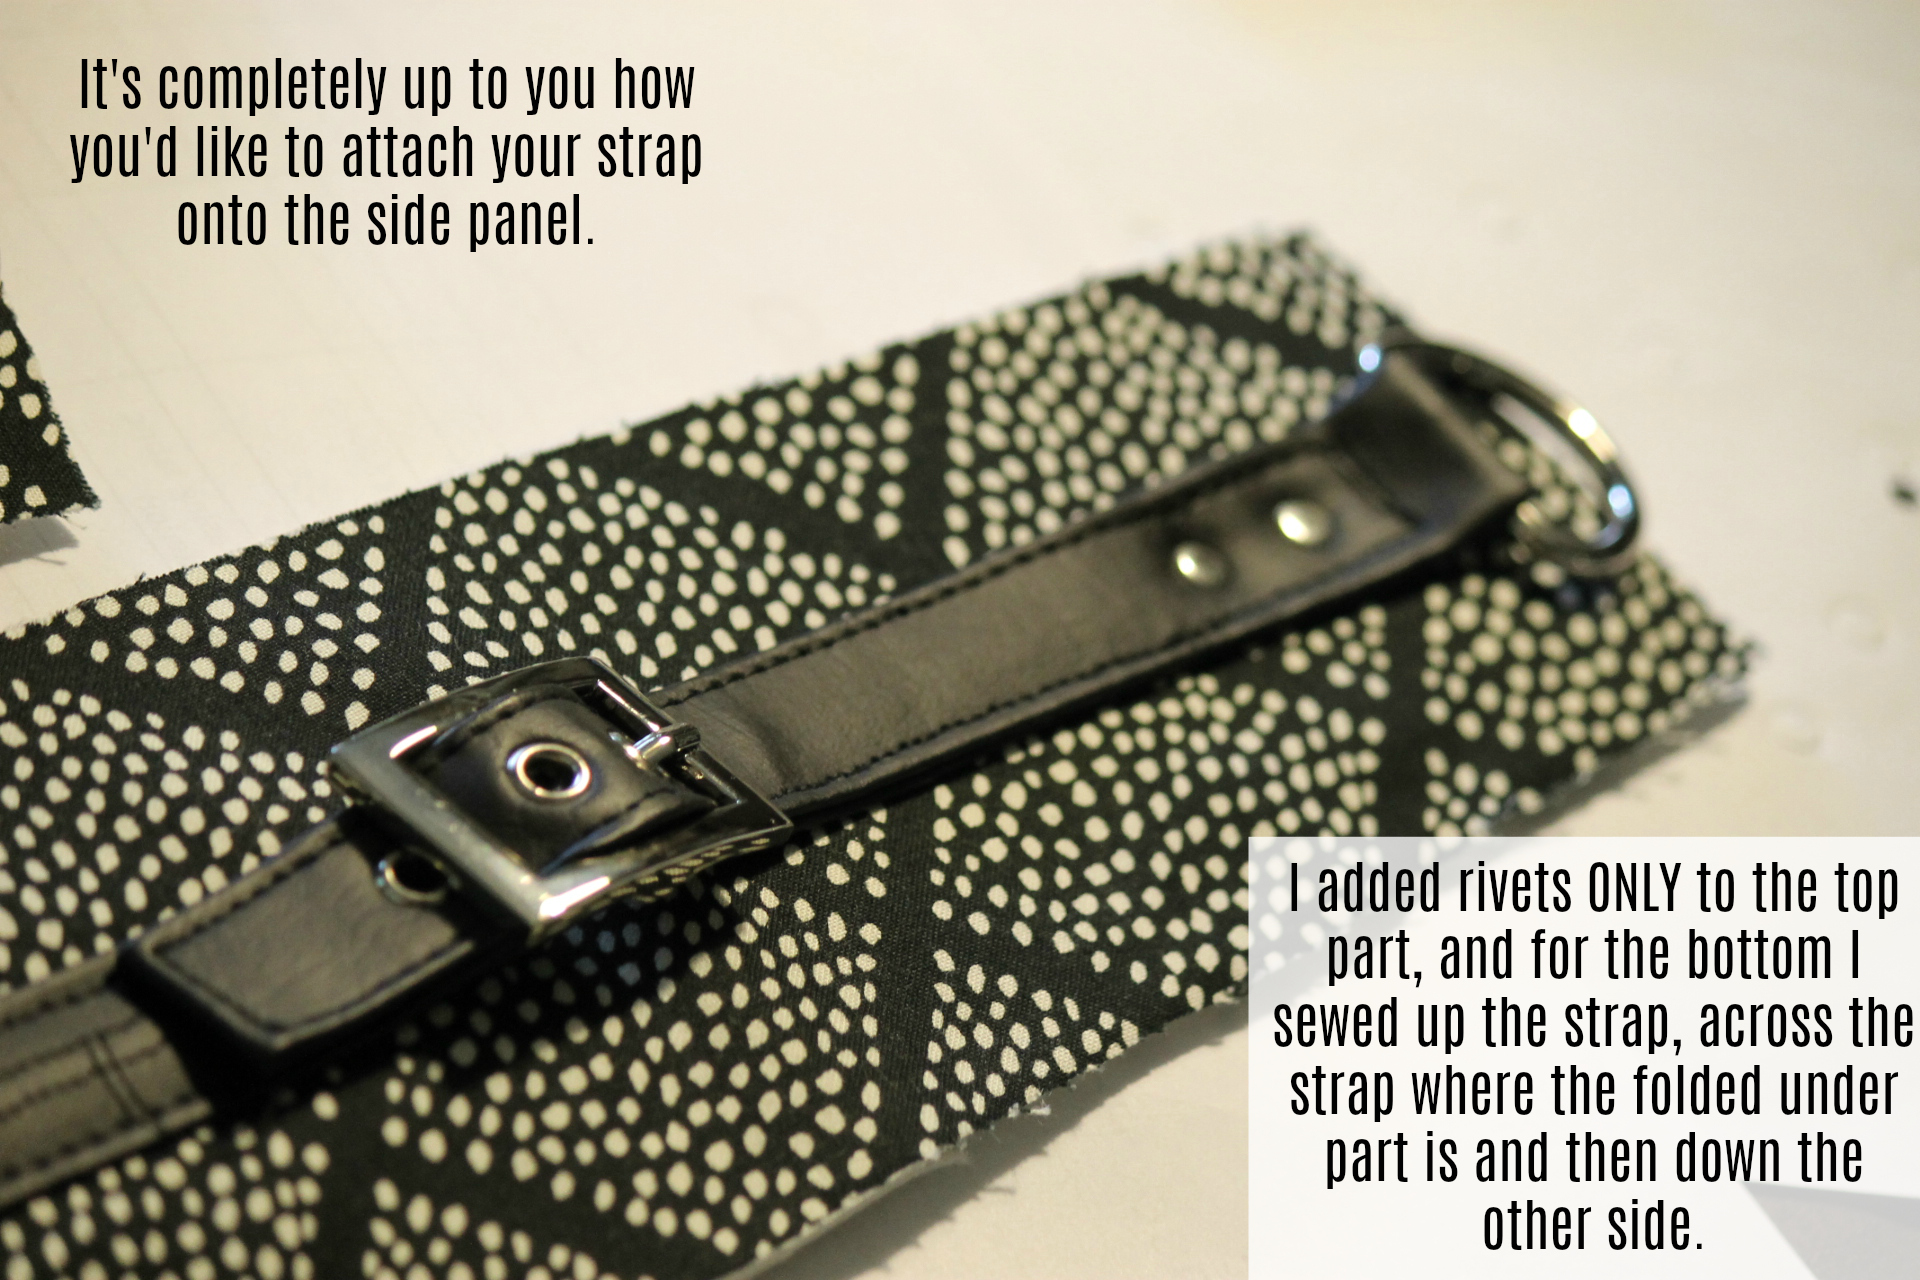
It’s up to you which method you use to attach the straps to the side panel. Just be sure to place the top D ring at the same height as the pattern states because you will need to be able to sew the top edge of the side panel in the final assemby to finish the bag. To make sure my strap didn’t slip I added a small amount of glue to hold it in place as I sewed..Double sided tape works well too… Just make sure it’s only a small amount in the middle area of the strap.
I sewed on the bottom portion making sure to stitch over the folded end, and for the top I used only rivets as I like the top strap part to be loose.

Voila!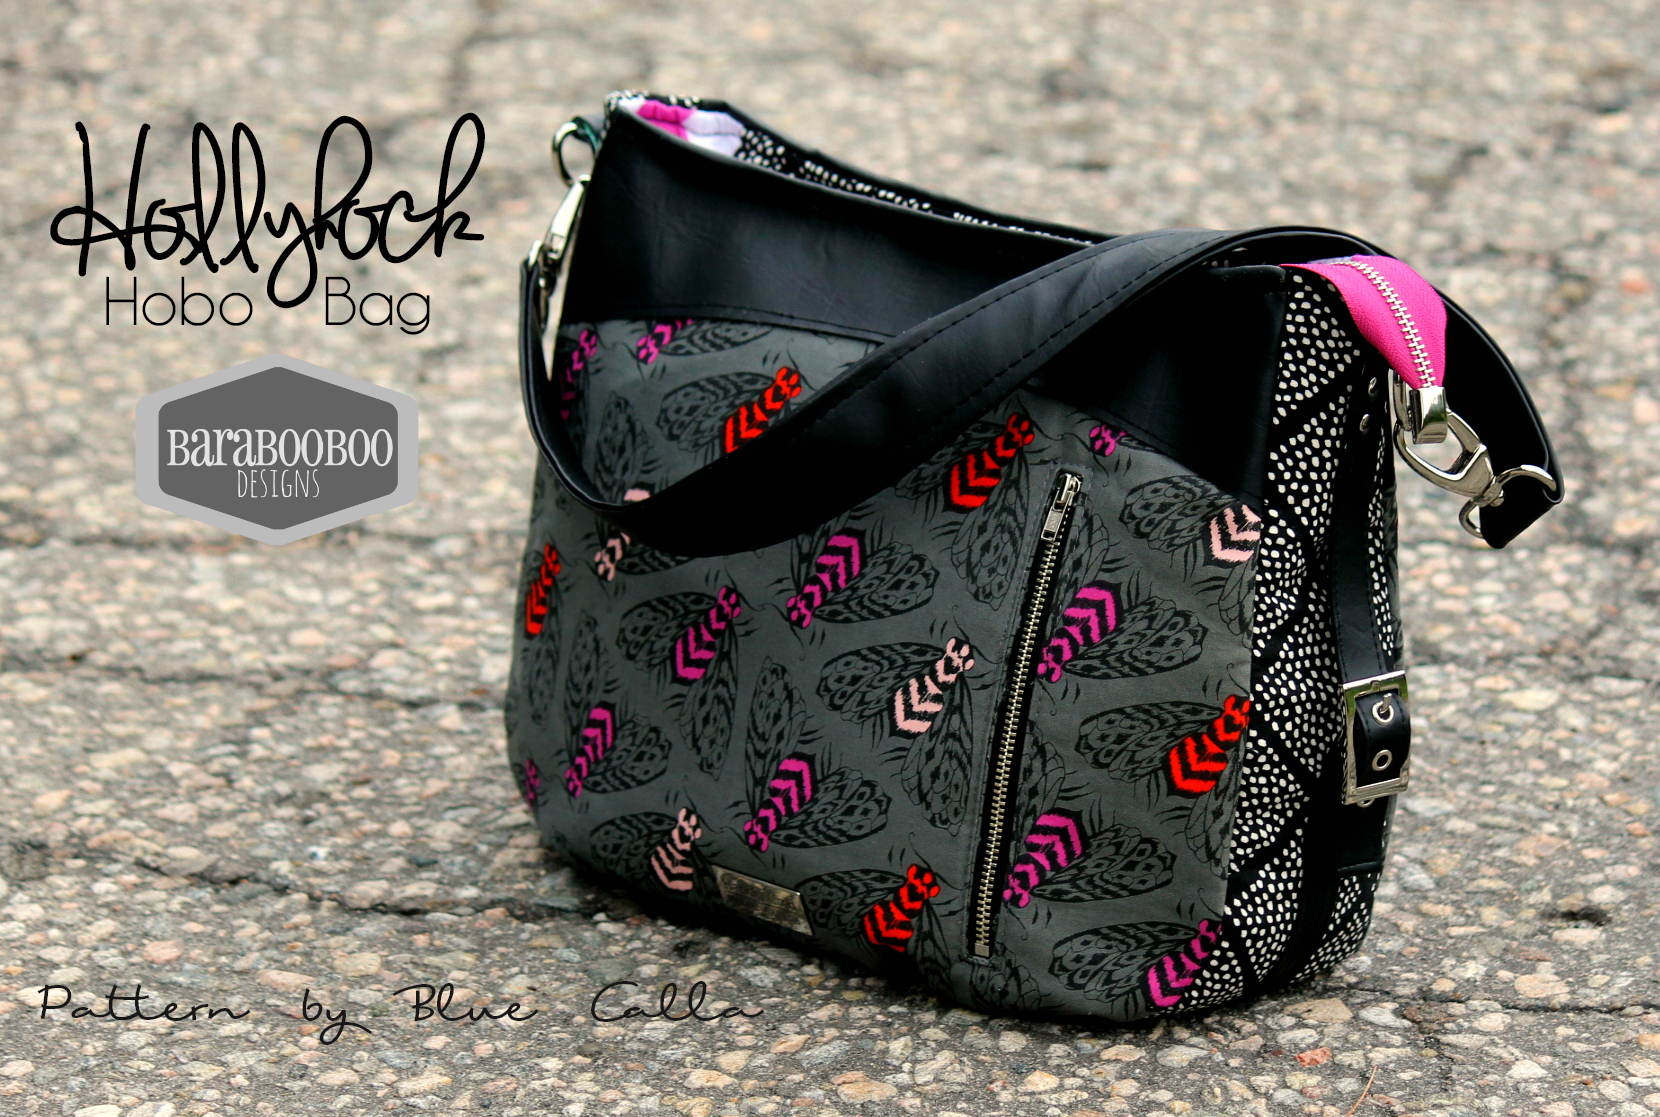
Winner of the Canada 150 In the Bag Blog Tour
Thank you all for reading and commenting on my Canada 150 post!! I have randomly chosen a winner to receive the Free TOTE pattern of their choice from Blue Calla Patterns. This is selected from the comments on my Canada 150 post.
(Re: the many Giveaways for the Blog Tour, please scroll back to see the Rafflecopter link is in my Canada 150 Blog tour posting at the bottom. When you click, it will take you to the widget where the names are published.)
For my OWN giveaway though, I had to do this OLD SCHOOL! I wrote everyone’s names down on a piece of paper, cut them up, mixed them into a bowl, and drew a name. I will try contacting them (as best as I can because several of you don’t really have a profile/email). After 48 hrs, if it has not been claimed, I will draw again! and same goes until I can actually contact the winner!
Here are some pics of the draw bowl!


AND the Winner is!!! Rachelle Bigham Baker!!
Please contact Blue Calla for your tote pattern Rachelle!!
Canada 150 – In The Bag! Blog Tour
This post contains affiliate links to patterns, ( so I get paid if you buy one)…as well as, the maximum number of Canadianisms (in red) as I could reasonably use and a small amount of Canadian Trivia. It has been written on my laptop from the comfy seat of my chesterfield . (There’s the first one!)
Happy Birthday Canada!
I am a proud Canuck and this year marks my country’s 150th birthday. 150 years since Confederation, wow! There’s quite a bit of kerfuffle going on “From Sea to Shining Sea”. To mark this occasion, I have joined this Canada 150 – It’s in the Bag Blog Tour to show off all of my 4 Blue Calla Tote Bags done up with this theme in mind.
*There are a whole bunch of prizes being given away for this tour, so make sure to read to the end! *
First, a bit about Blue Calla Patterns: Blue Calla is a Canadian pattern creating business operated by Torontonian, Celine Allaert. She has been creating original patterns for 4+ years, after sewing custom bags for people in her Etsy shop for many years prior. Her patterns are precisely written, photographed, tested and delivered to her customers by way of PDF, (she offers some in paper form as well). You’ll find her patterns to be either trendy or classic, but always unique.
If you are familiar with Blue Calla’s patterns, then obviously, you already know the tote patterns are anything but ordinary. You can get a basic tote pattern anywhere, but these 4 patterns are far from that! Below you can see the comparison pictures of all 4 tote bag styles, as it’s so much easier to SHOW size comparisons then it is to write about them!
THE BAGS:
(By the way, many Canadians drink milk from BAGS and not cartons…did you know this? we buy a large bag that contains 3 smaller bags of milk. We then put those smaller bags into a special container shaped to hold them and cut the corner off to pour.)

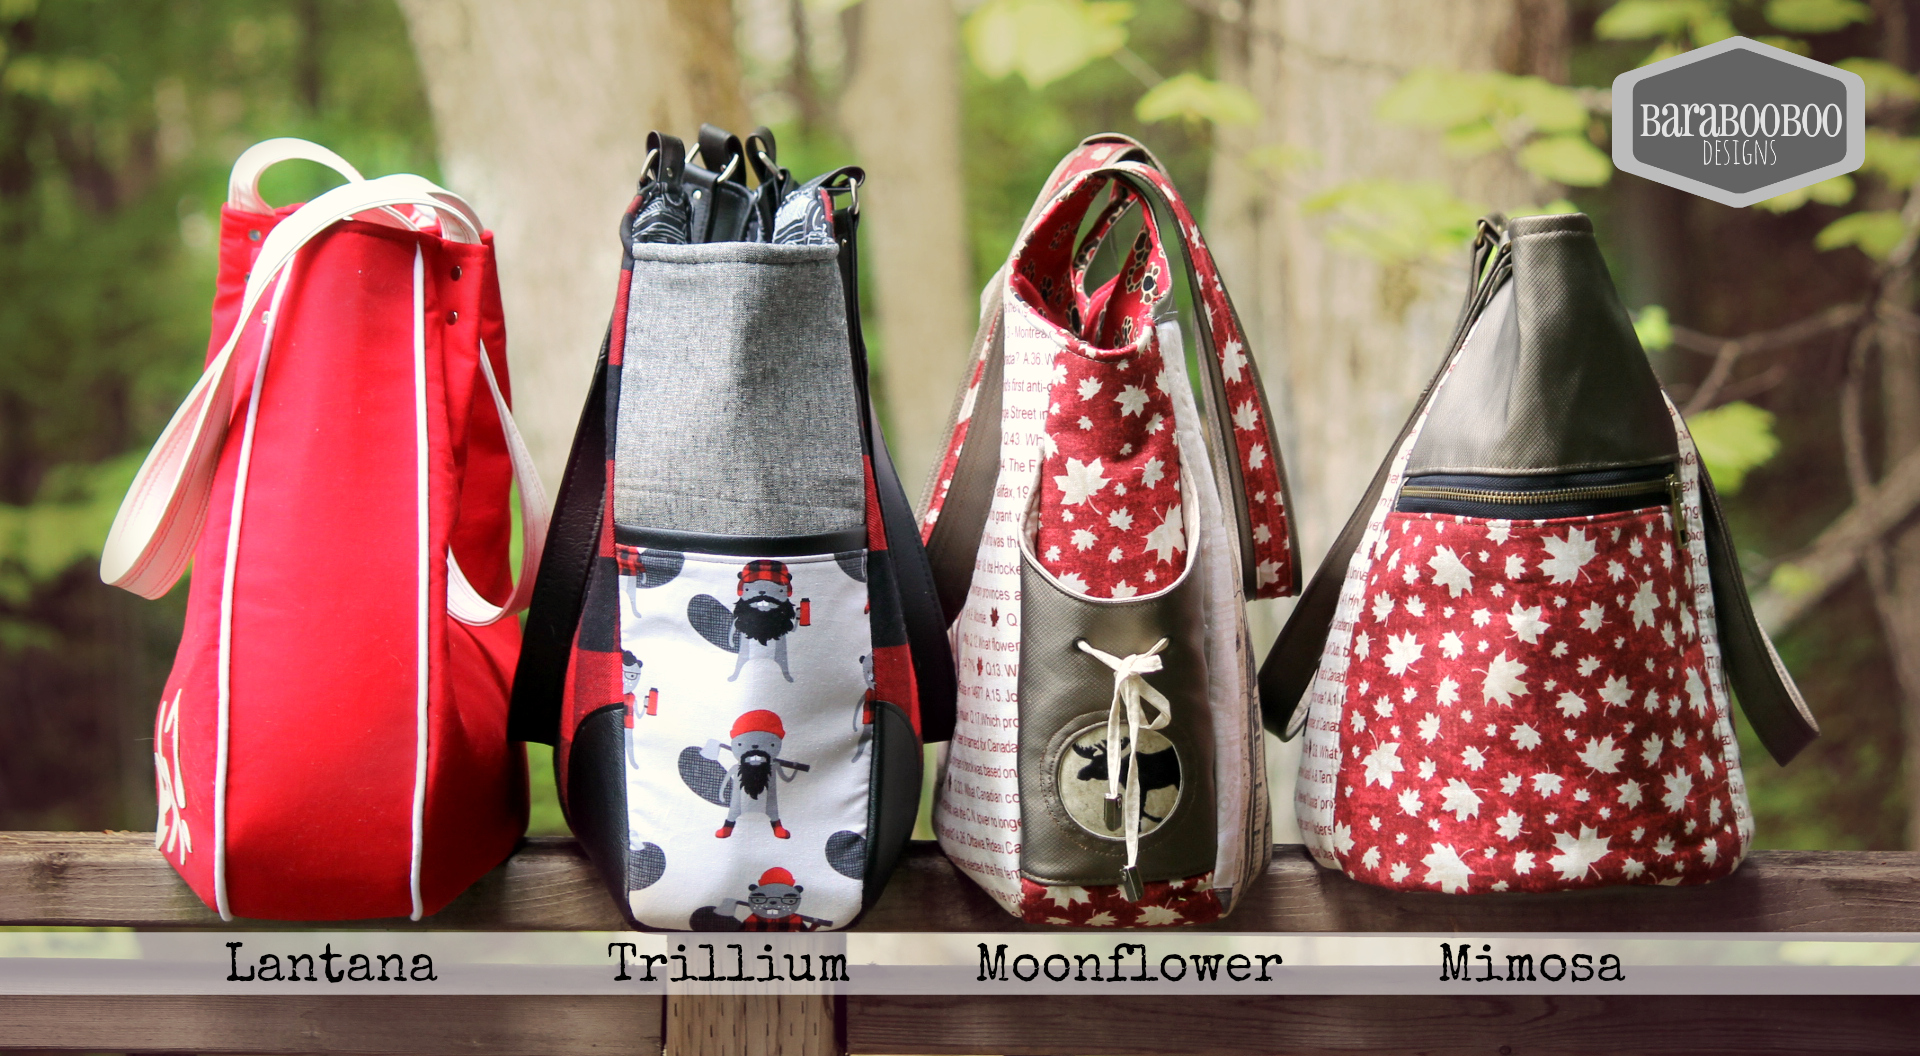
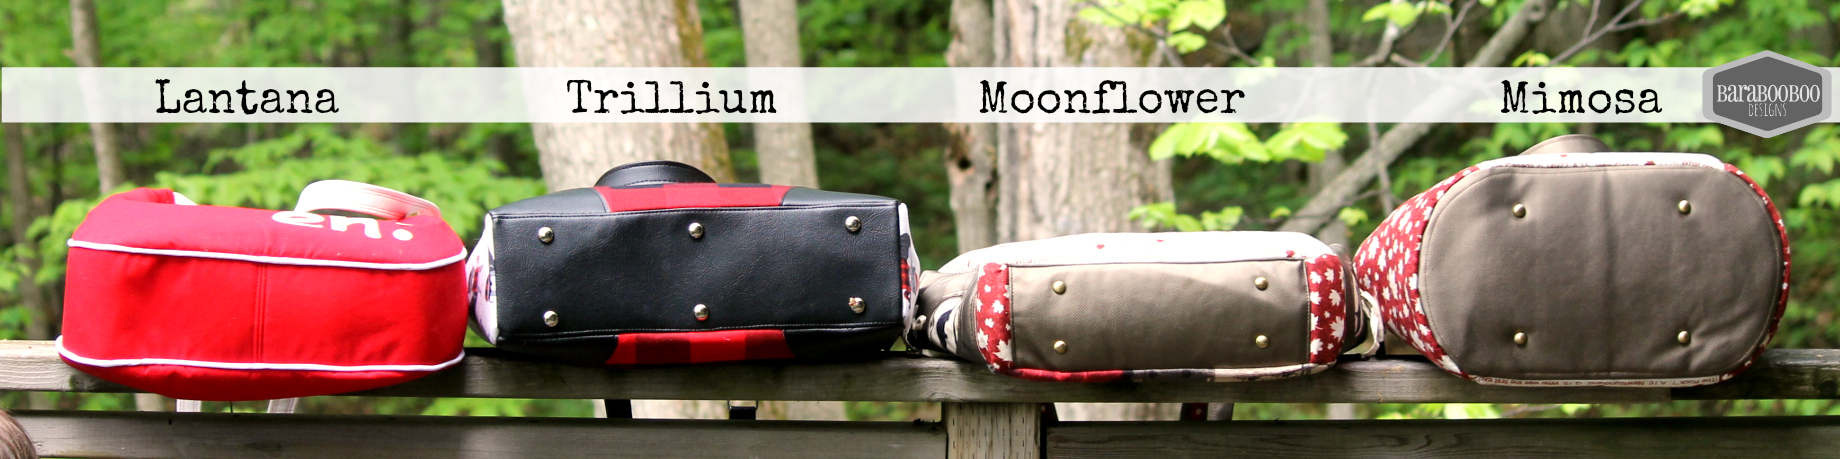
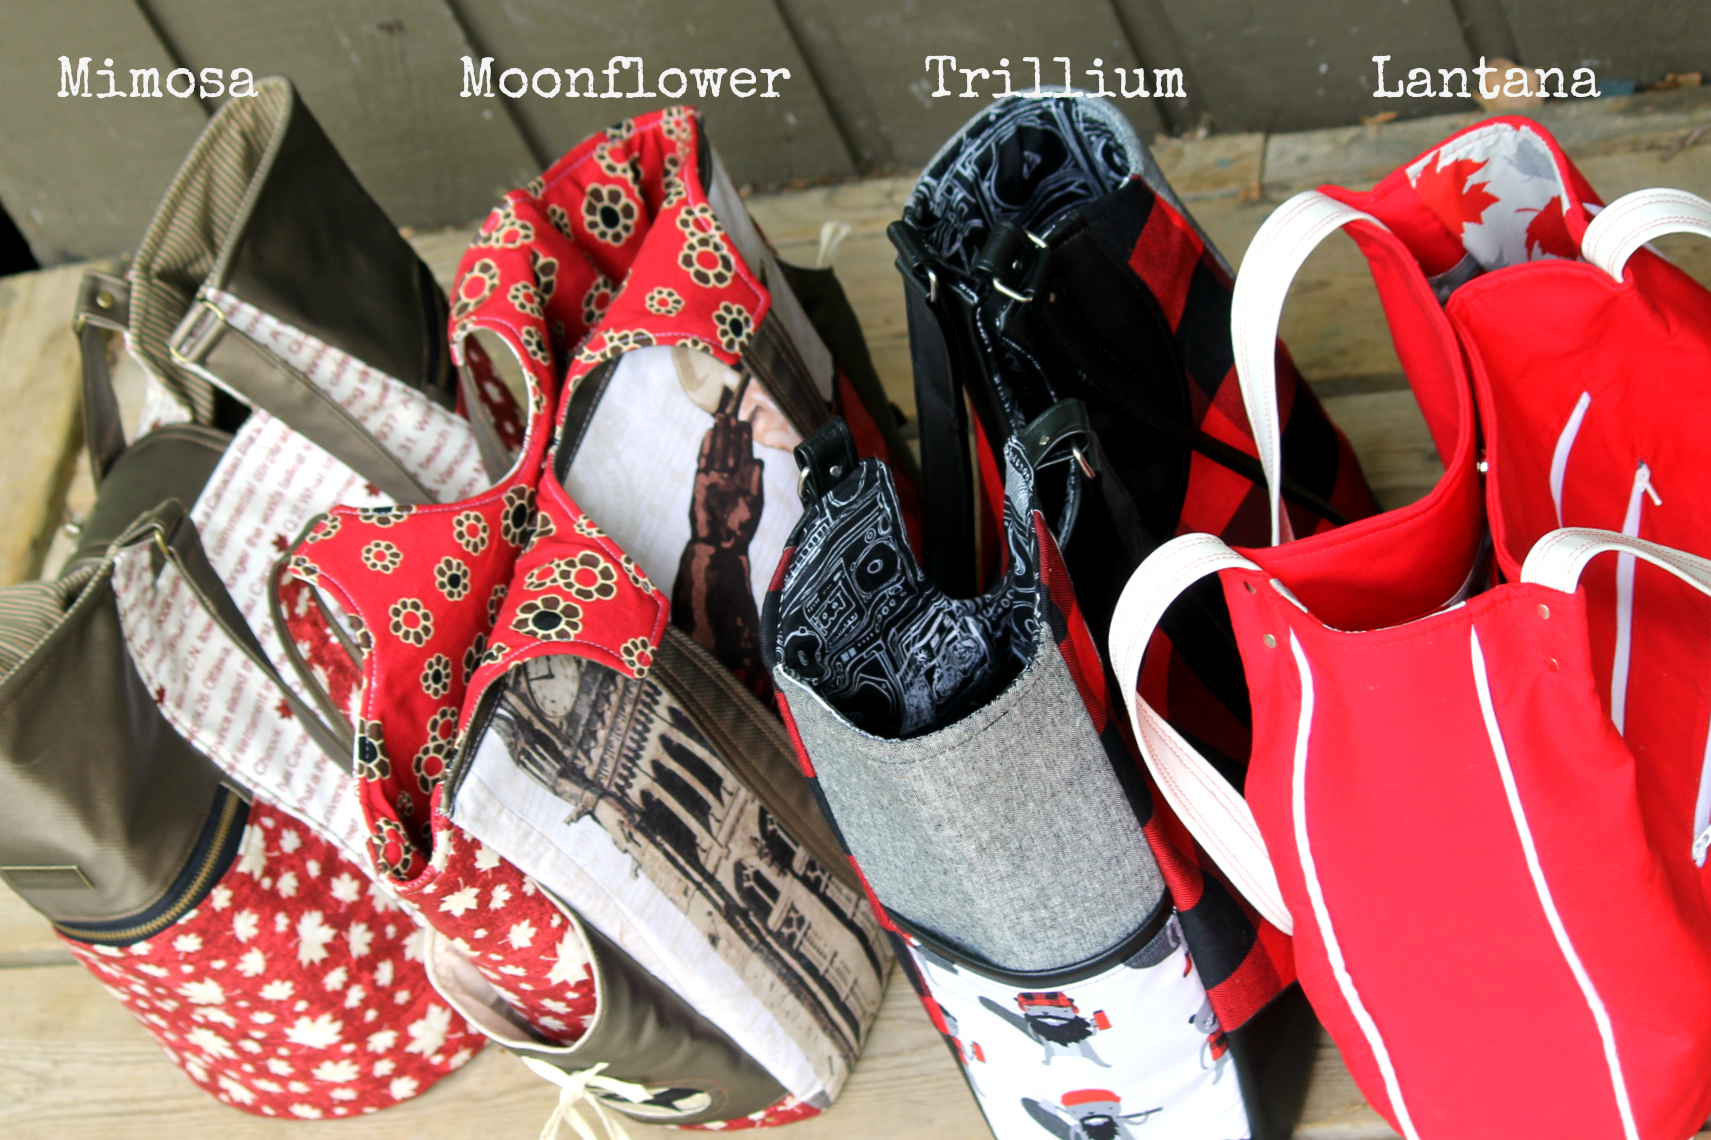
As you can see the size on these bags varies greatly, depending on the bottom and gusset style that the pattern has. Mimosa’s bottom is largest and so it has the most real estate for your stuff.
(BTW we refer to people’s bottoms in Canada as an ARSE).

Mimosa Tote: features a very spacious interior because of the oval bottom. In my opinion, this tote style holds the most. It has 2 handy exterior zippered pockets on the sides as well as 2 interior slip pockets. I absolutely LOVE the closure flap with the turn lock, however, to save money a magnetic snap may be used instead. The Mimosa is a more upscale look for a tote, and that’s why this one is my favourite! Purse feet may be used on the bottom if you choose. As well, there are many areas that you could showcase fussy cut fabric, pieced blocks or pretty hardware embellishments. This pattern calls for fleece and woven interfacing, with some stabilizer in the base, but NO foam in this one.
My Mimosa above is done in Northcott’s Sesquicentennial line (purchased from Sew Sisters in Toronto) featuring a red cork leaf on each side. The side panels are made of metallic, faux leather from Fabricland in Canada. The Antique zipper tape and pulls are from BringBerry Hardware in New Brunswick, Canada.
Speaking of Mimosas…. I don’t drink them myself, but our fridge usually has a case of 24 cans of beer in it…that’s called a TWO FOUR, (because we Canucks don’t like to complicate things)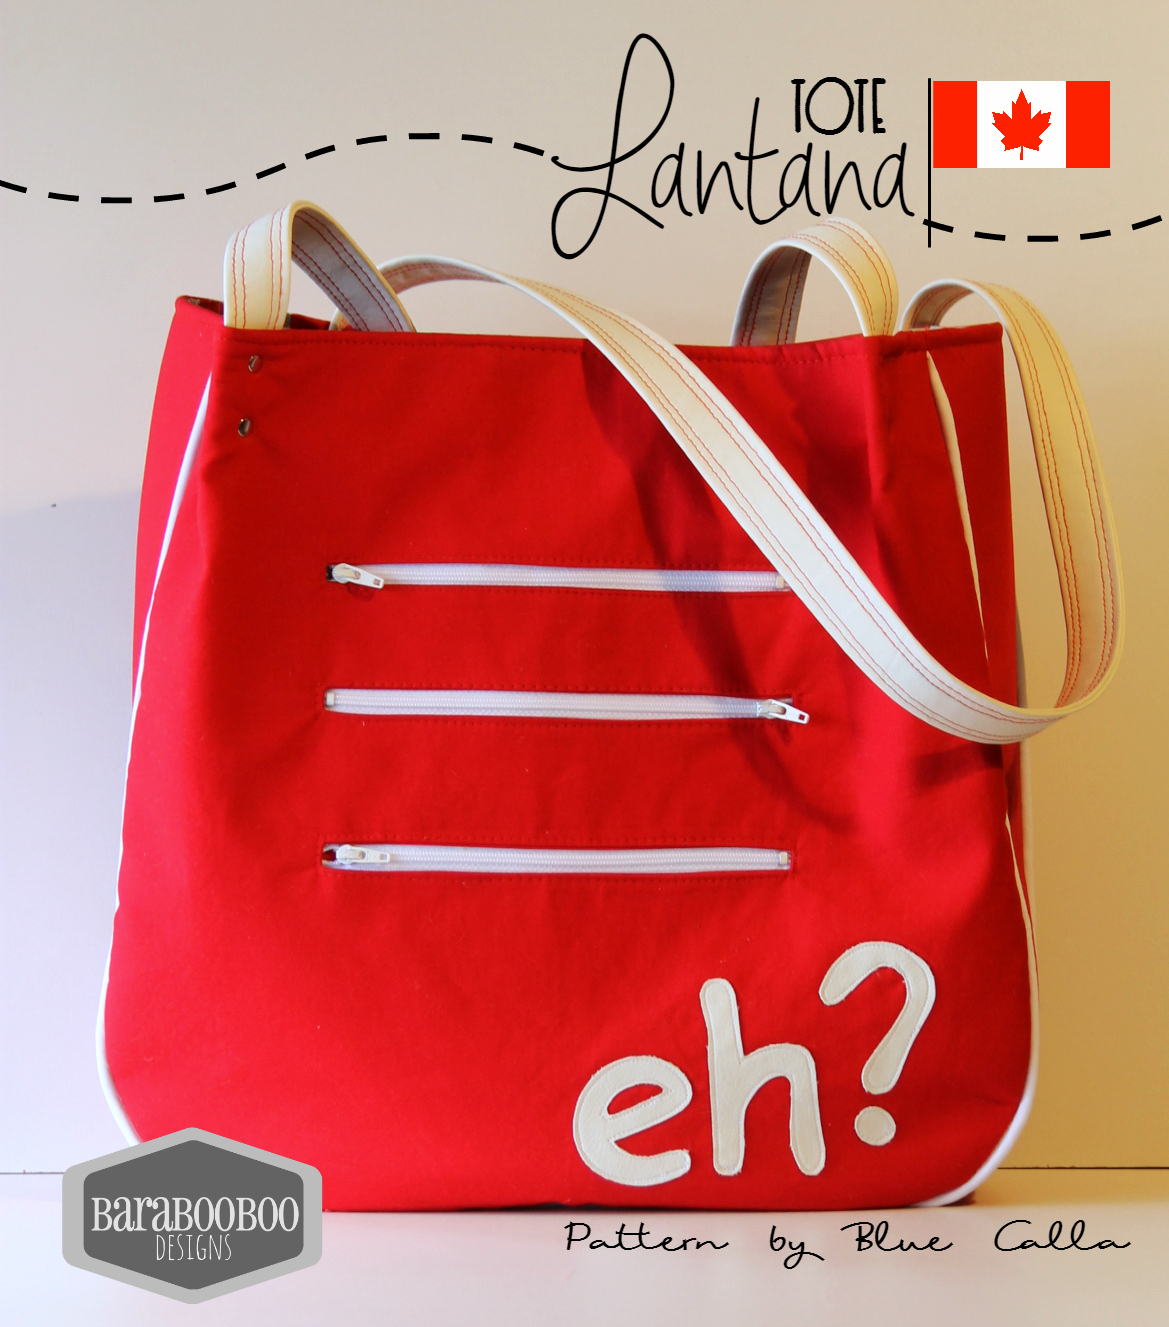
Lantana Tote: One of my favourite features of the Lantana is the method that is employed to attach the straps. They are inserted into a finished bag as the final step, and because they are riveted (or stitched) into folds in the finished bag, it changes the shape on top from flat/rectangular to a very wide almost square opening! Most people who make this pattern remark on this unique feature. Once installation of the triple set of exterior zippers is done, it’s fast and smooth sailing from there. Lantana is a fairly quick sew, and if you omit the 3 front zippered pockets, then you could really feature a large graphic print or a decent sized pieced block there. It would also be a great bag for the Quilt-As-You-Go method. A magnetic snap closes the bag top. The pattern calls for fleece and sew-in interfacing. I chose to add foam in the gussets and use woven fusible interfacing….. and I love how it stands on it’s own.
My Lantana Tote above is made in red cotton with white piping and white zippers. Inside, the cotton is printed with red and grey maple leaves. The “eh?” is done in raw edge appliqued white faux leather. All from Fabricland in Canada.
“eh?” Translation: Don’t you think? Conversational device that allows a non-confrontational Canadian to turn a statement into a poll of opinion or question.
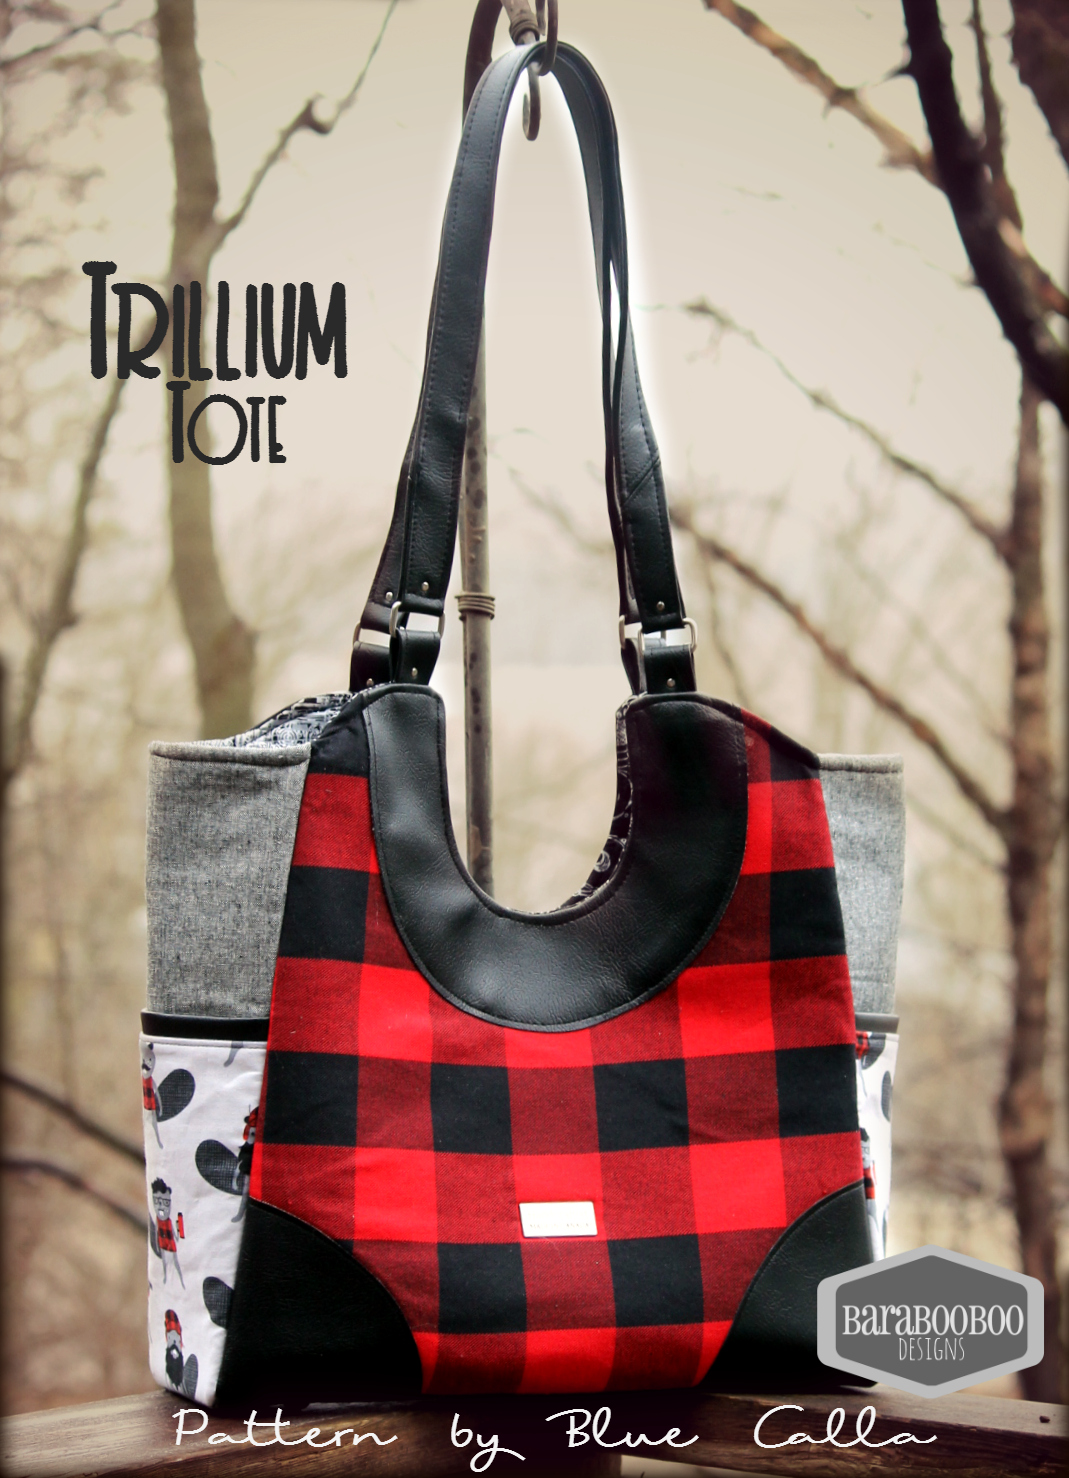
Trillium Tote: This pattern has recently had an update to it, and it doesn’t disappoint. It is well explained and not difficult to make. The main feature on this tote is the U shaped cut out on the main panels. It also sports 2 convenient exterior side panel slip pockets trimmed in faux piping. Inside, it’s spacious with a zippered and a slip pocket. A magnetic snap closes the bag. I really love the modern shape of Trillium and the top edge also has a lovely profile. The pattern calls for foam along with some woven interfacing, so it’s quite a stable bag, it stands on it’s own with no issue.
My Trillium Tote above is done in a woven Buffalo Plaid from Fabricland, in addition to the Burly Beavers print by Andie Hanna for Robert Kaufman (purchased from Funky Monkey Fabrics in Varna, Ontario). Accents are done in black, faux leather, and the grey is Essex Linen from Mad About Patchwork (Ottawa, Ontario). Hardware by Emmaline Bags (Alberta, Canada)
The Trillium flower is the official flower of the province of Ontario, apparently they are illegal to pick, but I live in a vast area of forests and lakes, where these blossoms thrive. The province is sandwiched in the middle of the country. It has the most southerly point in Canada (Point Pelee), and also is home to Ottawa: our country’s capital city.

Moonflower Tote: This pattern was conceived by The Cloth Albatross and then written, published and drafted by Blue Calla. It’s a fairly large but skinny tote. The pattern calls for all 4 sides to have a circle cut out on it for reverse applique. I chose to omit one large circle cut out because I had a huge Panel I wanted to use. It’s so easy to modify the exterior of this bag! The cut outs are an EXCELLENT place to feature a coveted fabric that you’ve been hoarding, or a pieced block, or needlework embellishment. The exterior pockets also have a sweet drawstring feature fed through a set of grommets on each side. Inside, there’s a large “half moon” shaped slip pocket, and a zippered pocket. You can choose to add some fancy hardware to join the straps to the bag, but the pattern doesn’t call for it, or much other hardware at all. The closure is a magnetic snap. This pattern calls for fleece and woven interfacing throughout. I used a stabilizer on the base. As a bonus, there’s a FREE pattern to match this bag called The Morning Glory Pouch.
My Moonflower is done in the large Sesquicentennial Mounties panel in Northcott’s “Oh Canada” line (from Sew Sisters in Toronto), it’s combined with several other Northcott prints from the same line. The reverse side features the Canadian Trivia print, see below. Hardware on this one also from Emmaline Bags.
“Mountie” = RCMP Royal Canadian Mounted Police- known for their unique hats, uniforms and horses.
As always, sewing a Blue Calla pattern is a pleasure and produces something you can be proud of. There are many Free patterns available on her website, if you want to try one out!
As for me, I am off with a pocketful of loonies and twoonies to buy myself a BeaverTail, I think I will go with Killaloe Sunrise this time….yum! I deserve a treat!
******POST GIVEAWAY: A random person from the comments on this Blog Post will win their choice of the Blue Calla Tote patterns I have featured here! So show me your comments and questions! This is open to everyone, and will be drawn at 12 noon (ET) on Wednesday June 14th 2017*******
Each blog has an exclusive giveaway, so be sure to visit them all.
SCROLL down further for the TOUR GIVEAWAY, Rafflecopter link below!!! There are soooo many prizes!
Tour Discounts
- 10% off!
Tangled Blossoms Design is offering 10% off anything in stock for the duration of the tour. Offer expires June 10, 2017. Use discount code HAPPYBIRTHDAYCANADA
- 15% off!
Bringberry Handbag Hardware and Design is offering 15% off anything in stock for the duration of the tour. Offer expires June 10, 2017. Use discount code LOVECANADA150
Giveaway Prizes
- Grand Prize: 2 PDF patterns from Blue Calla Patterns, $50 voucher from Bringberry Handbag Hardware and Design, $40 voucher from Fabric Please
- Second Prize: 2 PDF patterns from Blue Calla Patterns, $35 voucher from Emmaline Bags, $25 voucher from MM Cork Supply
- Third Prize: $50 voucher from Blackbird Fabrics
- $30 voucher to spend on any in stock fabrics from Tangled Blossoms Design, 1 Pattern from Thread Riding Hood
- $25 voucher from Fabric Please, 1 Pattern, plus hardware kit from Emmaline Bags
- $25 voucher from Fabric Please, 1 PDF Pattern from Thread Riding Hood
- $25 voucher from Fabric Please, 1 PDF Pattern from FABulous Home Sewn
- $25 voucher from Fabric Please, 1 PDF Pattern from FABulous Home Sewn
- $30 voucher from Sitka Fabrics
- $25 voucher from MM Cork Supply
- Ooh La La Jewellery* bag pattern & hardware kit from Among Brenda’s Quilts (Includes shipping within Canada & USA.)
- A selection of items for bag making from Flare Fabrics (Includes shipping within Canada.)
- $25 voucher from Stay Home Fabrics
- $25 voucher from Funky Monkey Fabrics
- Store credit for 1 yard of custom knit from Crookshanks Custom Textiles
- Store credit equal to one meter of custom knit plus one meter of solid from Midnight Mountain Fabrics
PLEASE enter the big tour GIVEAWAY here: a Rafflecopter giveaway
Tour Stops
(These links will be active on and after the day they are scheduled.)
June 4
June 5
Tangled Blossoms Design ◊ With Love in Every Stitch ◊ Happy Okapi
June 6
Michelle’s Creations ◊ Barabooboo ◊ Soca Sewing
June 7
Glitter in my Coffee ◊ Michelle’s Creations ◊ Seam of my Pants
June 8
Seam of my Pants ◊ Creative Roots Sewing ◊ Happy Okapi
June 9
June 10
Giveaway ends at midnight EDT (North America)
July 1
CANADA DAY 150
Please join us in thanking our tour sponsors by visiting their websites.
Louise Barrel Bag: May Bag of the Month Club Pattern
Sorry for the extended leave! I have been busy with custom orders and some other obligations I can’t publicly write about (yet). 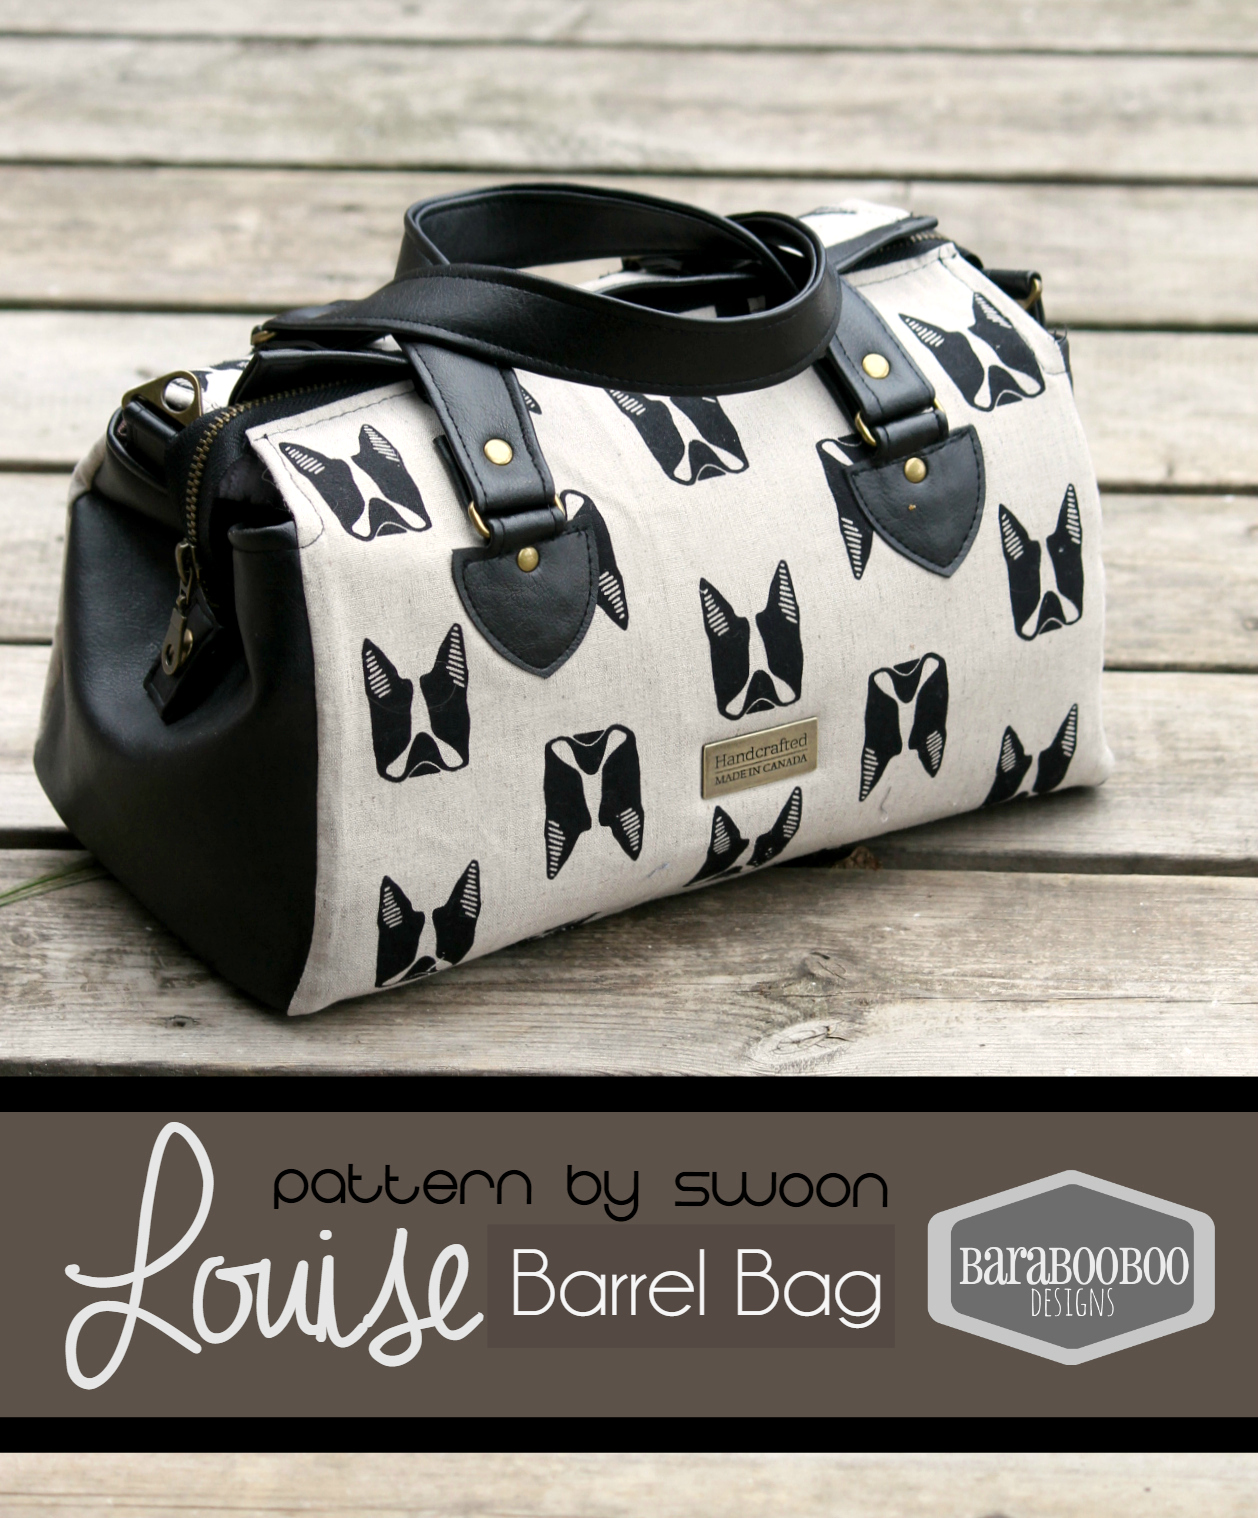
It’s May now and with a new month comes the latest Bag of the Month Club Pattern. This is a club where you buy a subscription for 6 months of bag patterns (each released on the 1st of the month from Jan – June). The bag patterns are secret until release but they are all from reputable designers who have large followings and sell many patterns. I test patterns for 4 of those pattern companies….so lucky me! I get to see and sew 4 of them before release. (I am burdened with keeping them a secret as well though!).
This is a look at the May bag by Swoon patterns. It’s called Louise Barrel Bag.
My tester is made up from Bull Dog linen blend by Maker Maker combined with faux leather in black. I used Antique Brass hardware throughout. I love this little bag because it’s a hybrid between 2 of my favourite Swoon patterns. Imagine: a combination of Nora and Blanche and you will get the Louise! Of course, it’s not JUST a mash-up…the construction is VERY different and it’s an easier sew than either of the other 2 bags. I was always being asked to modify Nora for customers to include a zippered top, so this pattern fits the bill perfectly! It also eliminates the final SIDE panel top stitch on Nora (that step is not for the faint of heart and has drawn guttural curse words from deep within me, while sewing that part). Well, NO MORE!!! You will be pleased to know that no curse words were uttered during the sewing of Louise! 
The zipper extends past the edges of the top and folds down to be snapped onto the side panels. Inside, there’s a zippered pocket included in the pattern but it would be easy to add a divided slip if you wanted more organization inside. Also, included is an optional shoulder strap and connectors for it.
This pattern has a unique feature: a zipper flap thingy that hides the zipper underneath. I am not sure if there’s a technical word for that bag anatomy other then Zipper panel or Zipper flap. A picture is worth a 1000 words though so see below.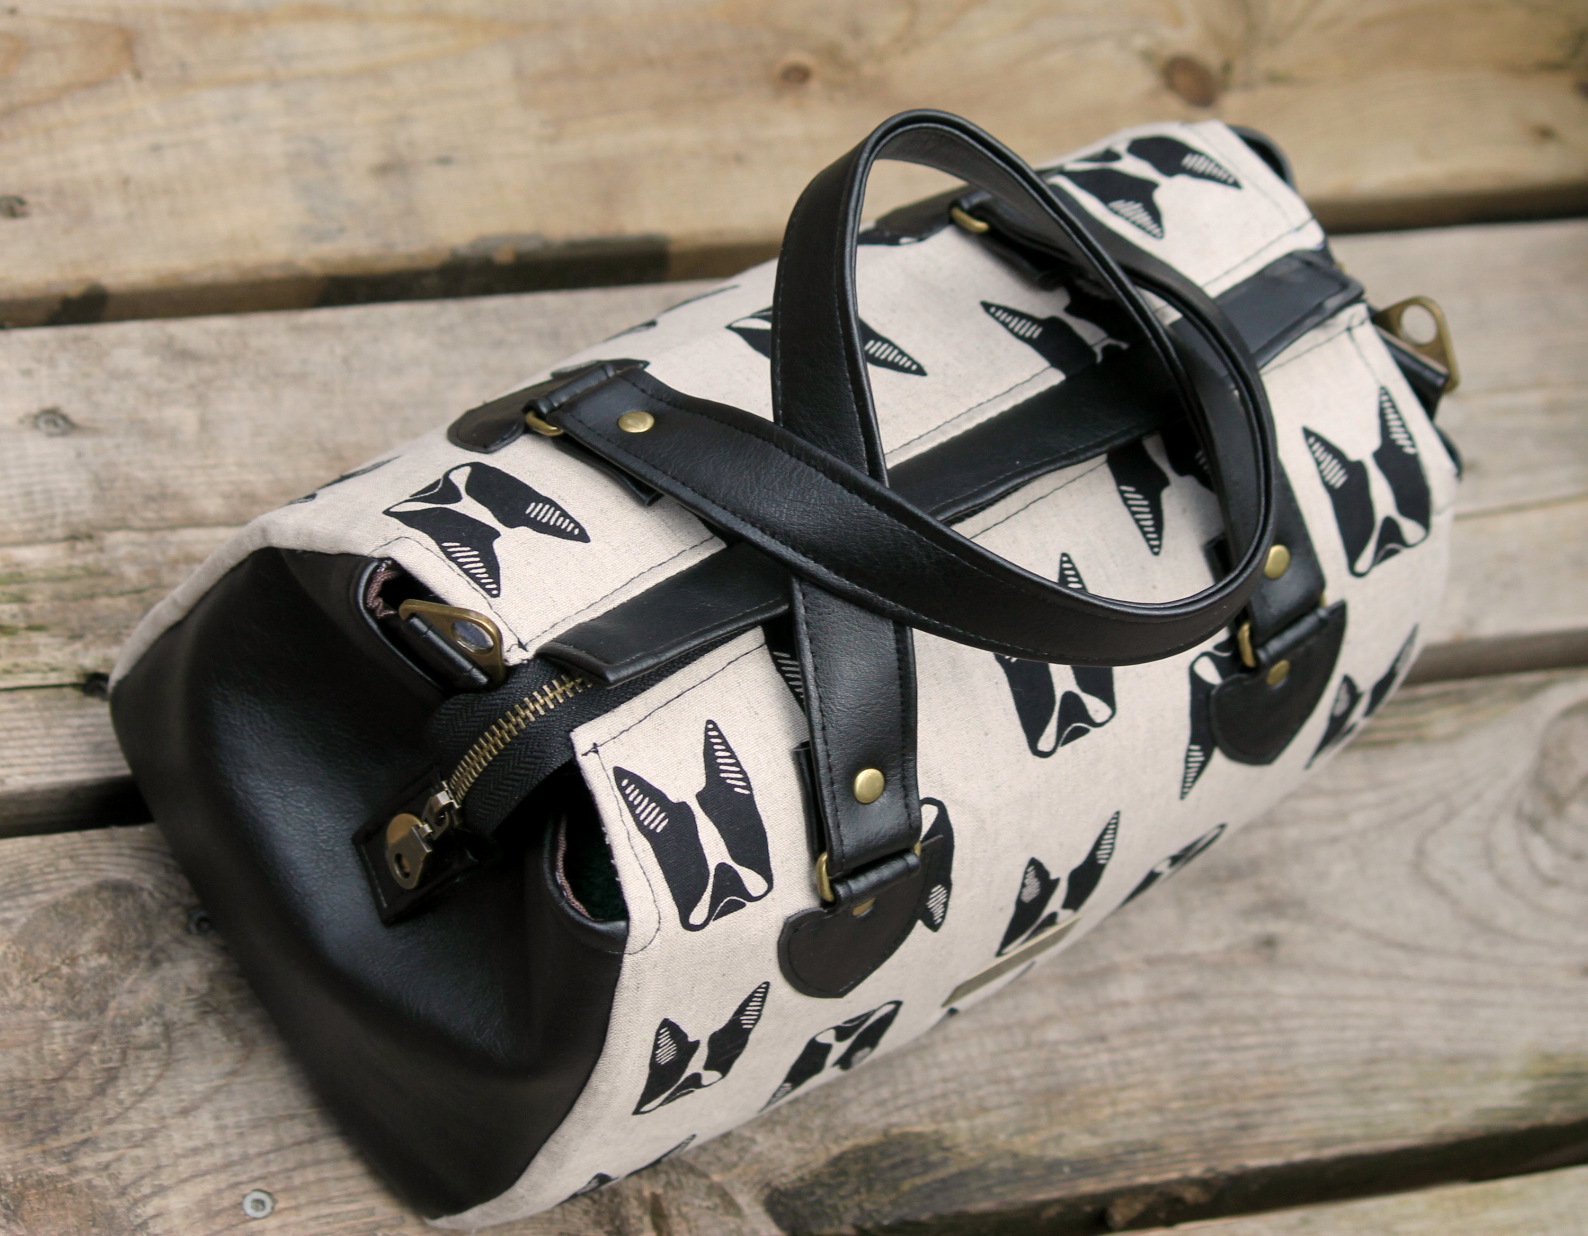
Approx Size: 12″ wide by 8″ tall and 5″ thick on the bottom
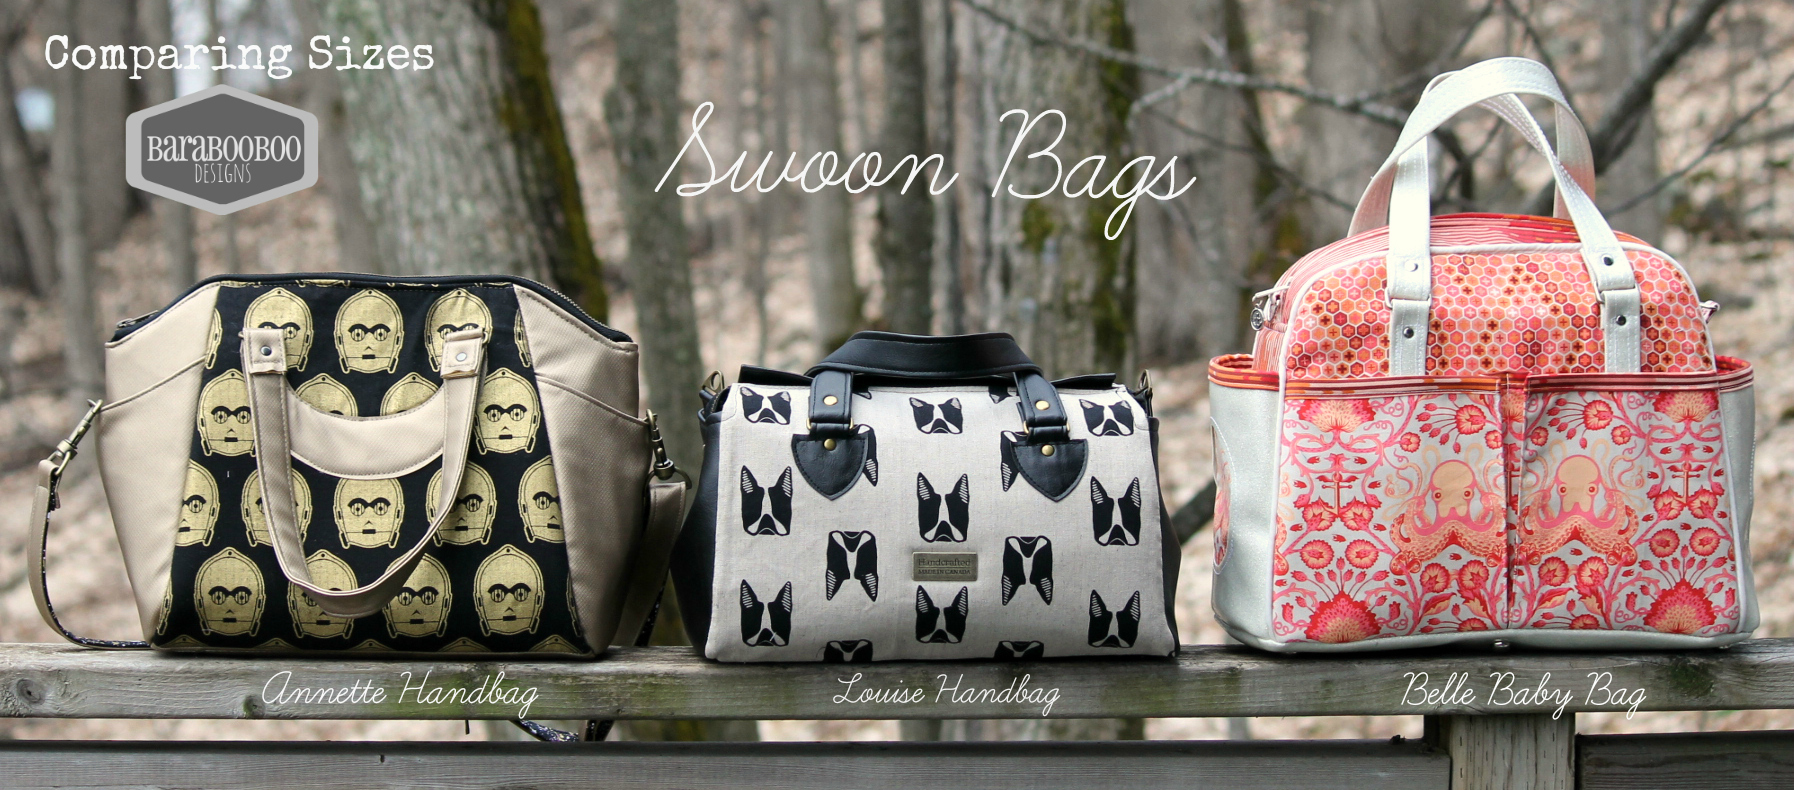
I often photograph my bags among other well known, commonly sewn bags bags to give an idea of scale. Louise was no exception. Here she is with some other Swoons. 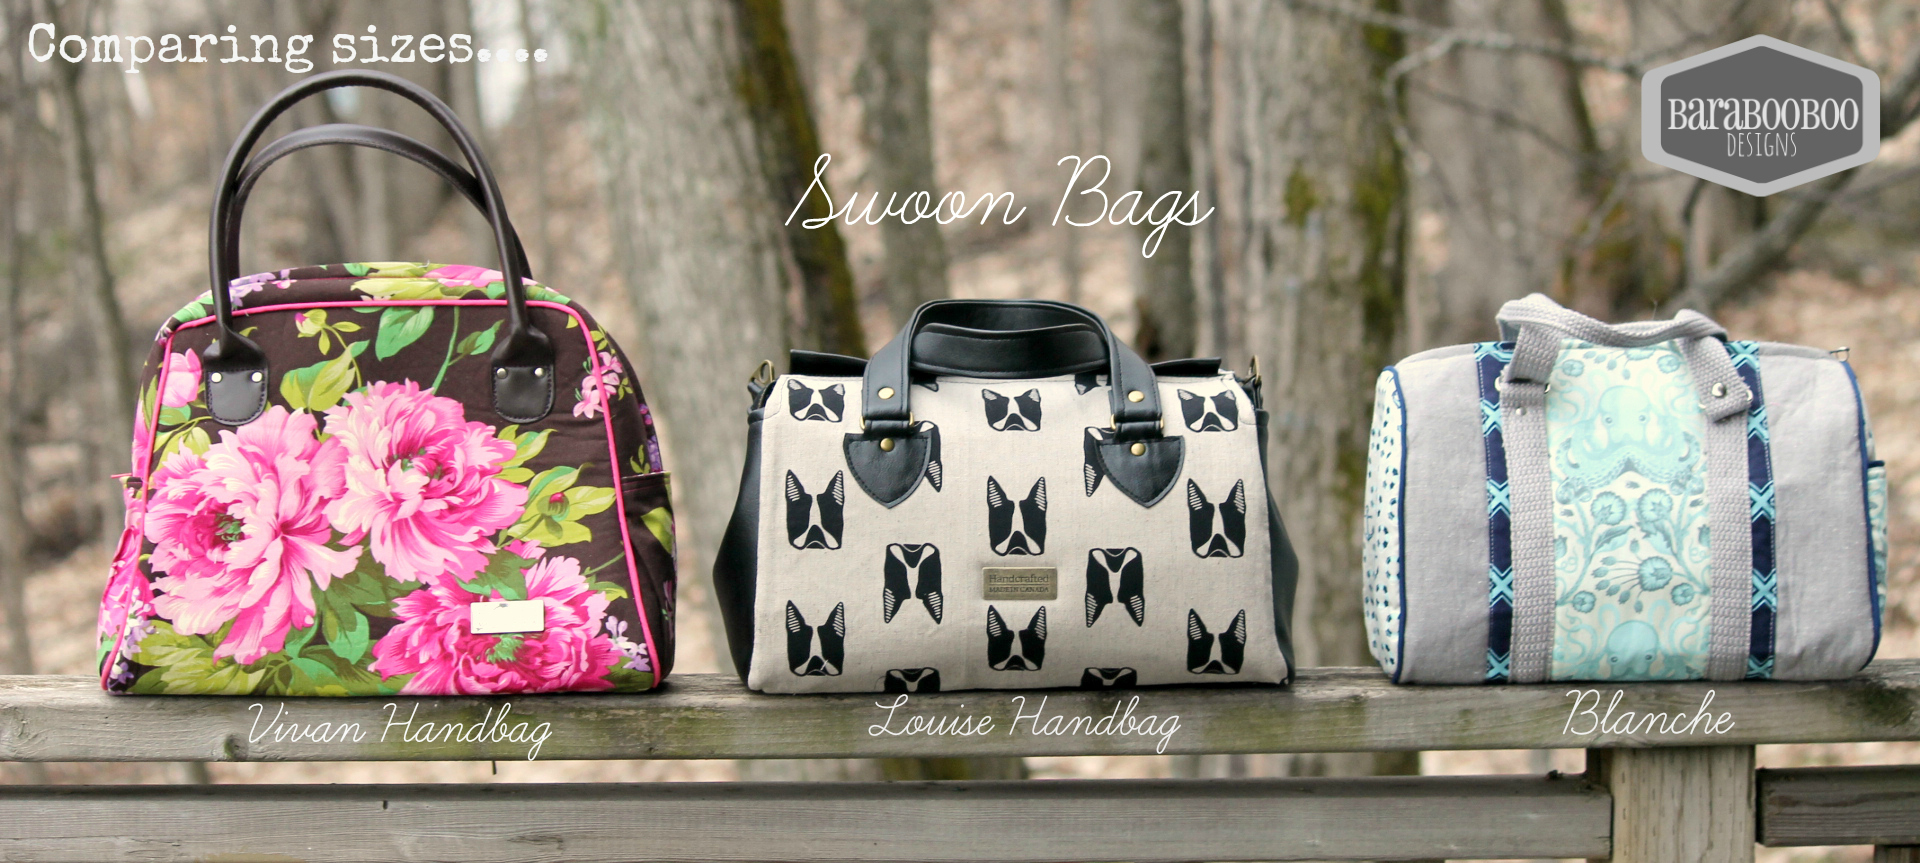
I also added purse feet on the bottom. Not in the pattern, but super easy to add!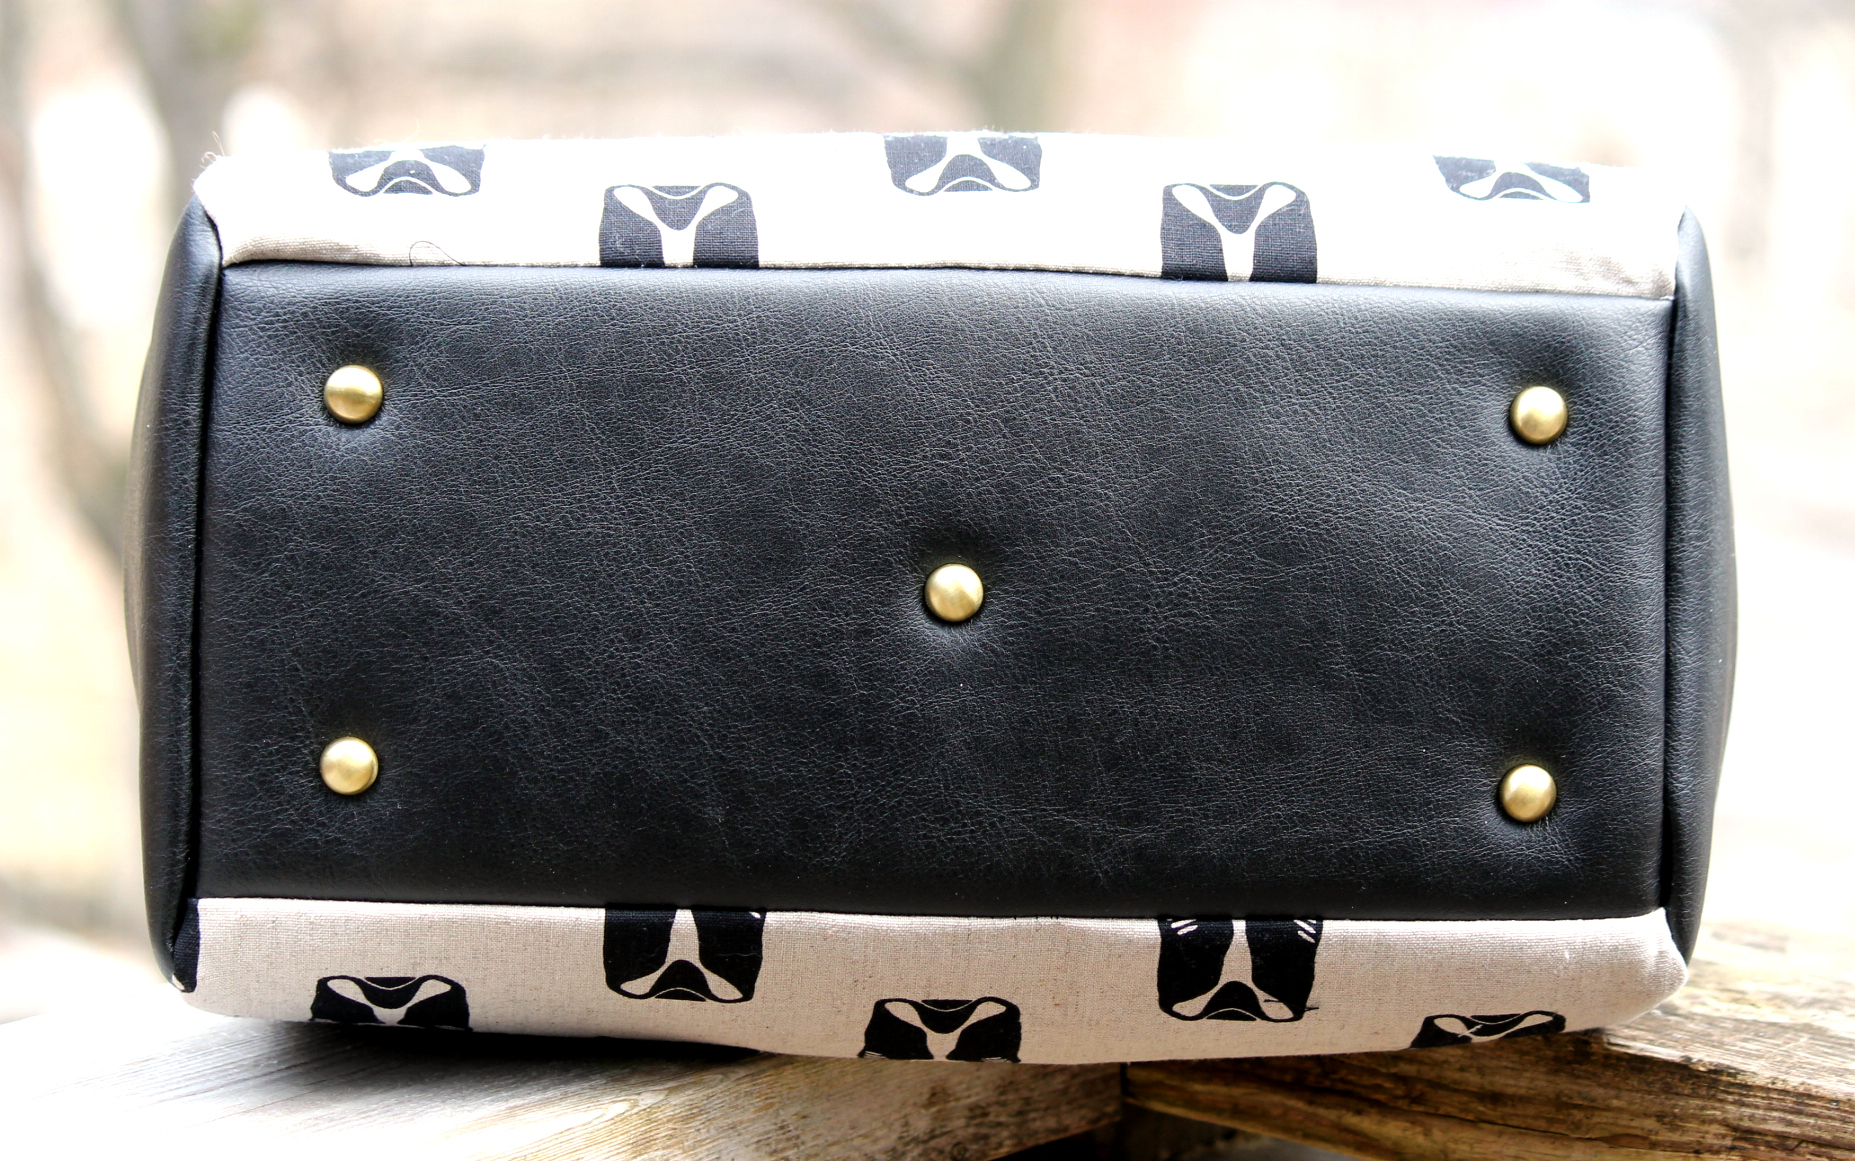
Overall, this is a moderately easy and fast sew, that will leave you with a very useful and modern looking handbag! I recommend buying the subscription if you would like the pattern NOW! or if you wait 6 months, then the pattern designer is allowed to release it separately as an individual pattern purchase if she decides she wants to do that.
In my opinion, so far…the club subscription has been worth every single cent. I have liked or loved EVERY bag released and with membership you also get the pleasure of the FB group for support as well as general bag maker chatter. Oh, and of course inspirational pics of bags by other makers…my favourite part!
So far we have had:
Clover by Blue Calla Patterns
Captivating Clutch by Mrs. H
Sublime by Sew Sweetness
Moxie by Betz White
Louise by Swoon
There’s one more to go for June and that will be Chris W Designs and it will be a complete surprise for me since I don’t test for Chris W.
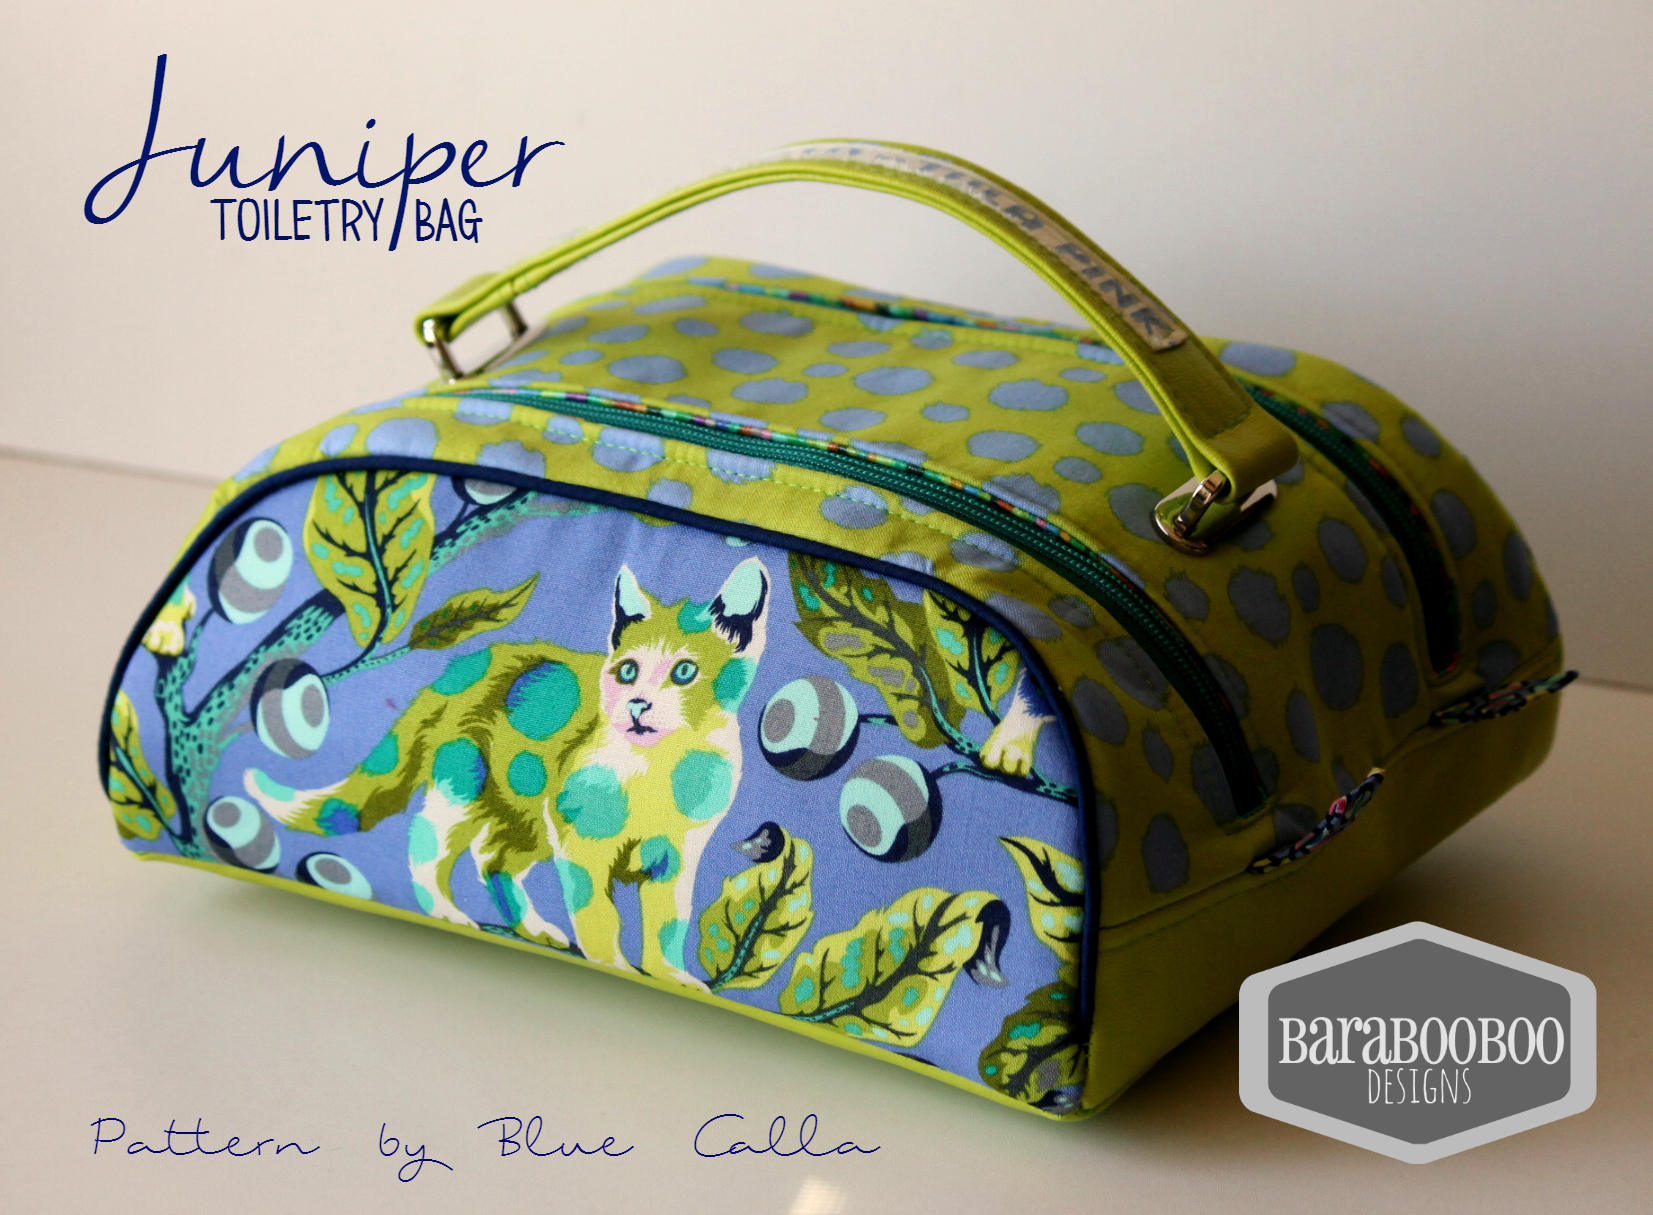
Juniper Toiletry Bag
(Blue Calla patterns is one of my affiliate links, I will be compensated if you purchase a pattern)
I am a pattern tester for Blue Calla Patterns, it’s one of very few Canadian Bag Pattern Companies. I love testing patterns for a few reasons:
1. I get unlimited free patterns (totally awesome), and I get to try the new ones before the rest of the world does!
2. Having a testing deadline FORCES me to finish things, even if I have no “sew-jo”.
3. I get to make suggestions for patterns I would like to see, and have someone actually consider creating them! (and yes, she has done some of my ideas!)
4. I love being able to feel like my feedback, along with the other testers makes it possible for her to present an amazing product to her customers.
**** BTW, this will be a great end of year Teacher Gift, it’a getting close to that time!****
Last week I tested the Juniper Toiletry Bag for Blue Calla. This is one of my favourite styles of bags to make and I sell many toiletry/make up type bags to my customers. Everyone needs one: men, women and children. This pattern is totally unisex and can be customized in sooo many ways. I usually sew 1 bag as my test bag for her and provide feedback….this time I sewed up 4, in 2 days! That is how much I love this one!
Info: Release date: Wednesday, April 12th
Dimensions: 9.75″ W x 4″ H x 8″ D
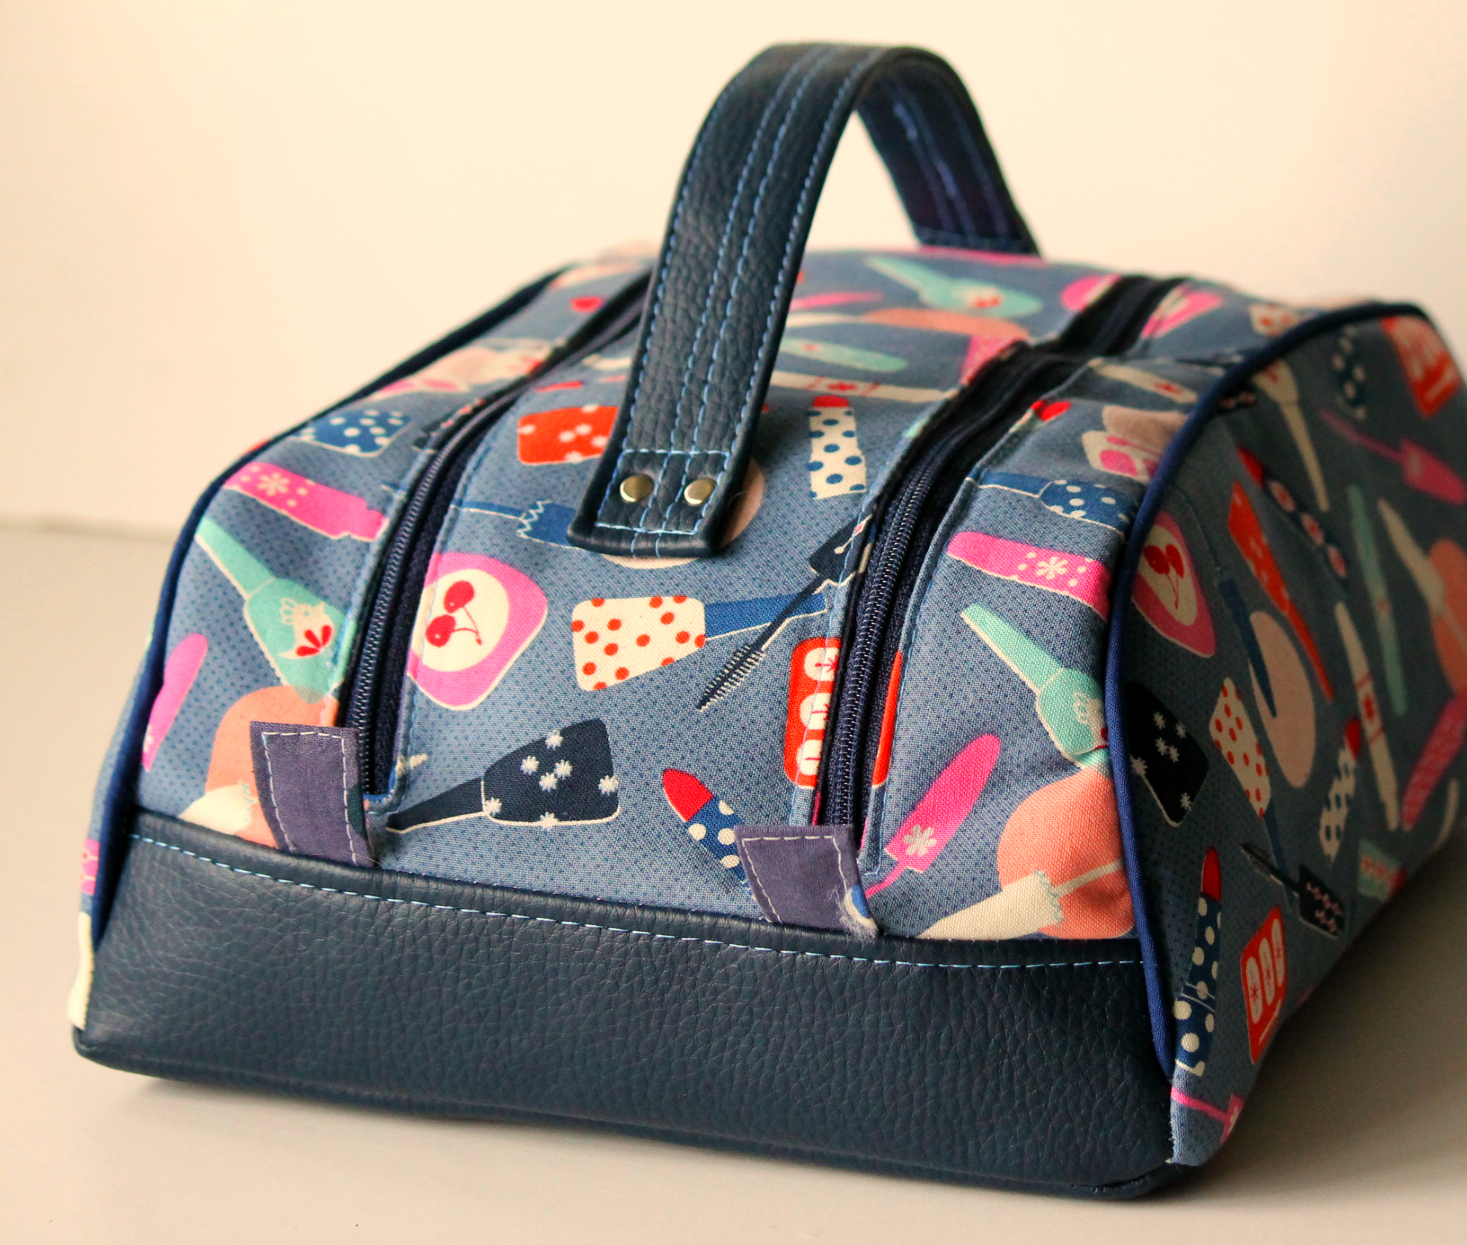
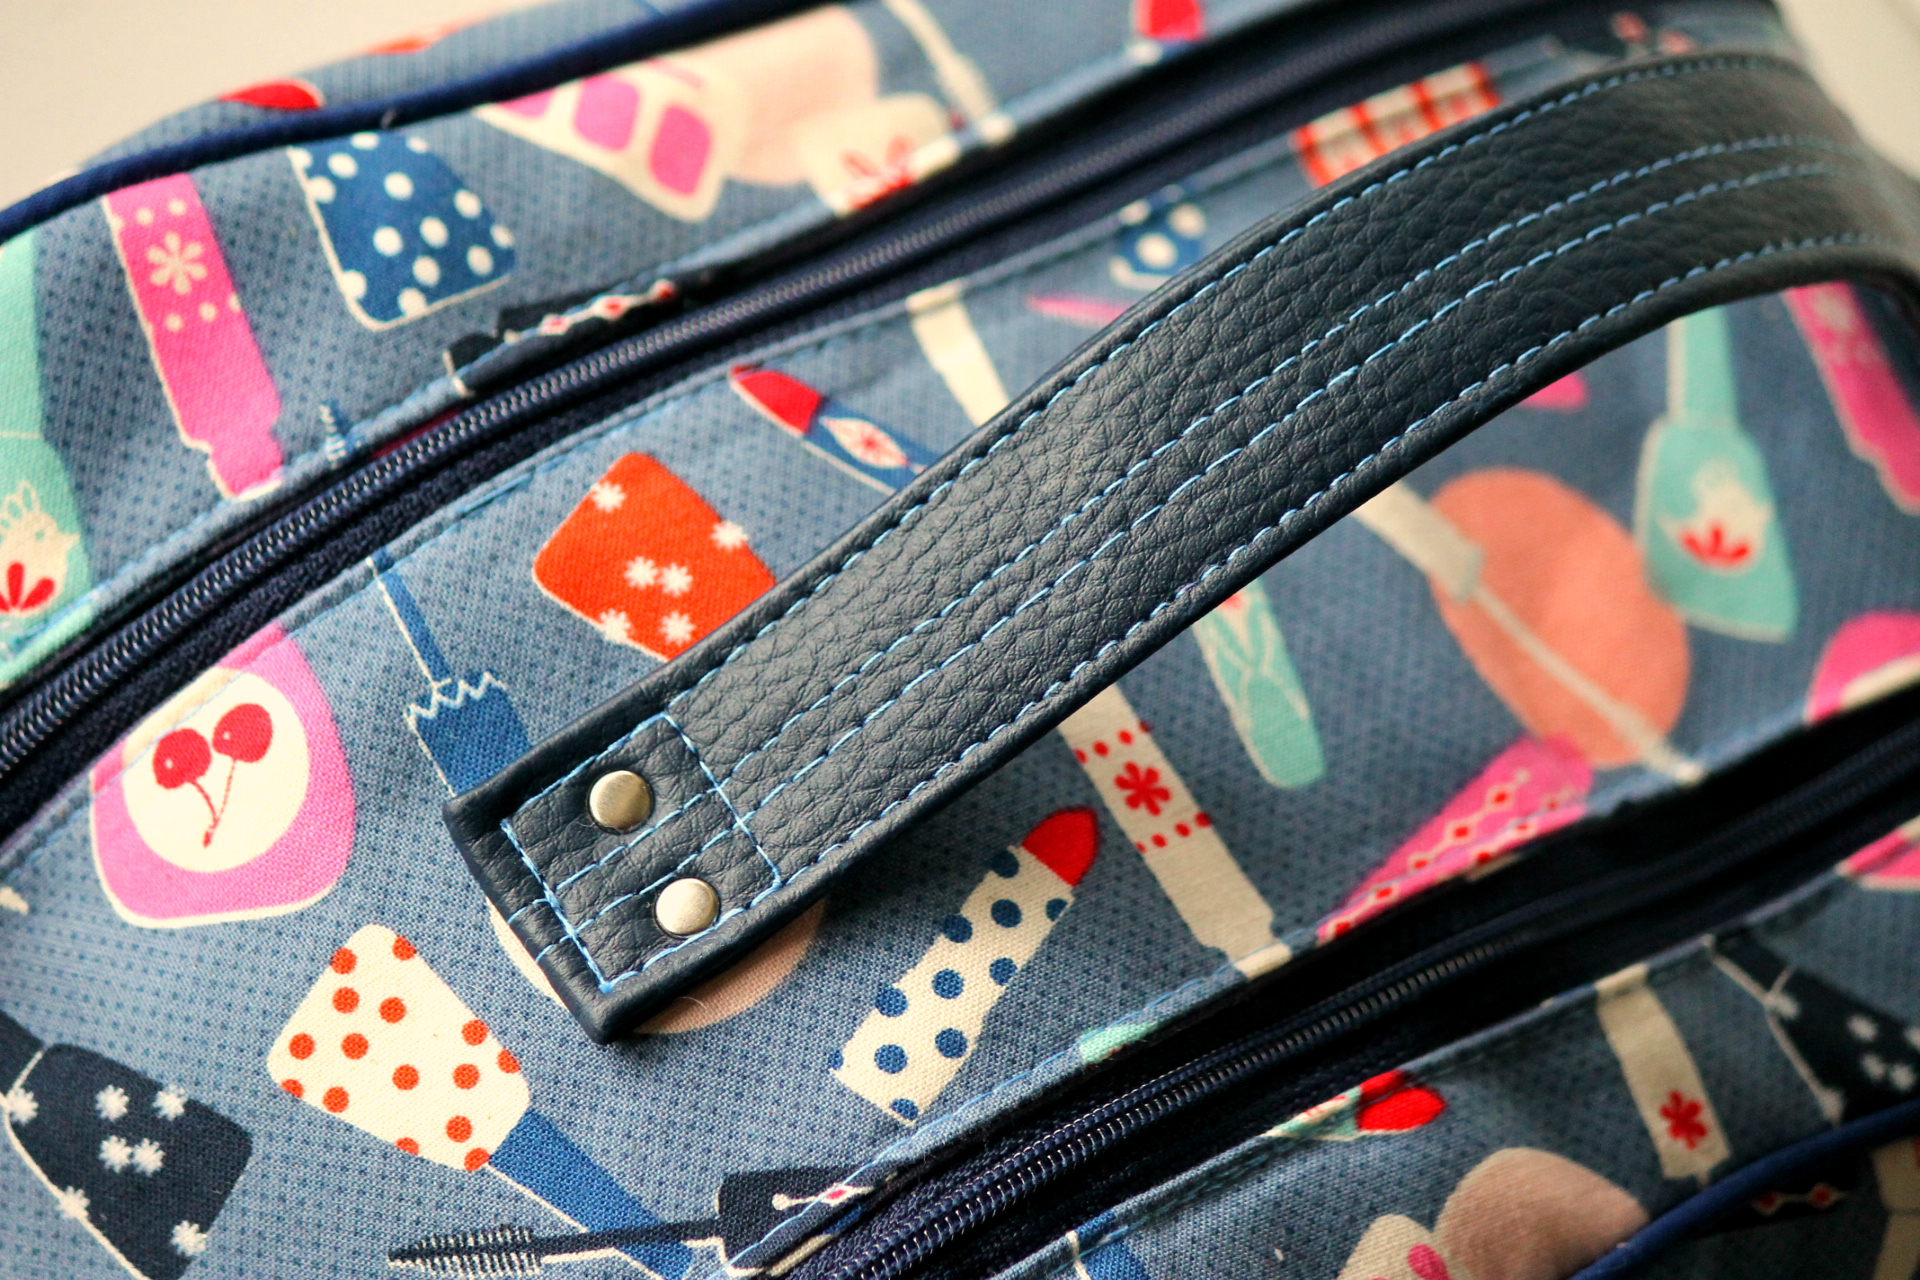
Features: It has 2 zippers that open 2 separate compartments, a top carrying handle, and a very wide, flat bottom that won’t tip over. There are small pull tabs at the end of the zippers.
Potential Fabrics: This can be made out of a huge range of materials, such as vinyl, cork, cotton, laminated cotton, waxed canvas and possibly even leather. As for interfacing, it requires a little bit of foam, fleece and fusible woven interfacing, and a piece of Peltex stabilizer for the base.
Hardware: This one hardly takes any hardware, just 2 zippers, that’s IT!! You can always add more hardware to fancy it up, I added Bridge Connectors and Rivets and Feet to some of mine, but it’s not necessary at all.
Skill Level: I would say this is for a confident beginner/ intermediate skill level, if you are comfortable with zippers, you should be OK. I always encourage beginners to try something they think is slightly out of their skill level, you will likely surprise yourself! It’s easy to omit the piping to simplify the bag slightly.
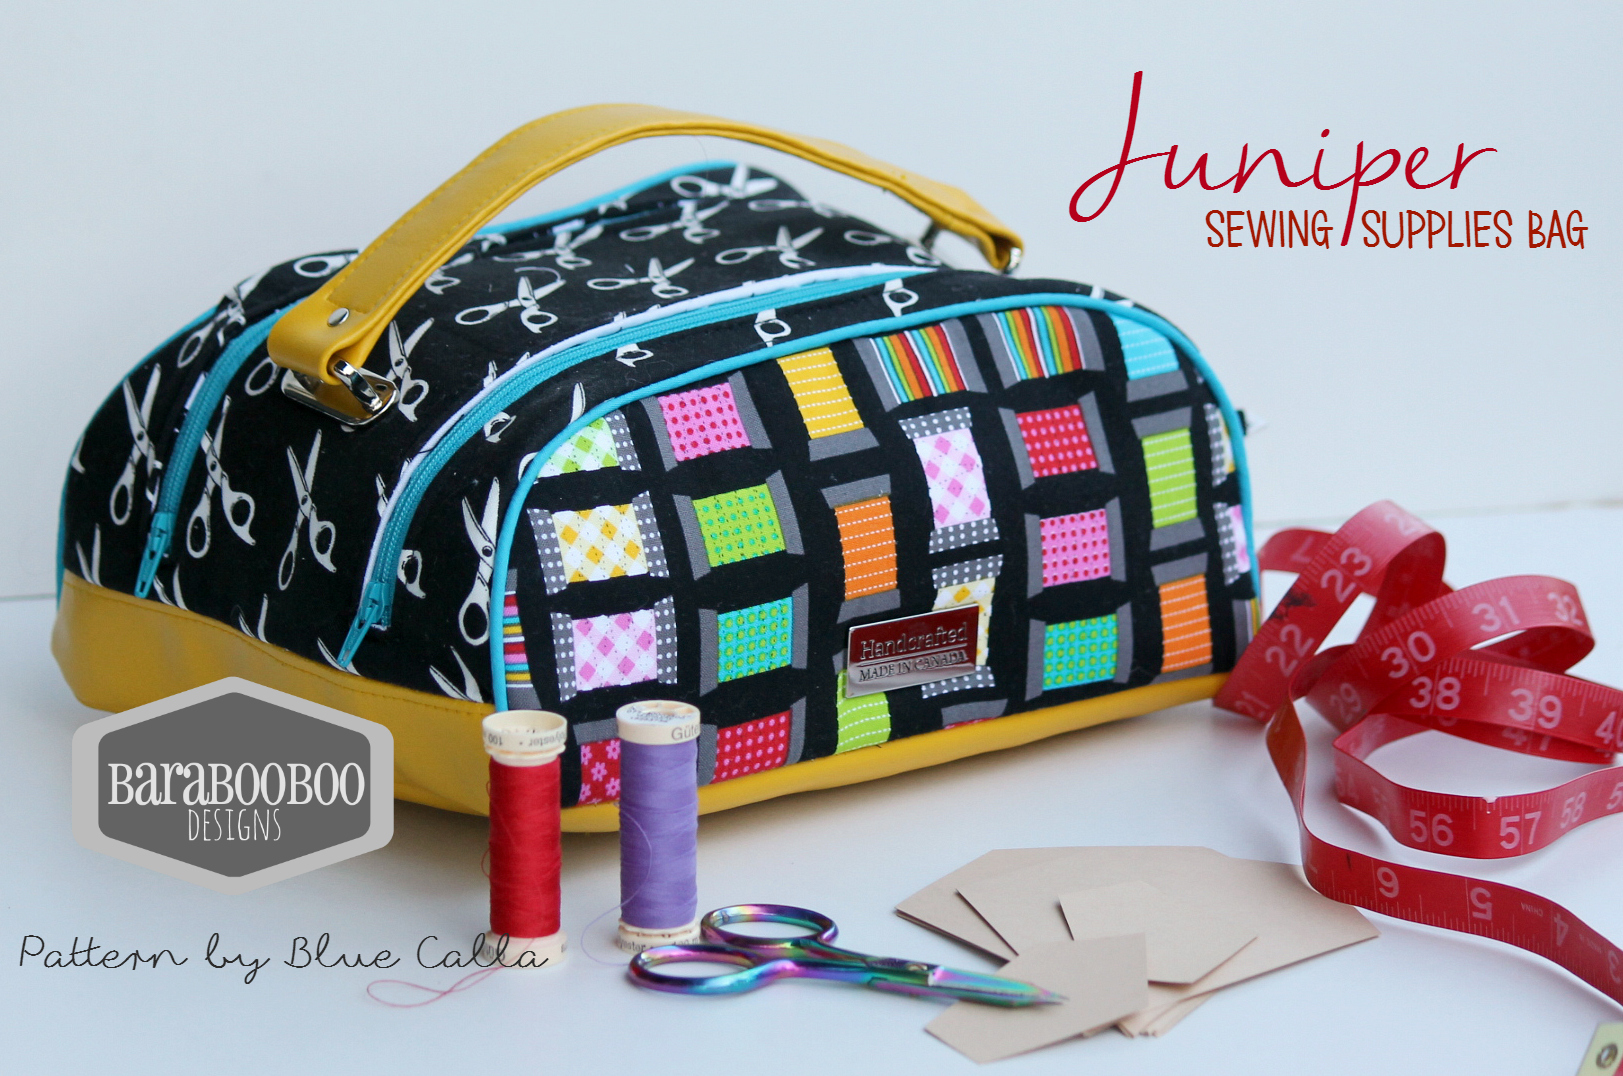
As I mentioned above, I made 4 of these! 1 of my 4, I decided to do as Sewing Bag, to hold my hand sewing for travelling. I added an exterior divided pocket, used Sewing Theme fabrics and combined them with yellow marine vinyl. I was pleasantly surprised by how cute it turned out and it’s very useful too. There will be a tutorial for this simple customization on the Blue Calla Website when the pattern is released.
![]()
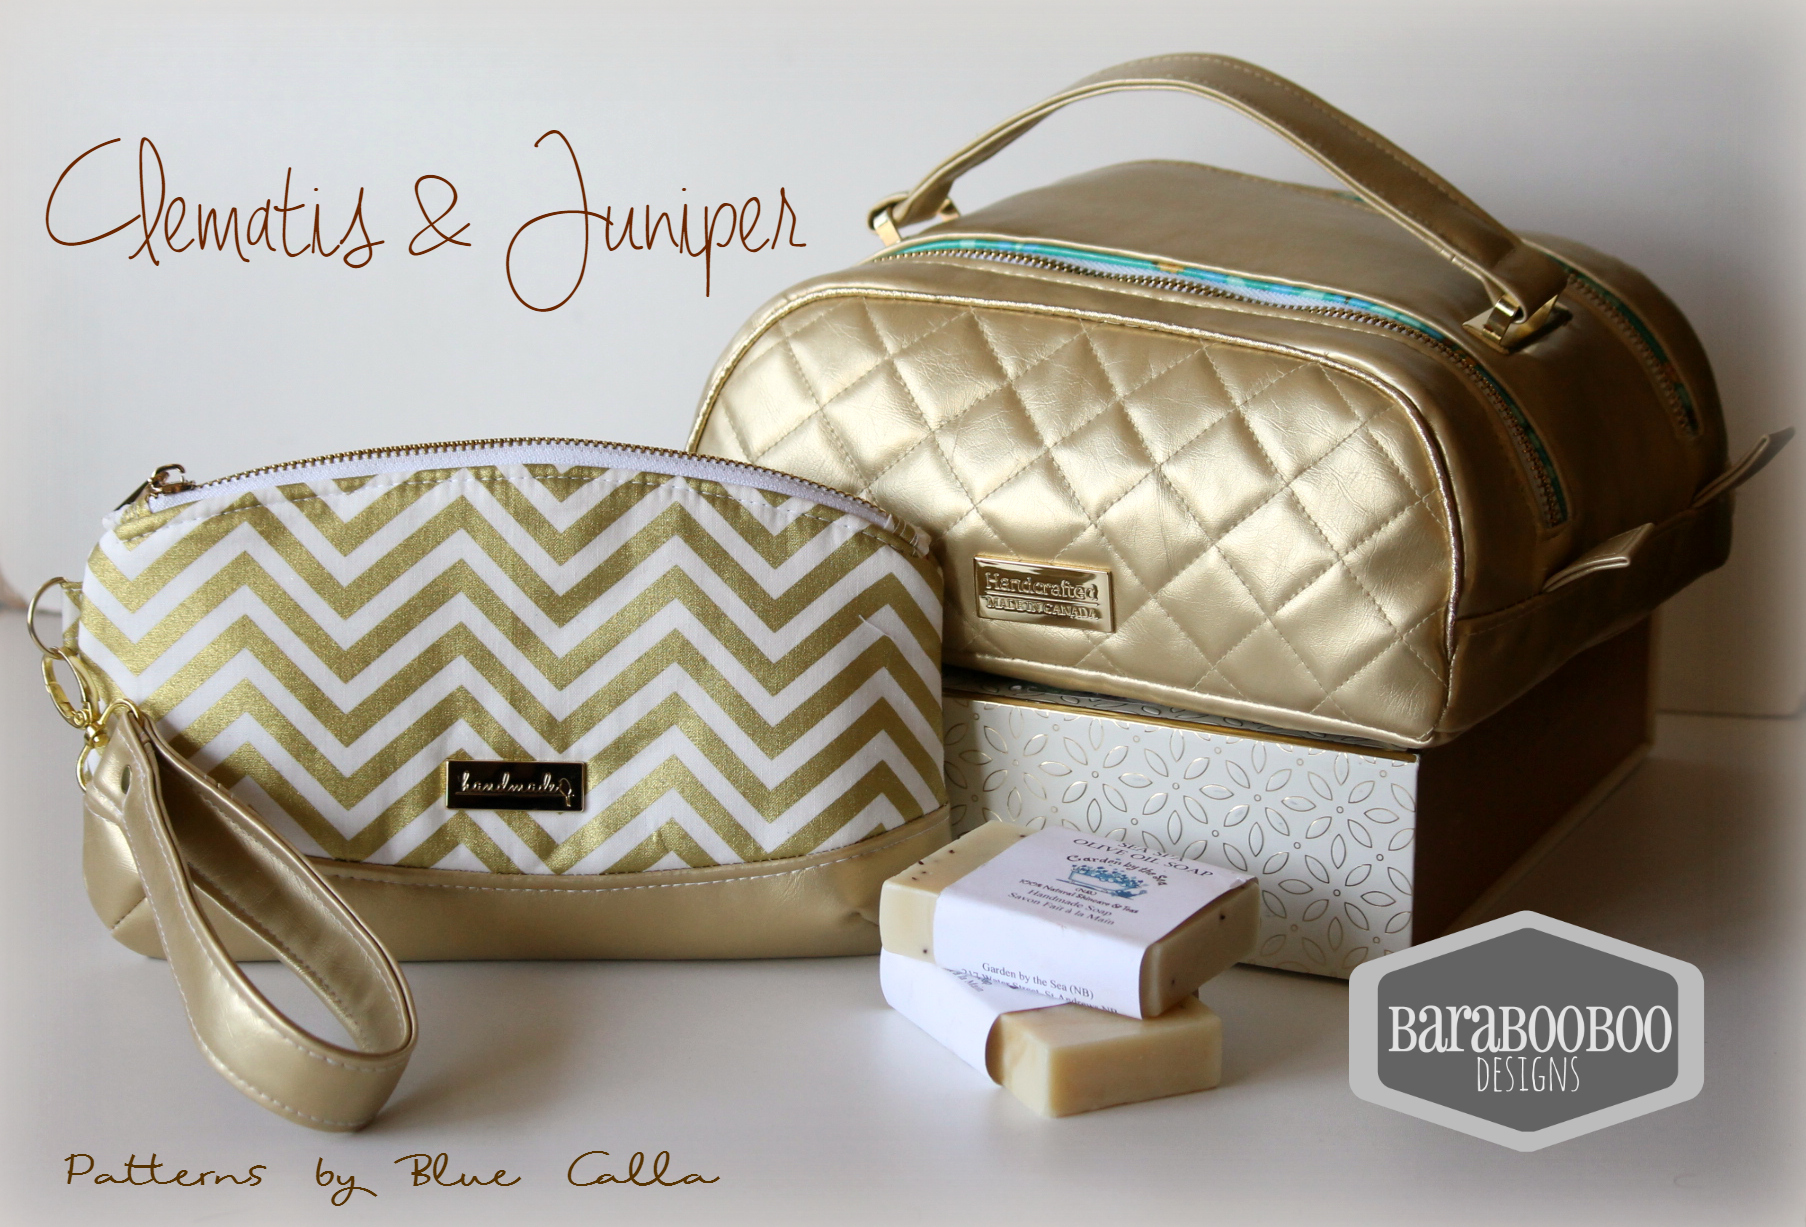
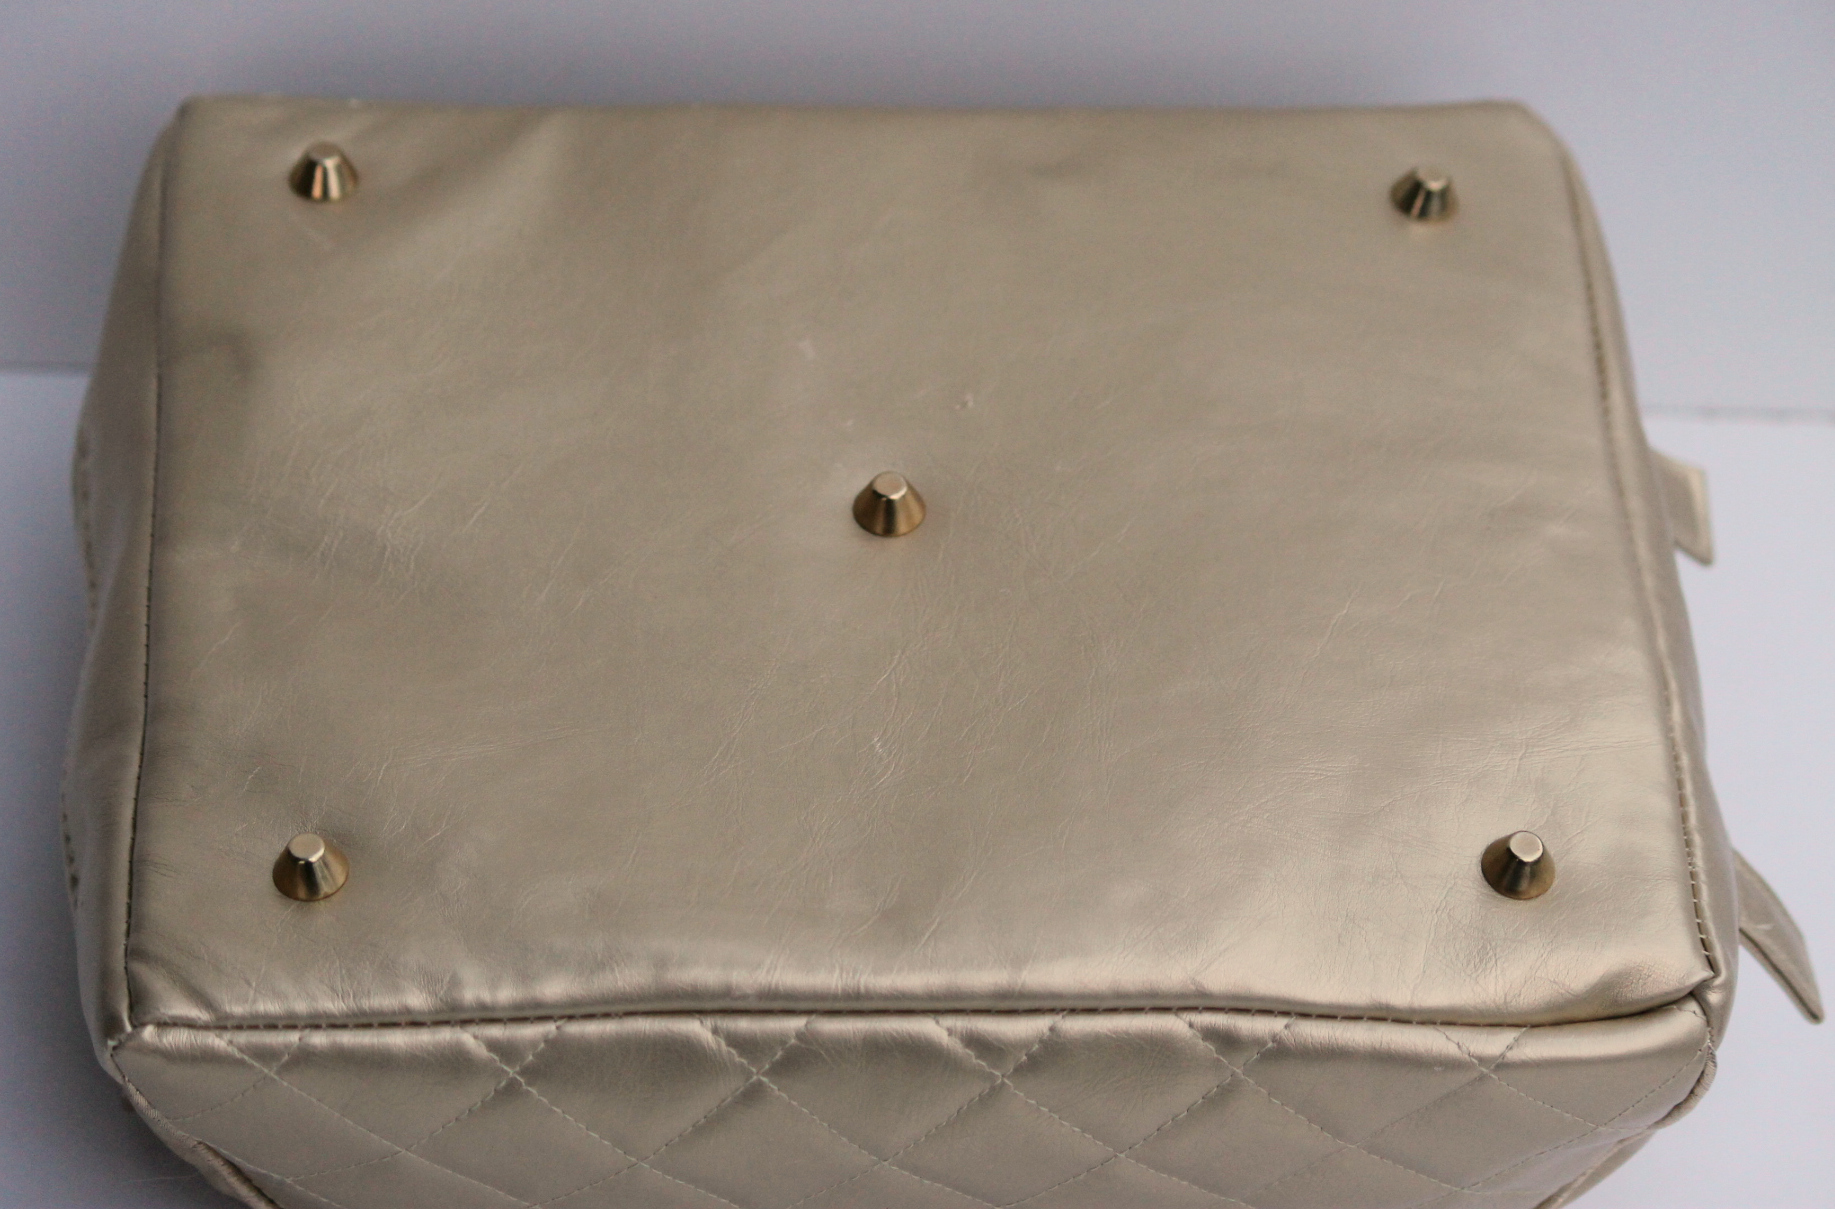
I also did a classy metallic gold faux leather version. It was easy to quilt the vinyl to foam for the side panels, and I recommend this, to add a little interest to plain vinyl. I also added some shiny gold hardware, including a Handmade in Canada metal label, bridge connectors for the handle and purse feet. My zippers on this one have gold teeth and shiny gold pulls. I did NOT make vinyl piping for this, (as that sounds about as appealing as cleaning a toilet: I hate making piping), I used a metallic gold piping that is available at Hobby Lobby in the US. (I have never seen it in Canada.) I have included a photo of it alongside the popular Clematis Pouch to give a feeling of the size.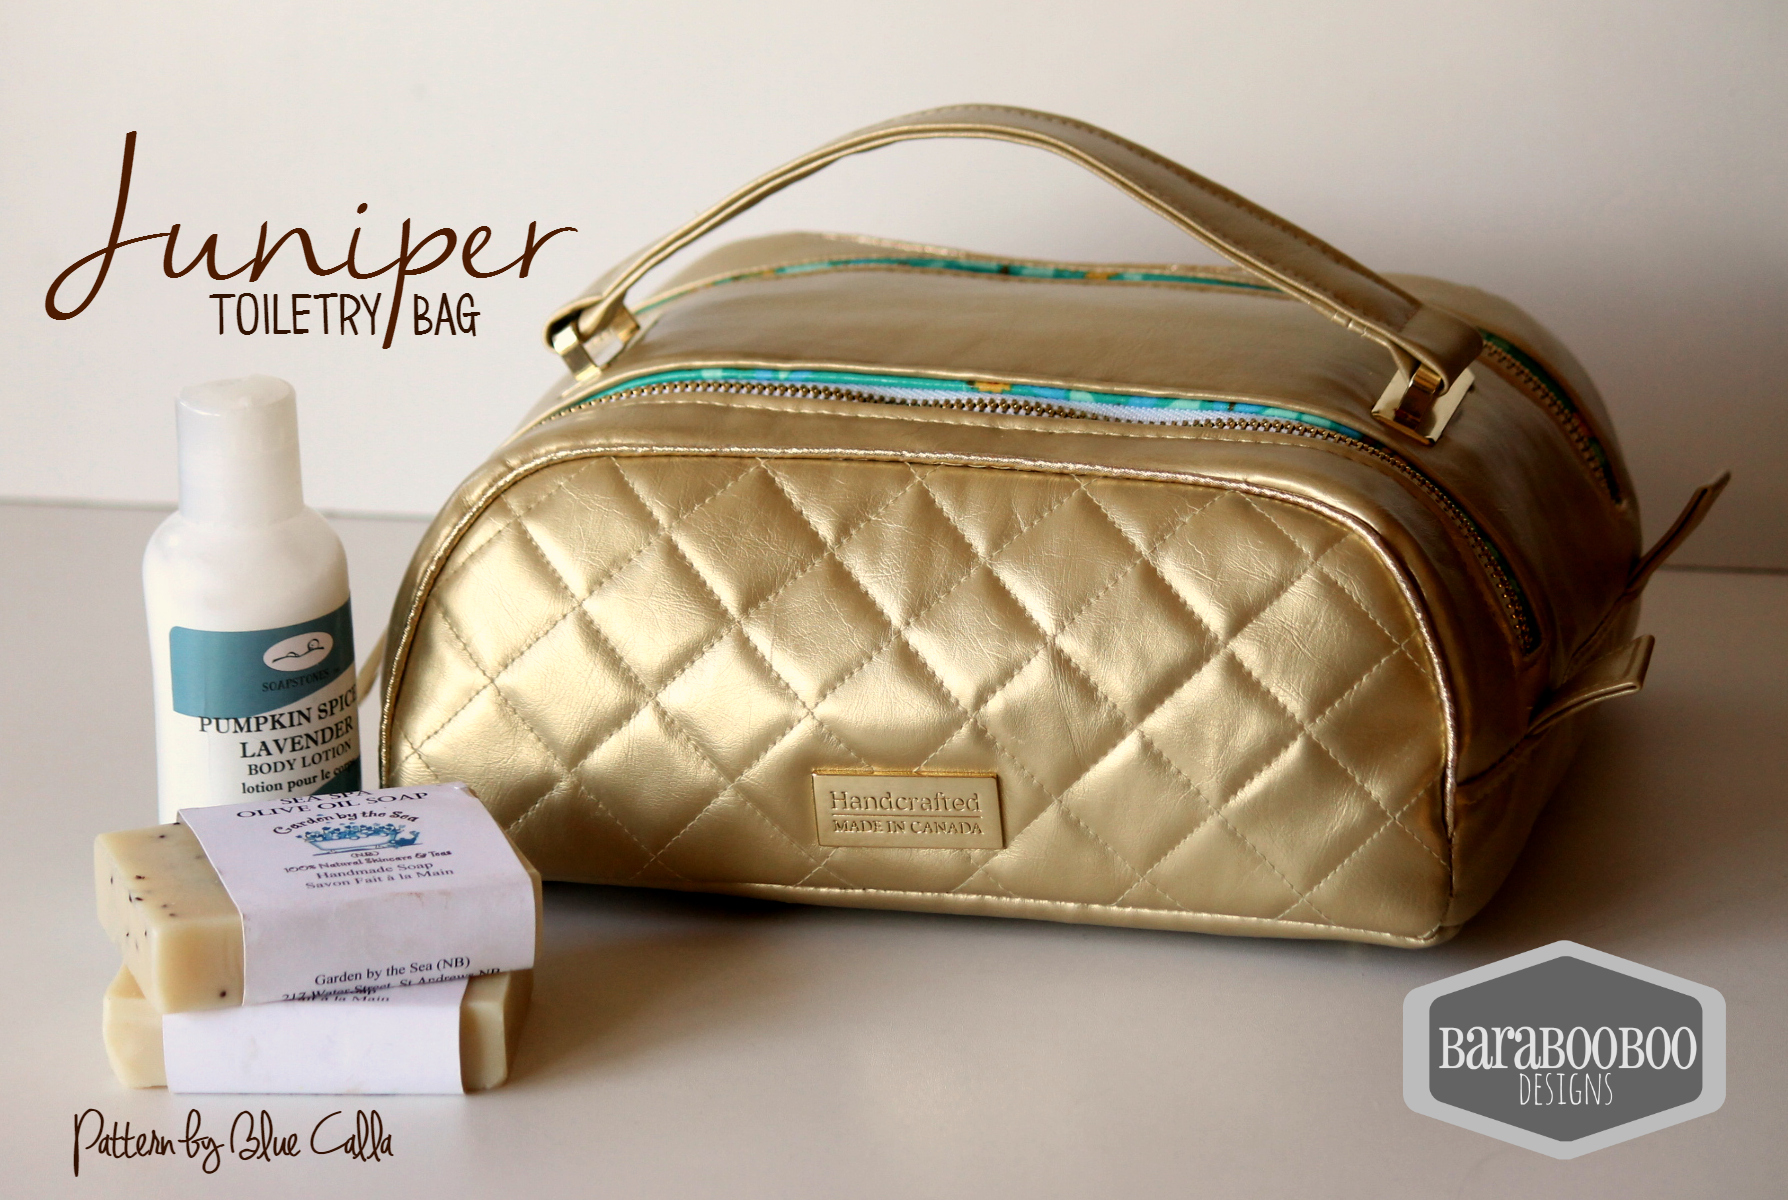


Next one: I ordered in this perfect fabric called Jubilee by Melody Miller for Cotton + Steel fabrics. I combined it with navy vinyl. It was meant to go on a bag like this! I just love it.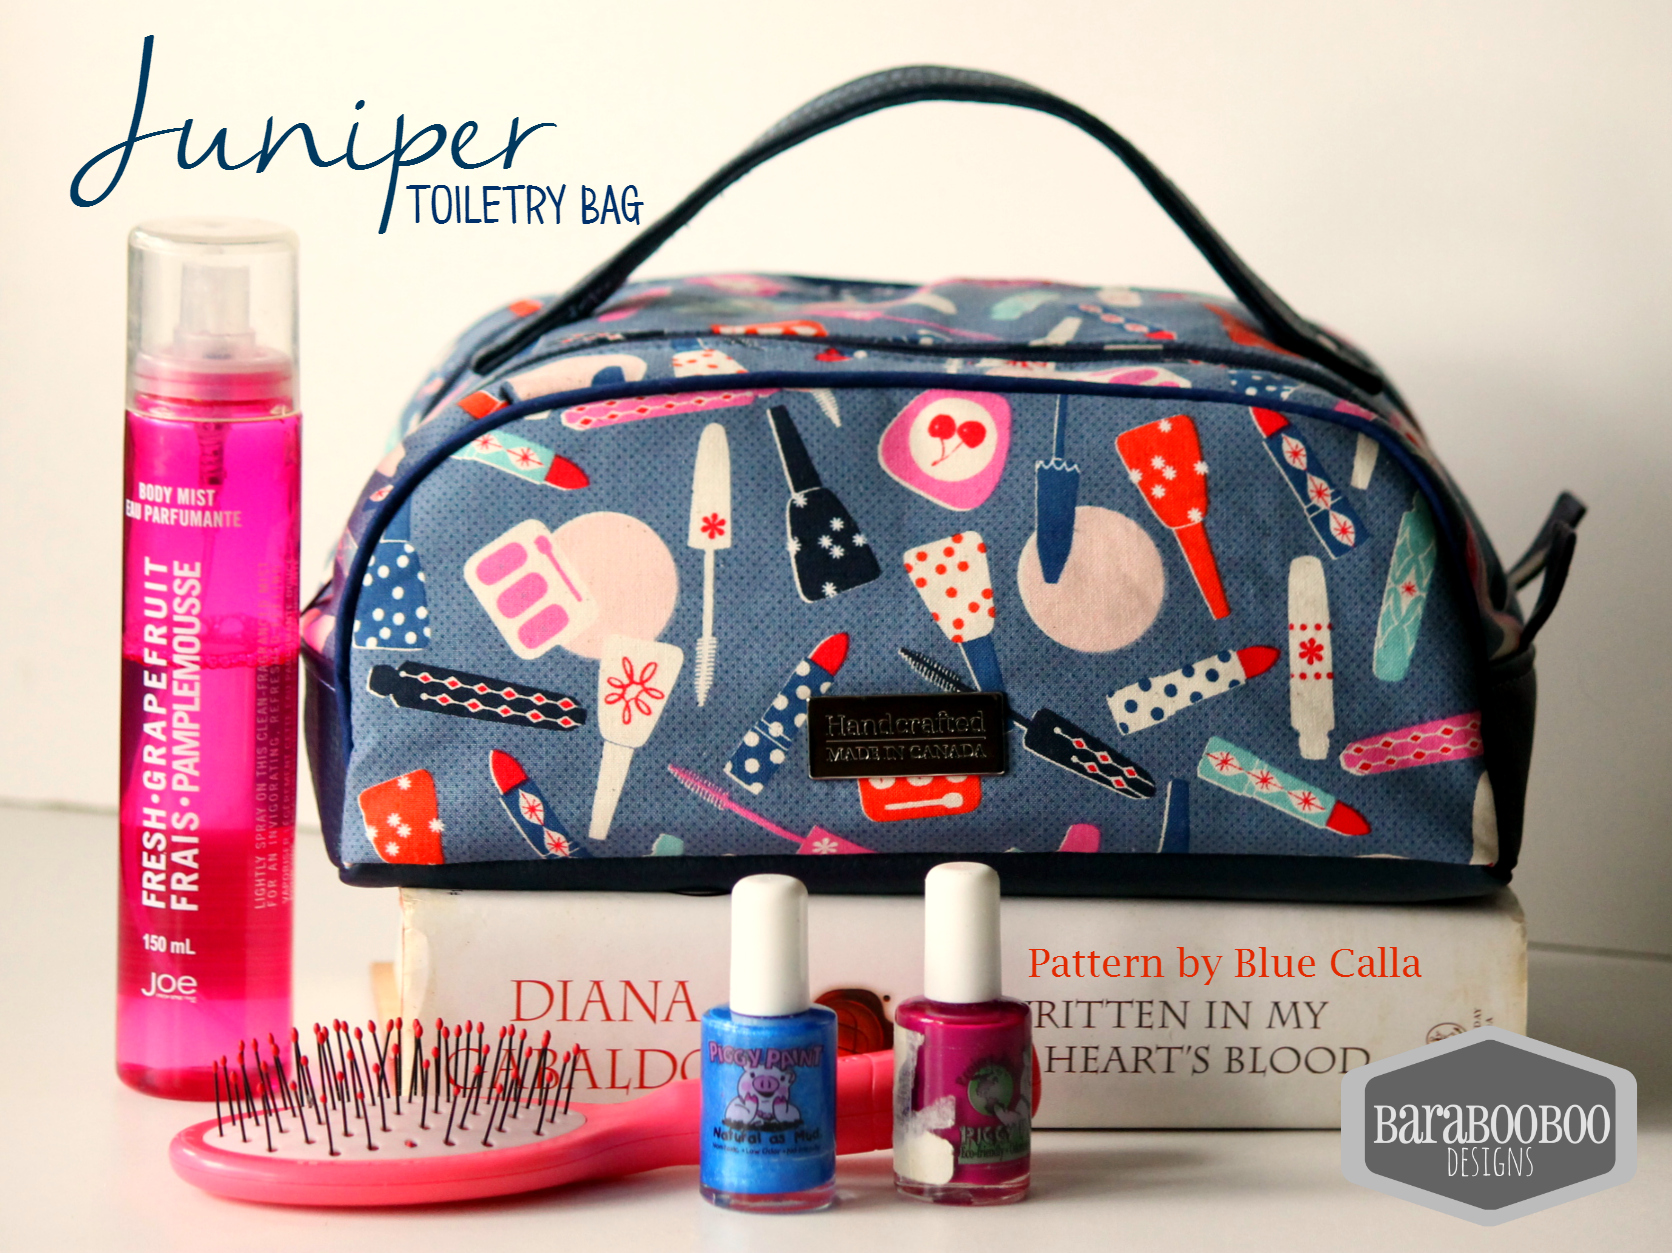
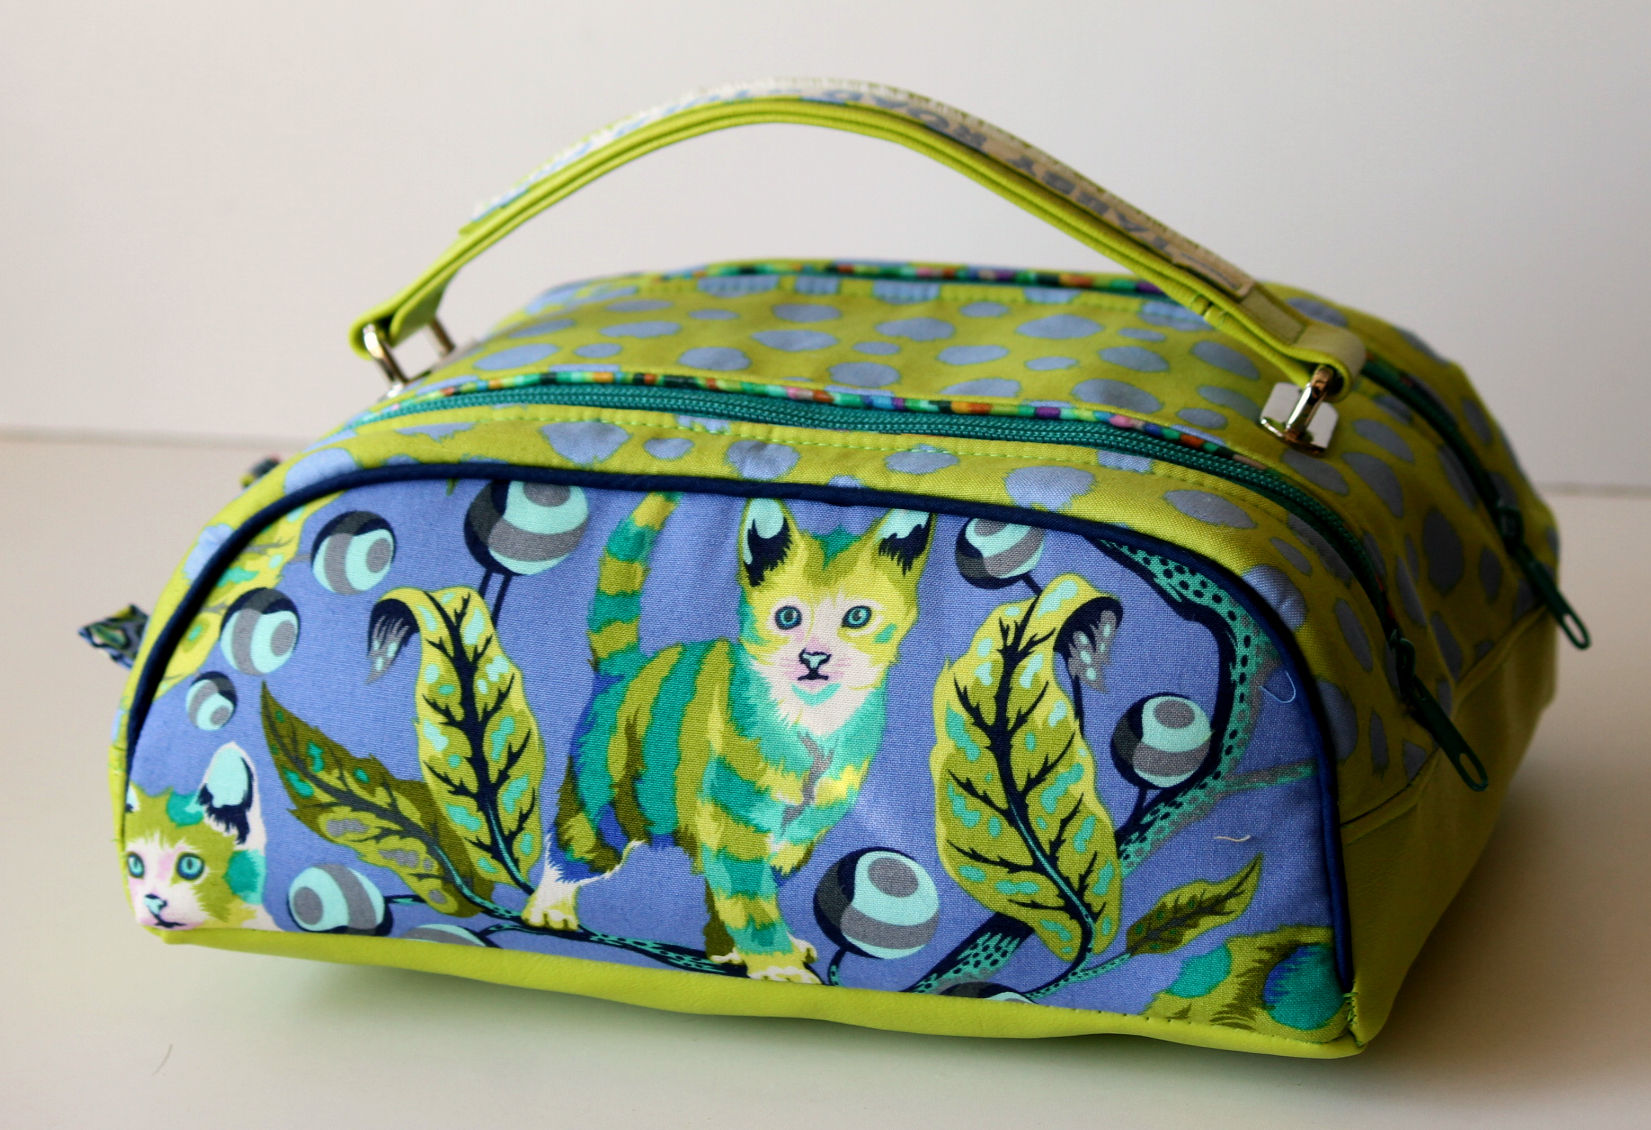
Finally, I did a “Tabby Road” version. I am a Tula Pink addict and although I am not really a cat lover (more of a dog person)…I broke down and bought a little bit of this line because the colours were really pretty. I combined it with lime green vinyl, and also featured a bit of the fabric’s selvedge on the handle. There are 2 different cats on this print, so I fussy cut each side to show off the 2 different kitties.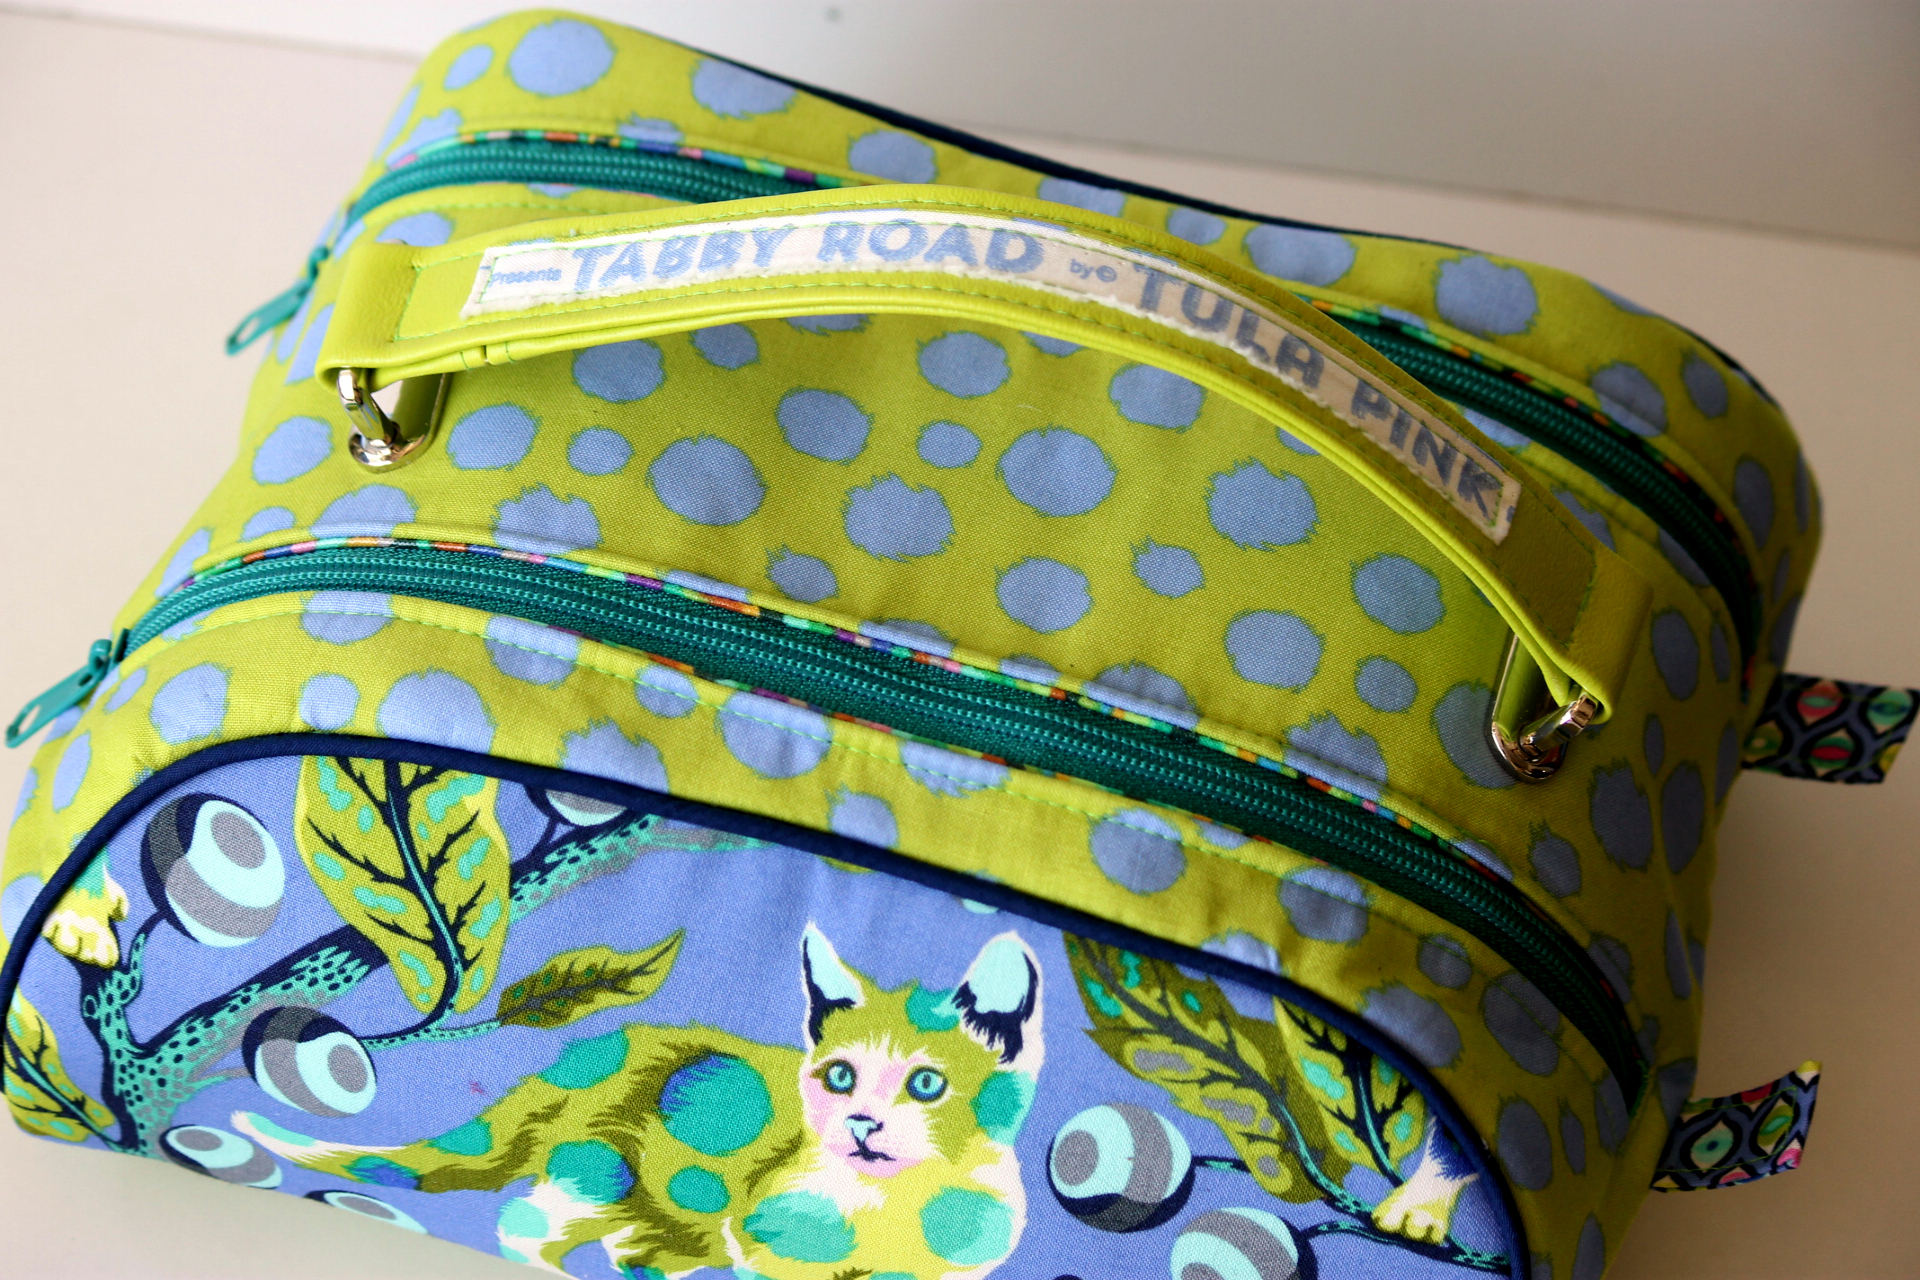
If you need a quick Christmas, Birthday, Father’s Day, Mother’s Day gift..this is your pattern! From start to finish it took me about 2 hrs. This is something everyone can use in one way or another. I am going to make some for my kids for summer camp and personalize them with their names.
The pattern will be available in 2 weeks! So, you’ve got time for some plotting and planning, or even a sweet little paper piecing for the side panel!
Michelle
Installing Grommets
I am often asked “how do you _____?”. (Fill in the blank with whatever you want.) So, every time I do something special on one of my bags I will do a photo tutorial for it. *KEEP IN MIND* that this is just MY way of doing it, I don’t claim to be a professional and I am just going to show you what works for ME!
Today I am going to show you how I install grommets, so you can do fun things like this:
Firstly, you need to buy grommets, punch, a setter and anvil. The setter and anvil often come as a set, and the punch is sold separately. VERY IMPORTANT: you must have a setter anvil and punch for each size of grommet you have (I only install 12mm because I am far too frugal to purchase other sizes of the tools!!). It also helps to purchase your tools from the same place/brand that sells the grommets you will be installing. They are not universal (I learned this the hard way). I got all mine on Etsy. I believe Joann’s and Fabricland sell the Dritz brand ones though so if you are need of doing it TODAY, then try them. Here’s the tools you will need: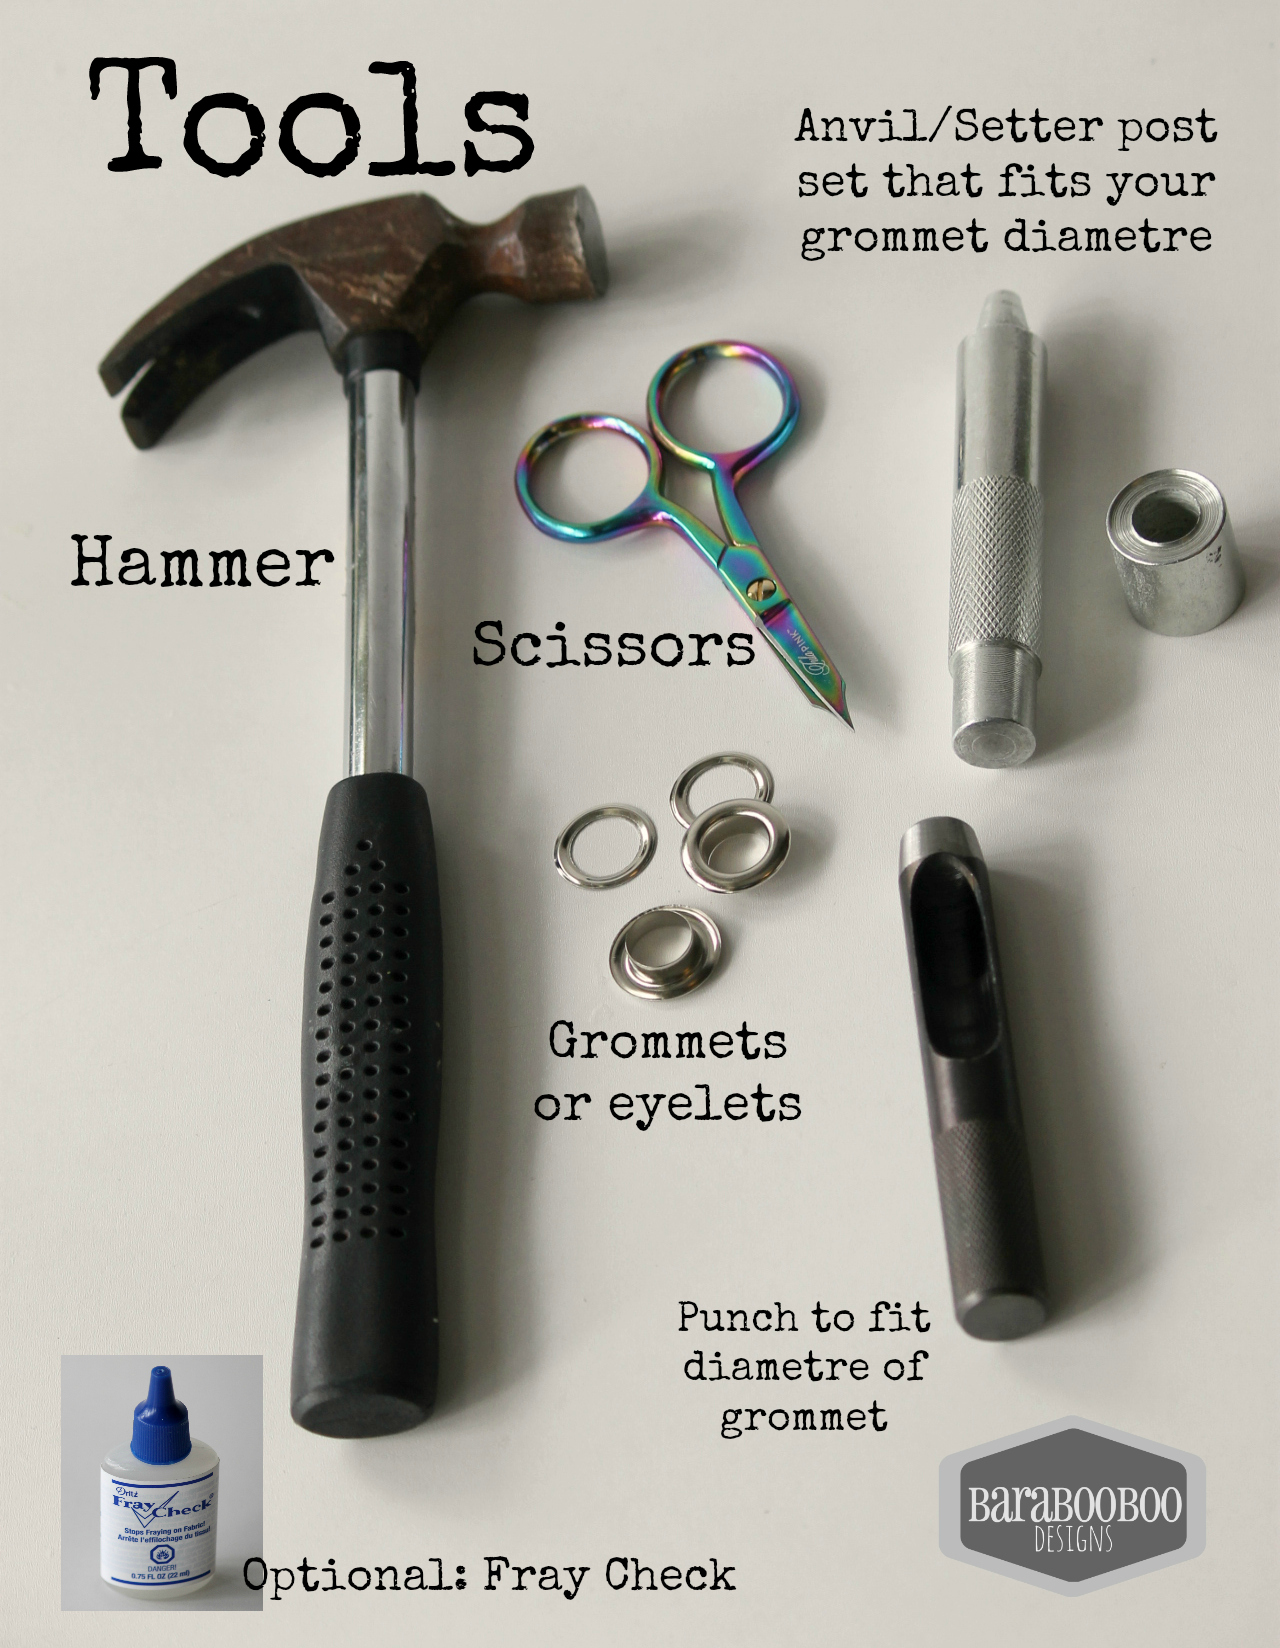
Next, mark the centres of where you would like to place your grommets. Then you can use your punch to cut the hole out. The side of the punch has an opening so you can see your marking on the fabric and get it centred. You can hammer the top of the punch to cut out the hole. I find on the thinner bag sections sometimes the punch doesn’t go all the way though even after hammering REALLY hard, so I lean it slightly to the side in sections and it seems to cut better…but sometimes it STILL doesn’t cut through so in this case I use my teeny, tiny Tula Pink scissors to finish cutting the hole out. Life is hard sometimes.
You can treat the raw cut edges of the hole with Fray Check. (this is optional, but I figure if I am going to the work of doing this, I certainly don’t want my holes to fray!). Take a look at your grommets they have 2 halves to them.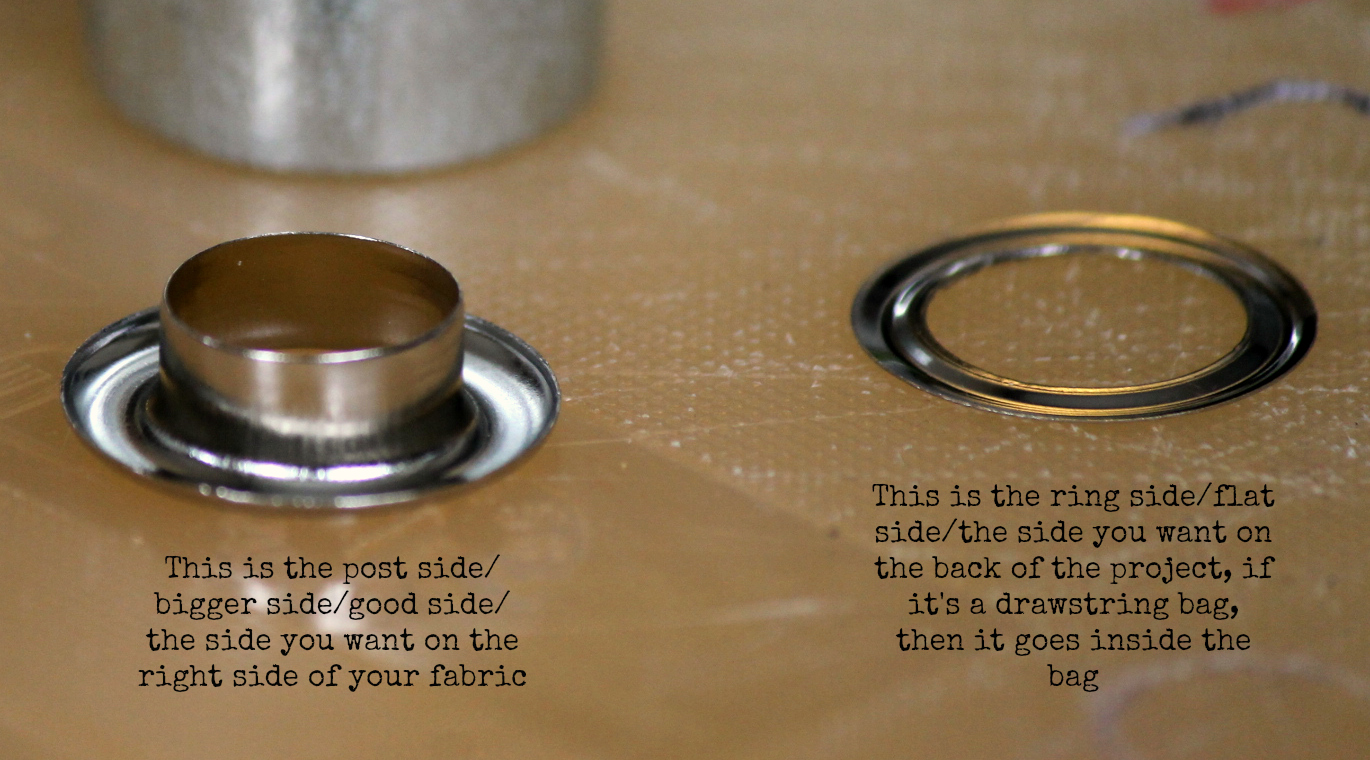
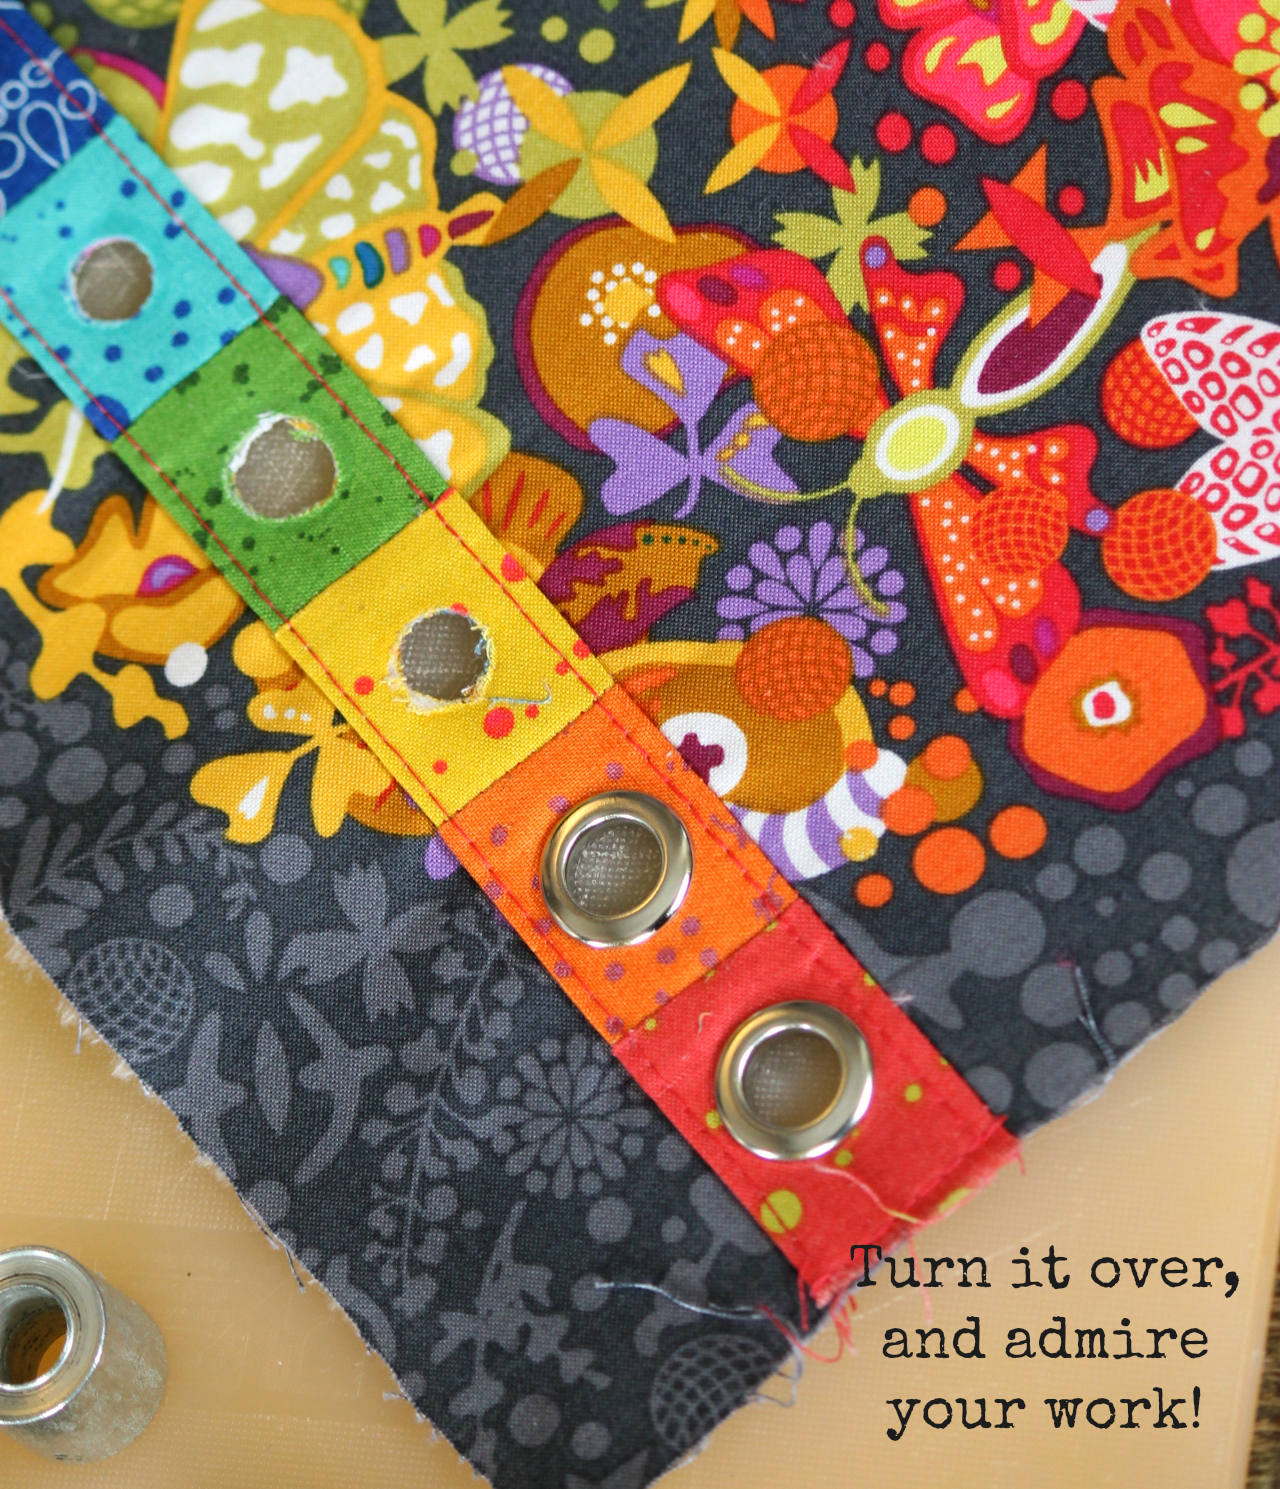
After you have punched your holes, find your anvil and the bigger (post) side of your grommet.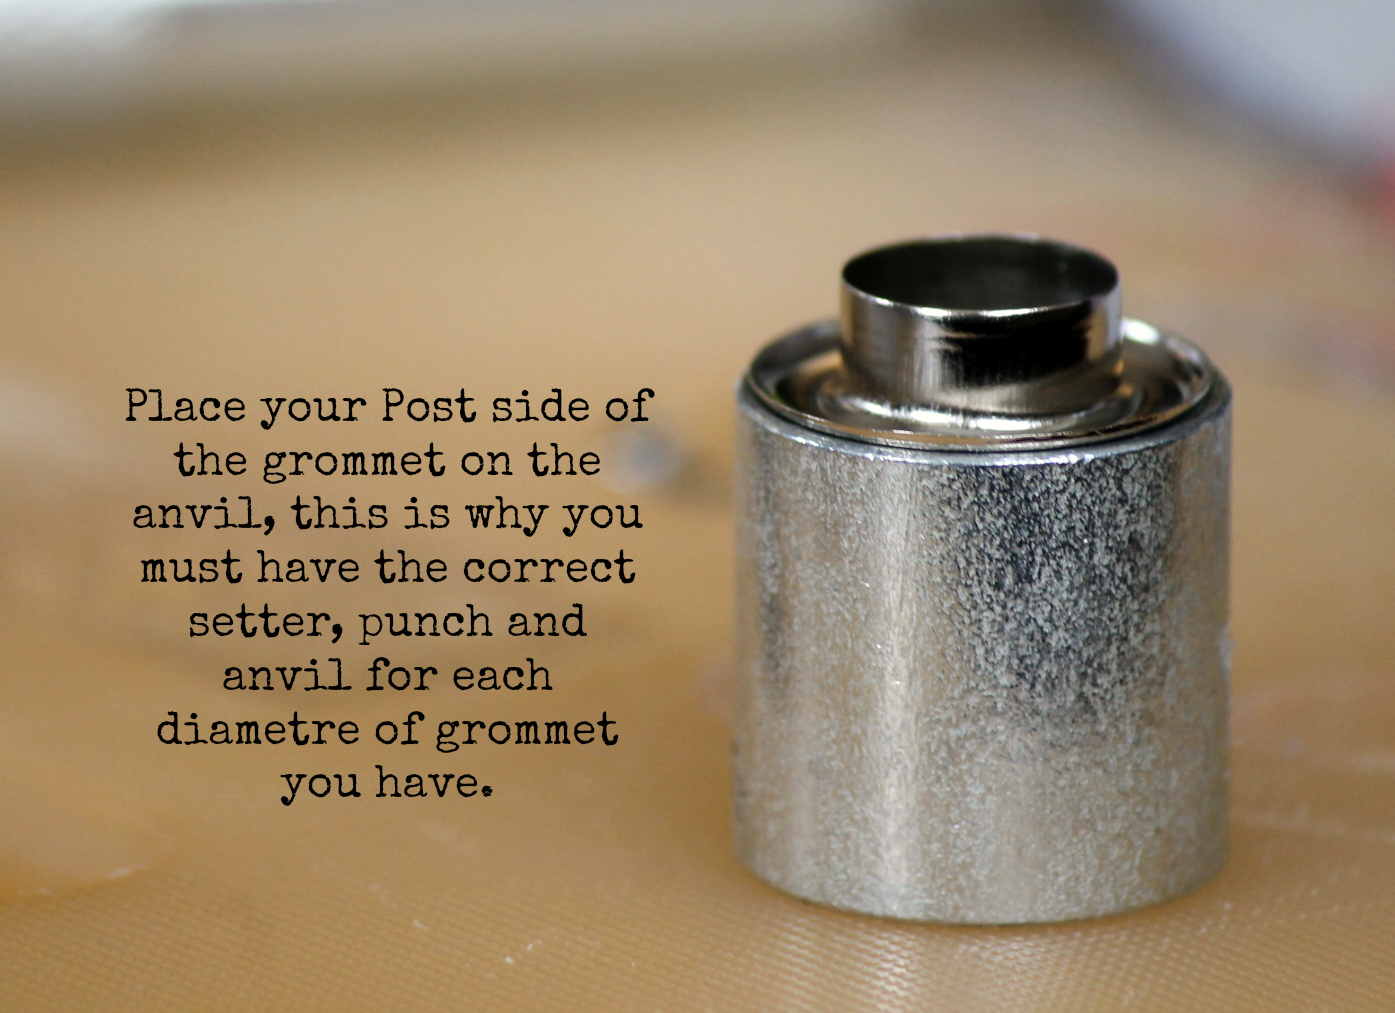
Place your project “Good Side Down”.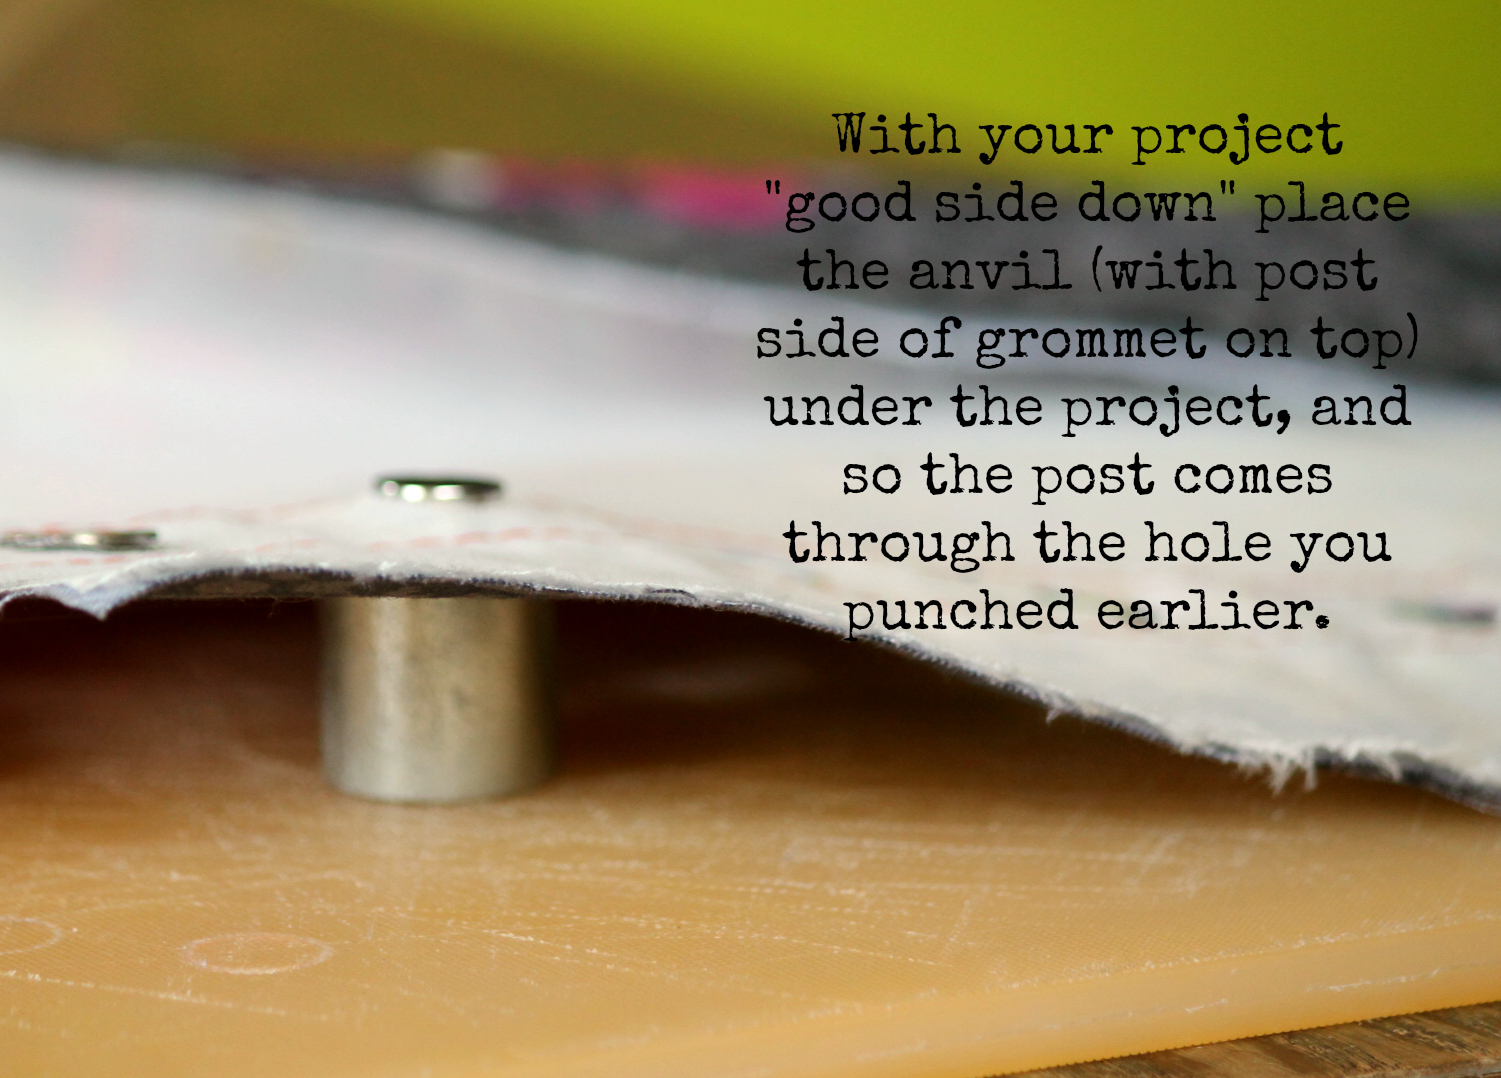
Find your “ring side” of your grommet.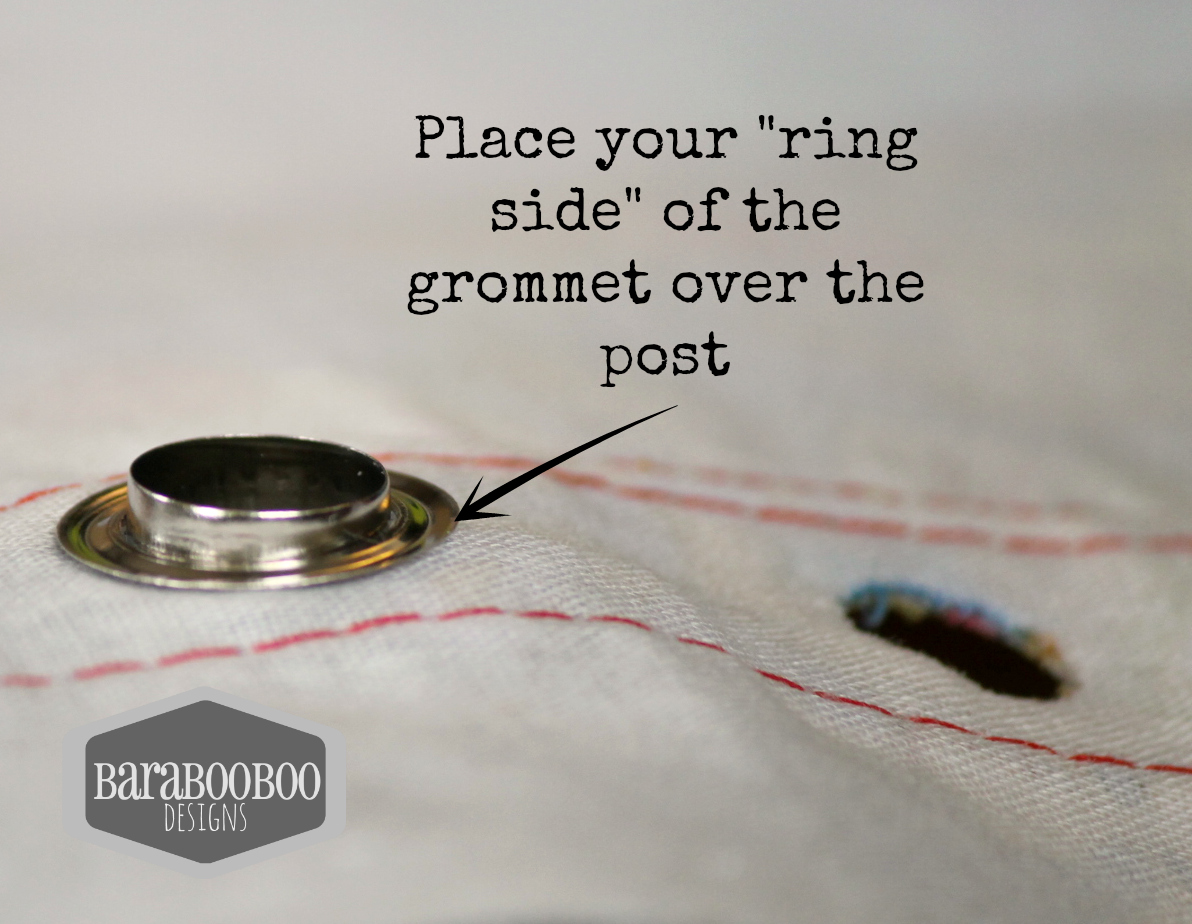
Get your setter tool.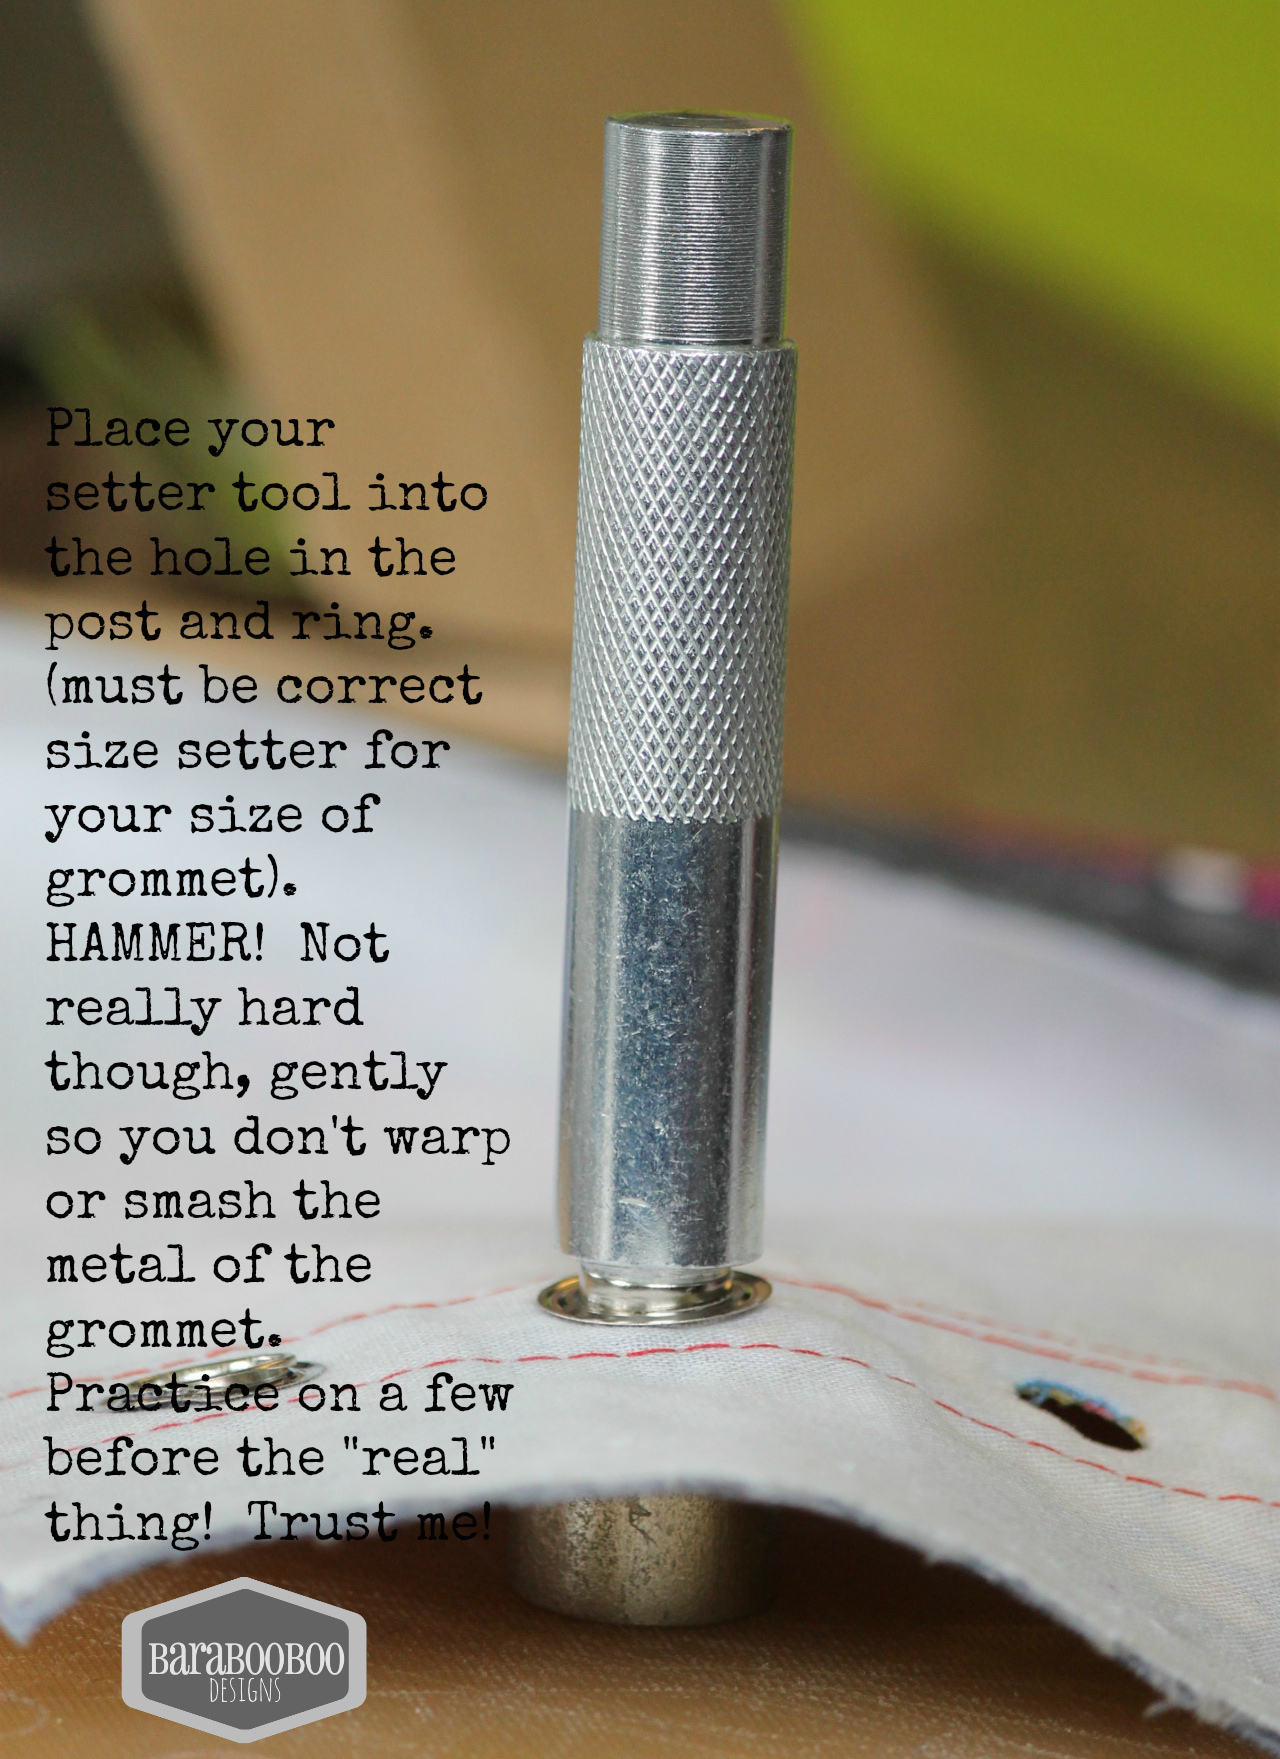
and hammer gently. Make sure to inspect the grommet after you remove the setter tool. All the edges should be pressed down, if any edges are sticking up then it needs to be hammered a bit more, it shouldn’t be sharp at all. If for some reason you need to remove a grommet, I do it by prying them apart with whatever tool I can under the edge, be patient…you can usually pry, tear, cut it out and start fresh with a new grommet.
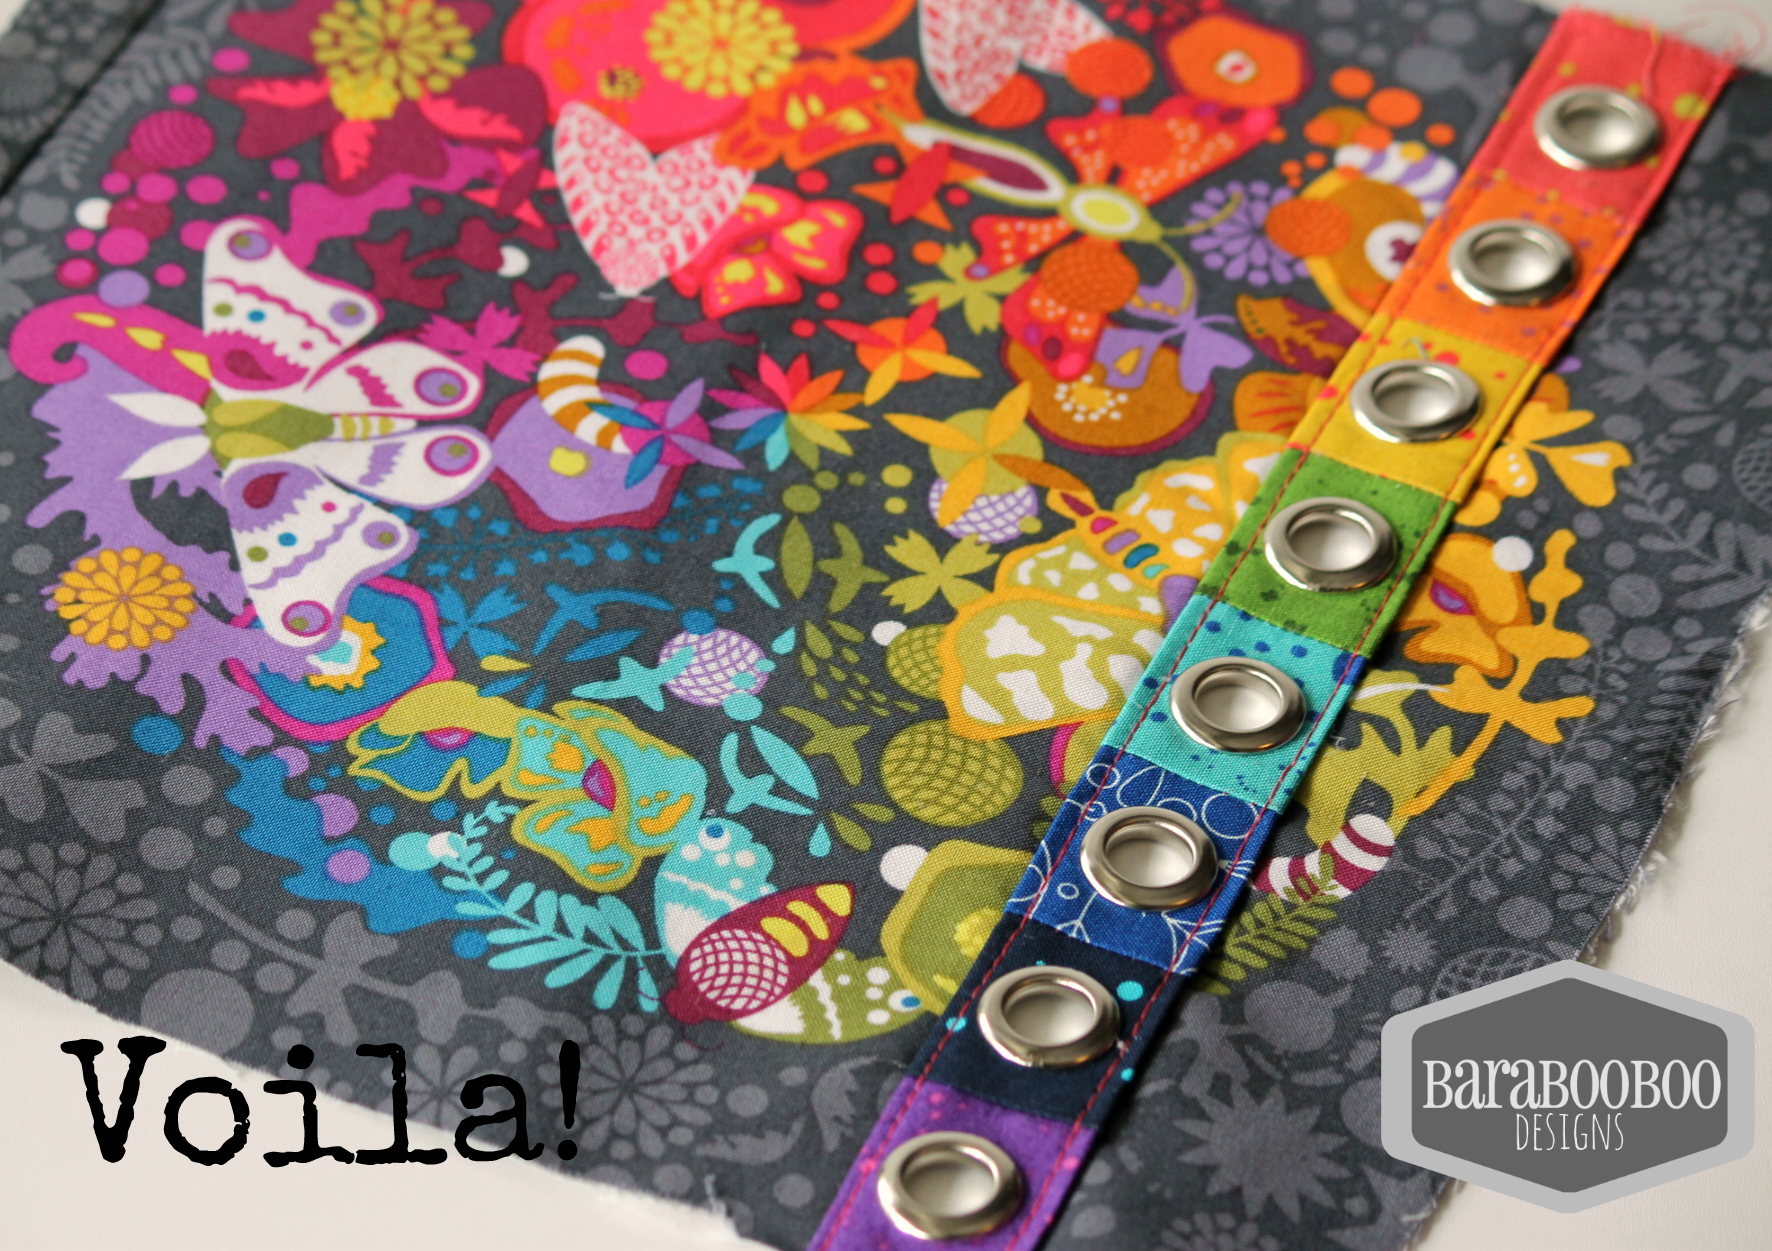
I hope you will find this useful! I would love to see what you have made!
–Michelle
Selfish Sewing
Sometimes, I set my bag orders aside to make something for no reason at all, except for pure pleasure. Yesterday, was one of those days. I have no planned destination for this, as I think it’s a bit big for a bag flap at 16″ wide. So, I will need to think on it for a while. I could always make a cover for my sewing machine but my machine is never not in use so doesn’t really require a cover. Maybe a large bag though such as a duffel or a tote…I need to look through my patterns!
(this post contains 1 affiliate link to a pouch pattern, that I will be compensated for if someone buys it)
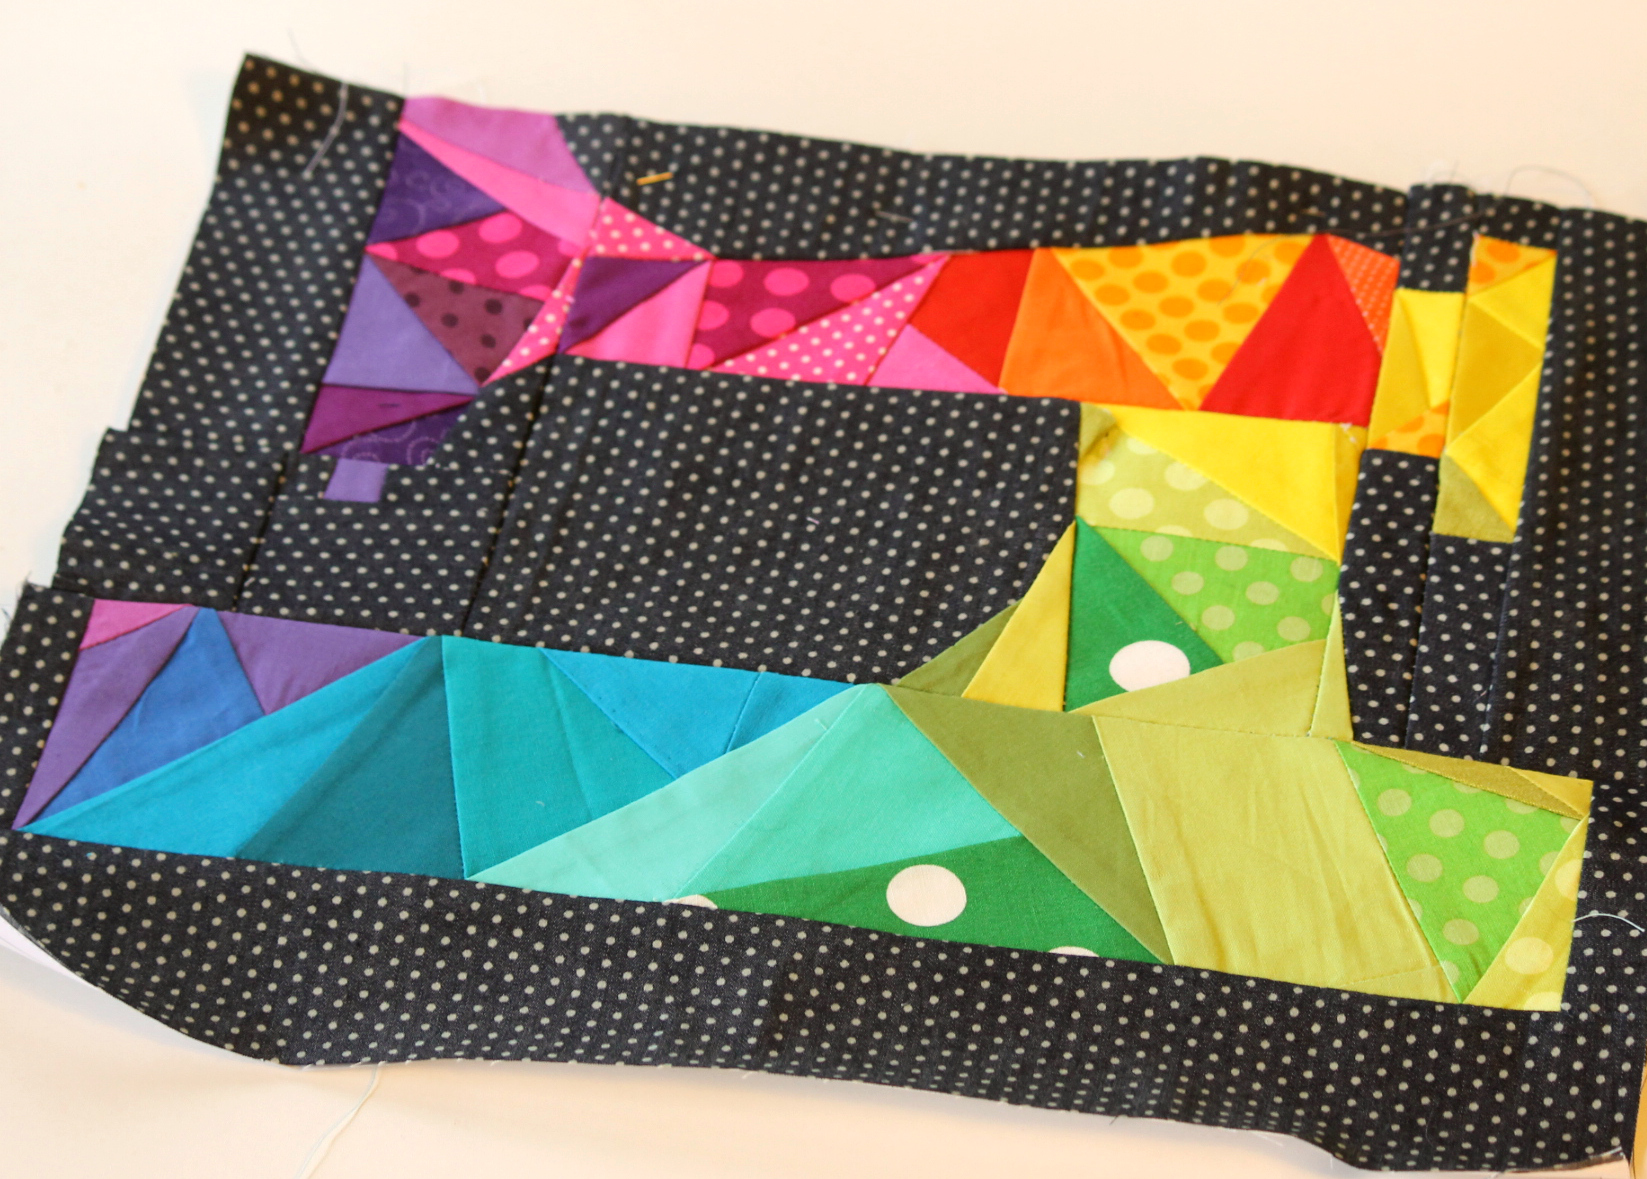
I bought the Sewing Machine paper piecing pattern from Quiet Play’s Craftsy Shop. I love their piecing patterns, and it’s not difficult at all to do. There are many free tutorials and videos on the web if you google for them. I can’t remember which one I used as it was so long ago. Here’s what the pattern looks like, I just print on regular printer paper because I cannot be bothered to change my settings to accept a thinner paper, and also I don’t actually have thinner paper. The regular paper is slightly harder to remove at the end, but it’s no big deal really.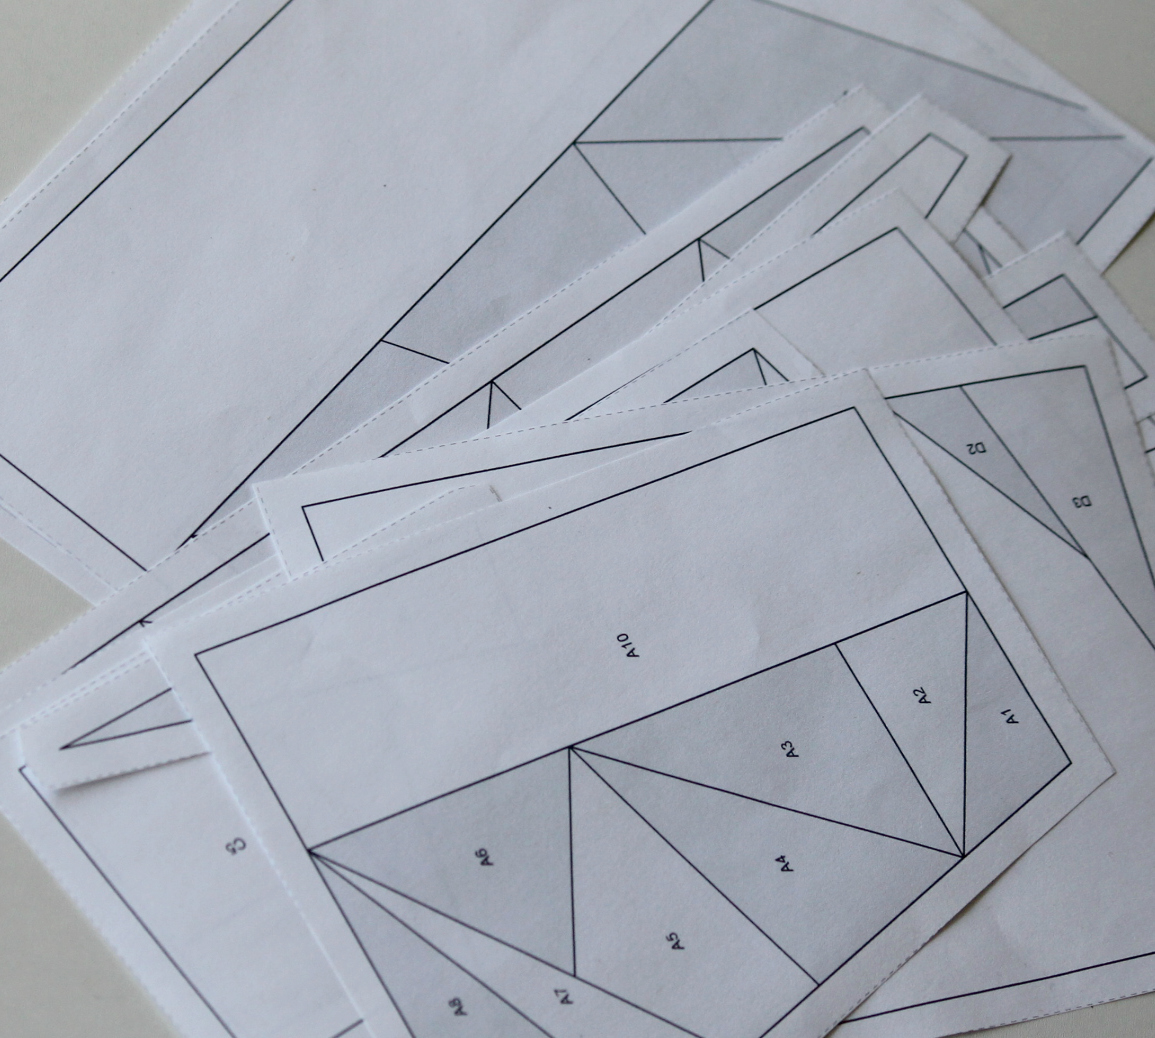 Then the next part is always my favourite, sometimes I spend hours doing it but not this time as I needed a rainbow and that only takes a few minute to pull from my stash. I don’t own solids in EVERY colour so I supplement with some polka dots when I do rainbow piecing.
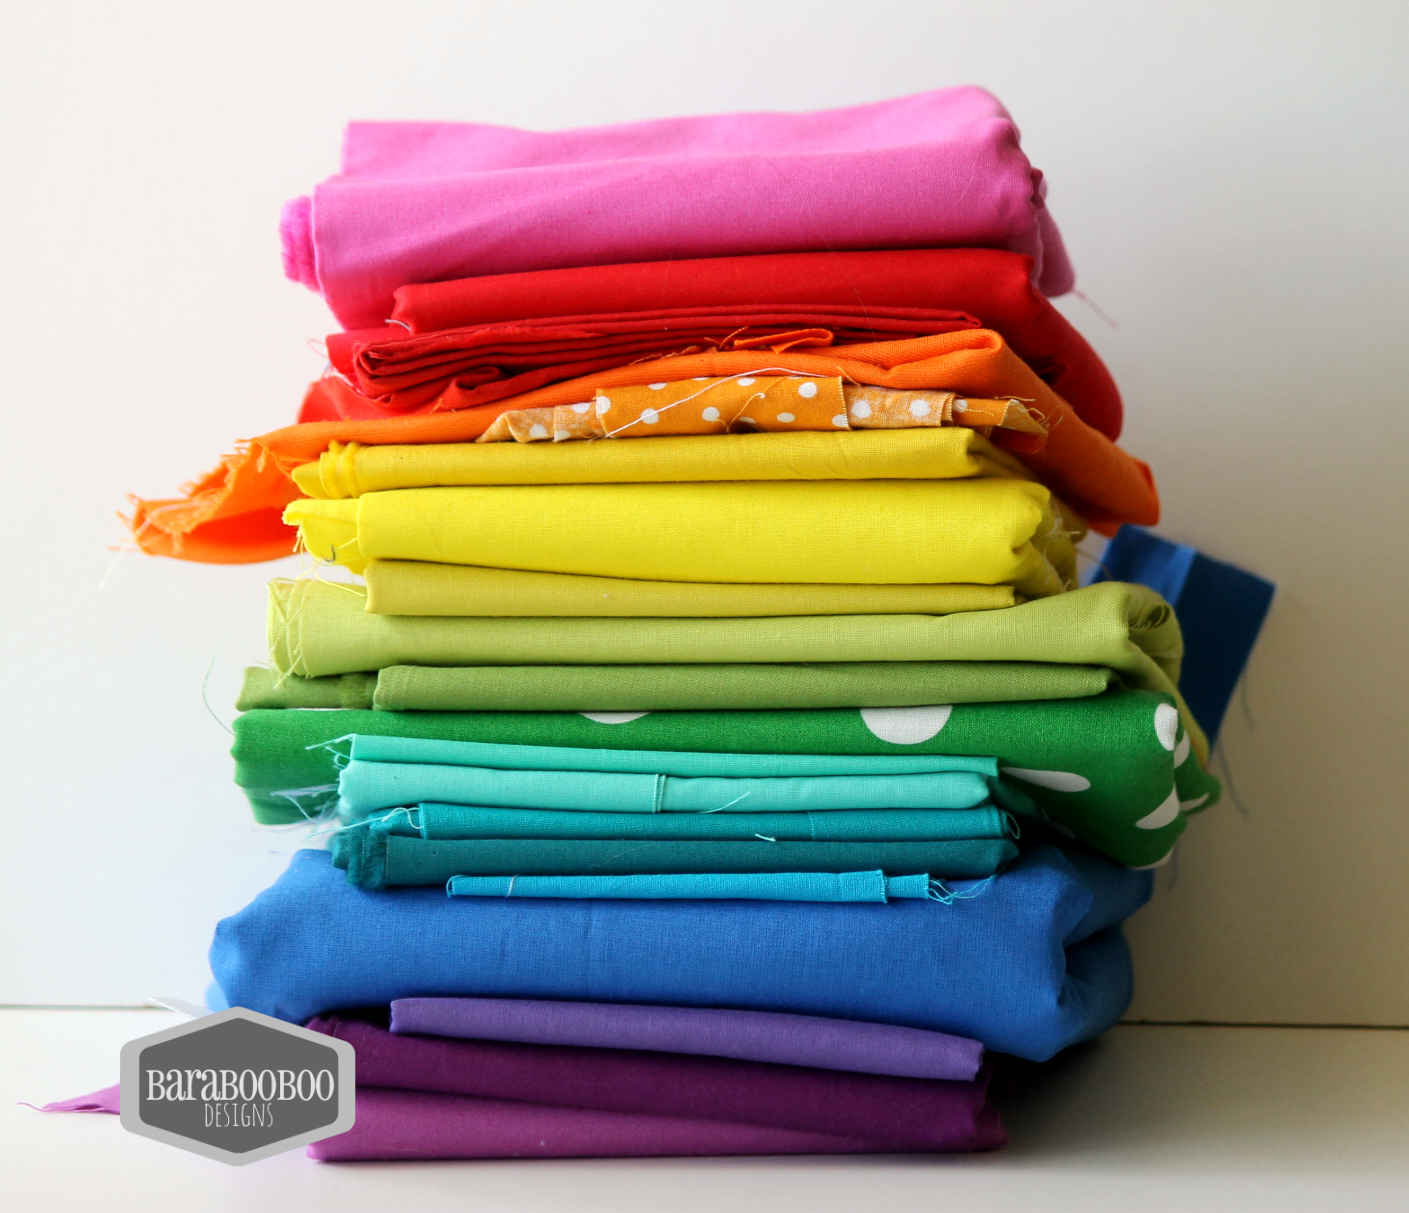
Then, I just start sewing…and I keep going until it’s done. It’s only a few hours to piece the whole thing. Don’t be alarmed at how the back looks, it’s a messy business, paper piecing. Or at least it is when I do it.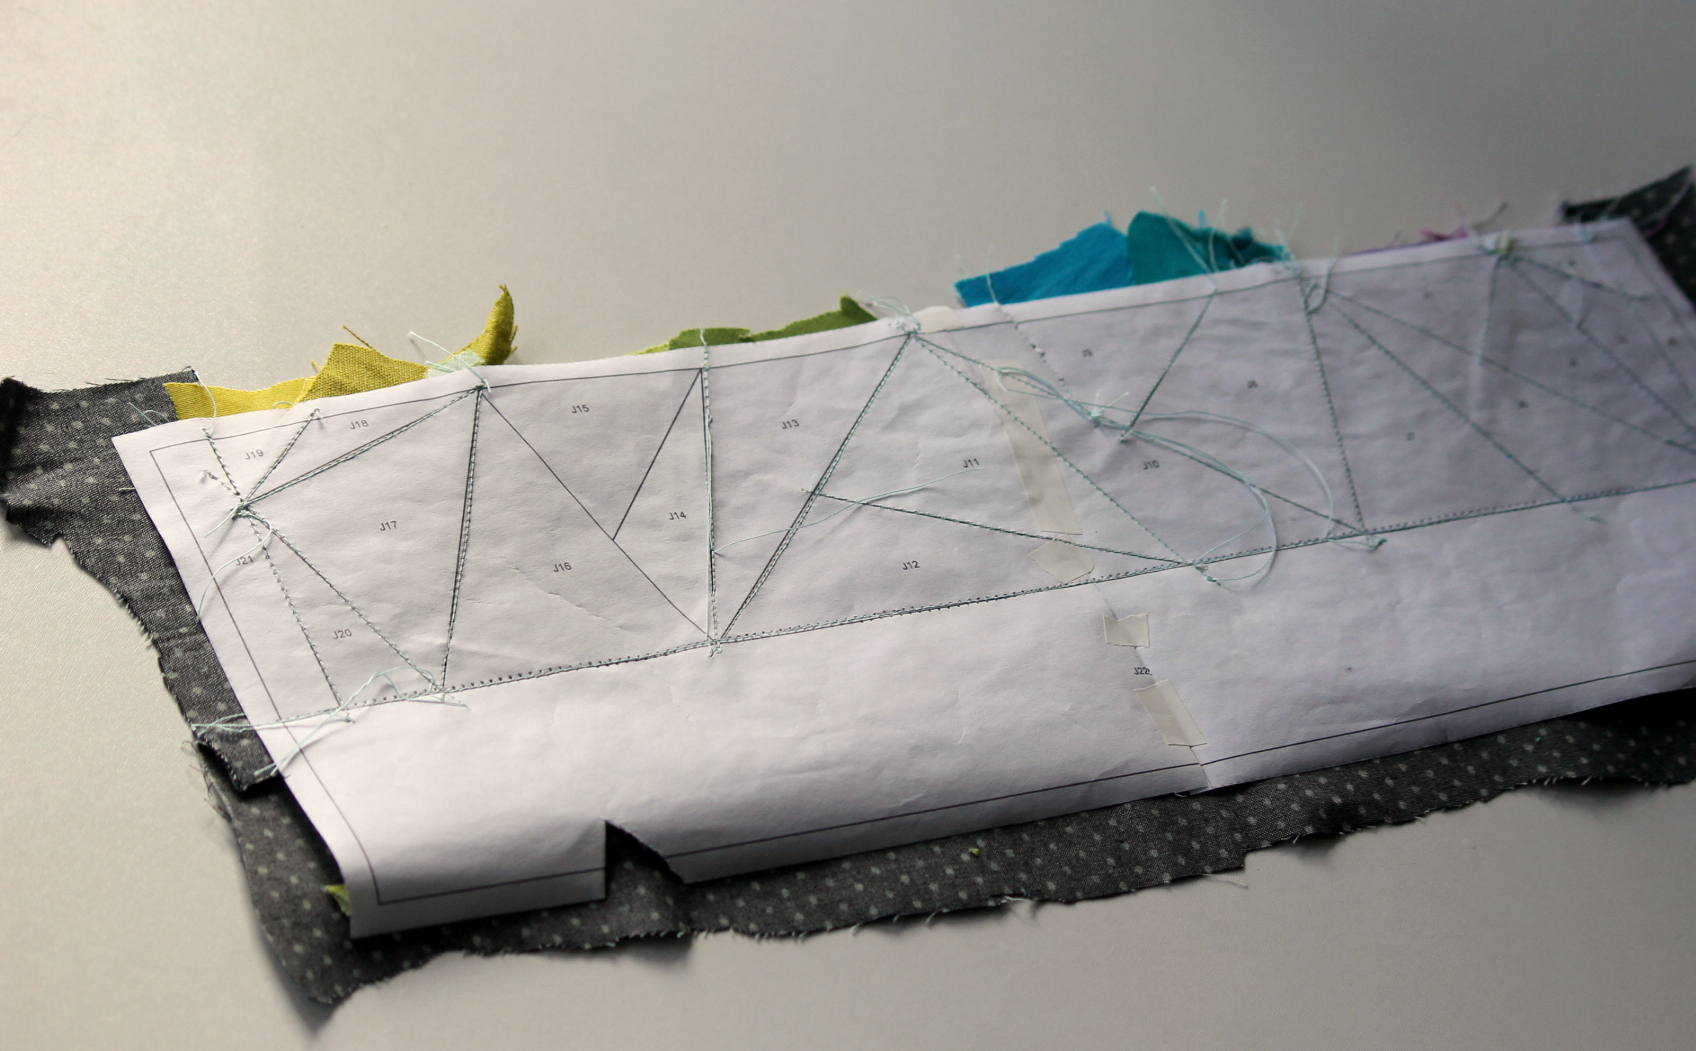
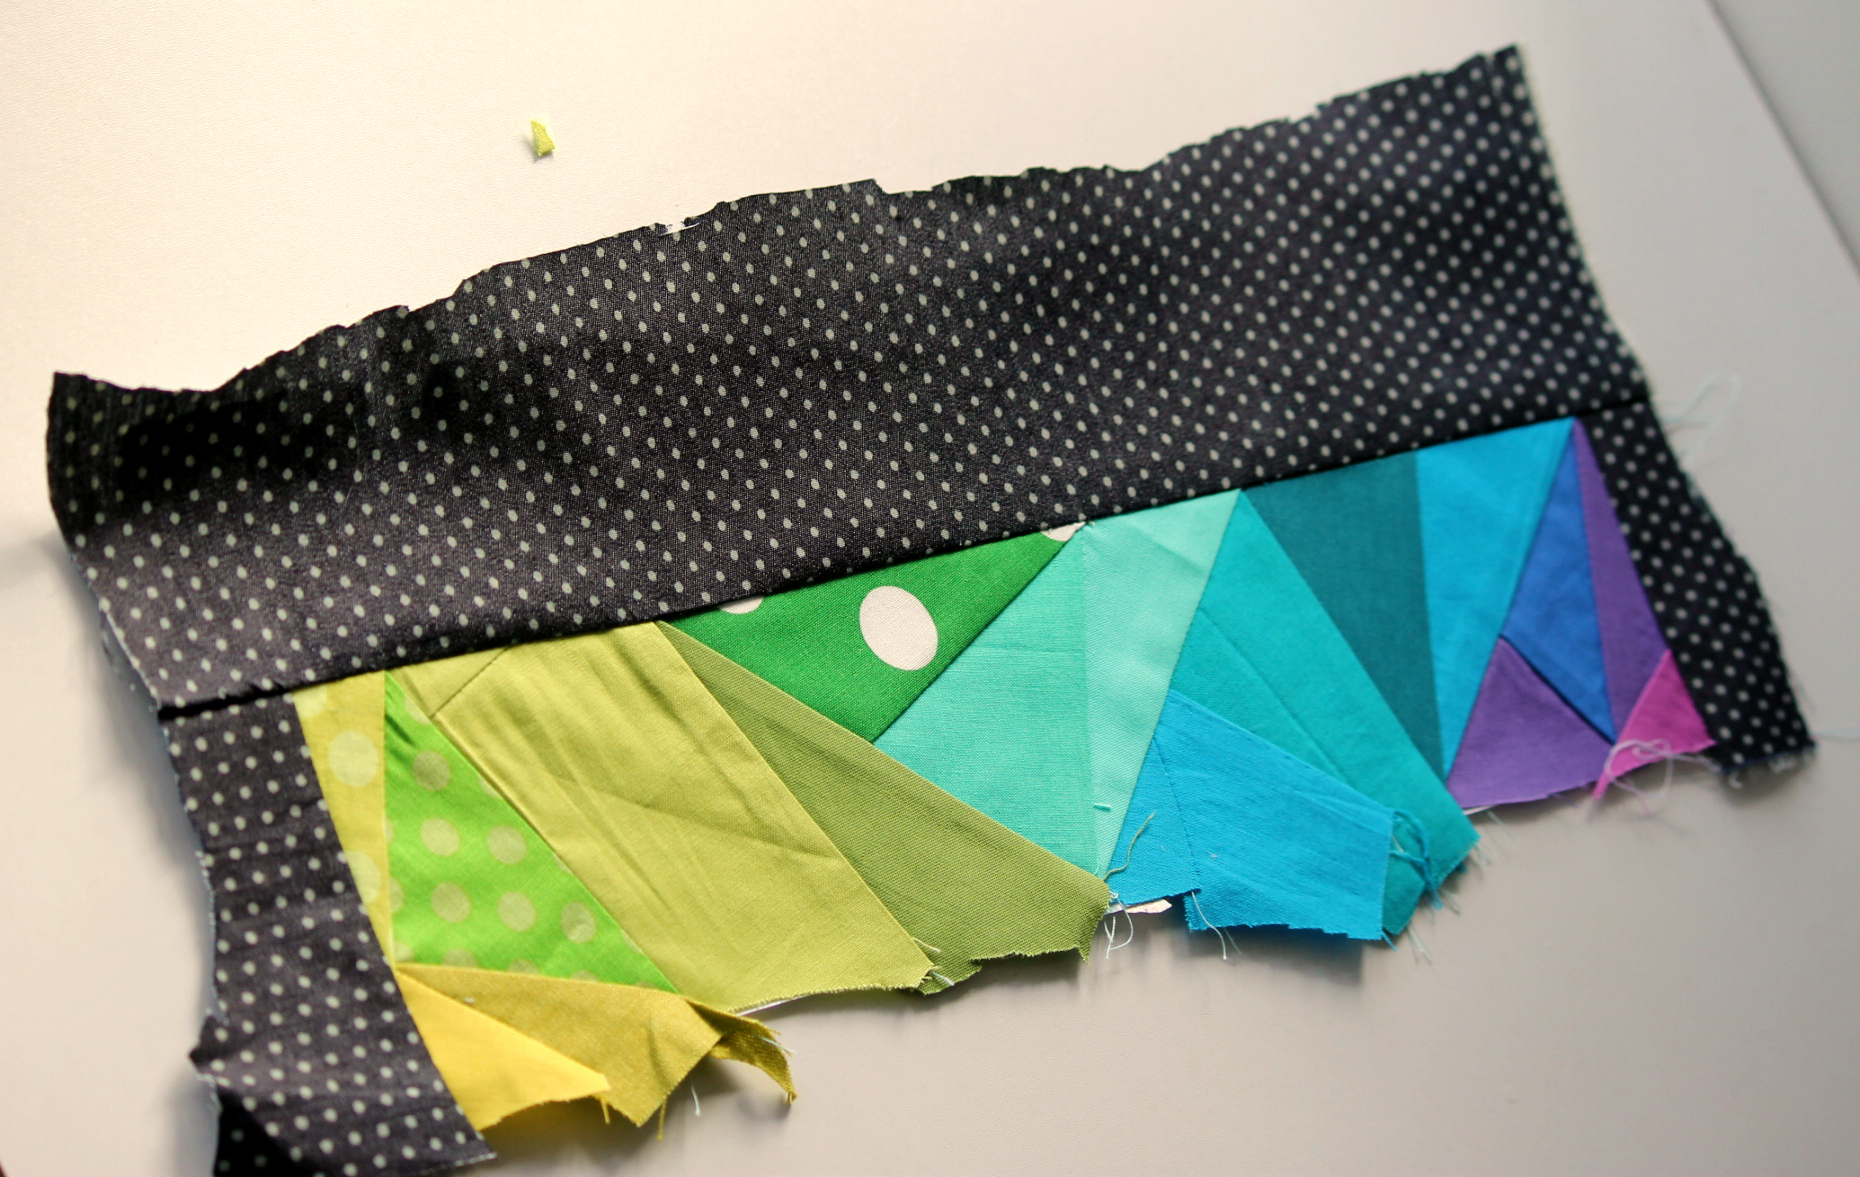
It’s done in sections, that are joined to make rectangular pieces that are then sewn together to make up the whole block. Here’s the finished block, it does need a strip of black across the top but I won’t add that until I figure out what I am making from it. 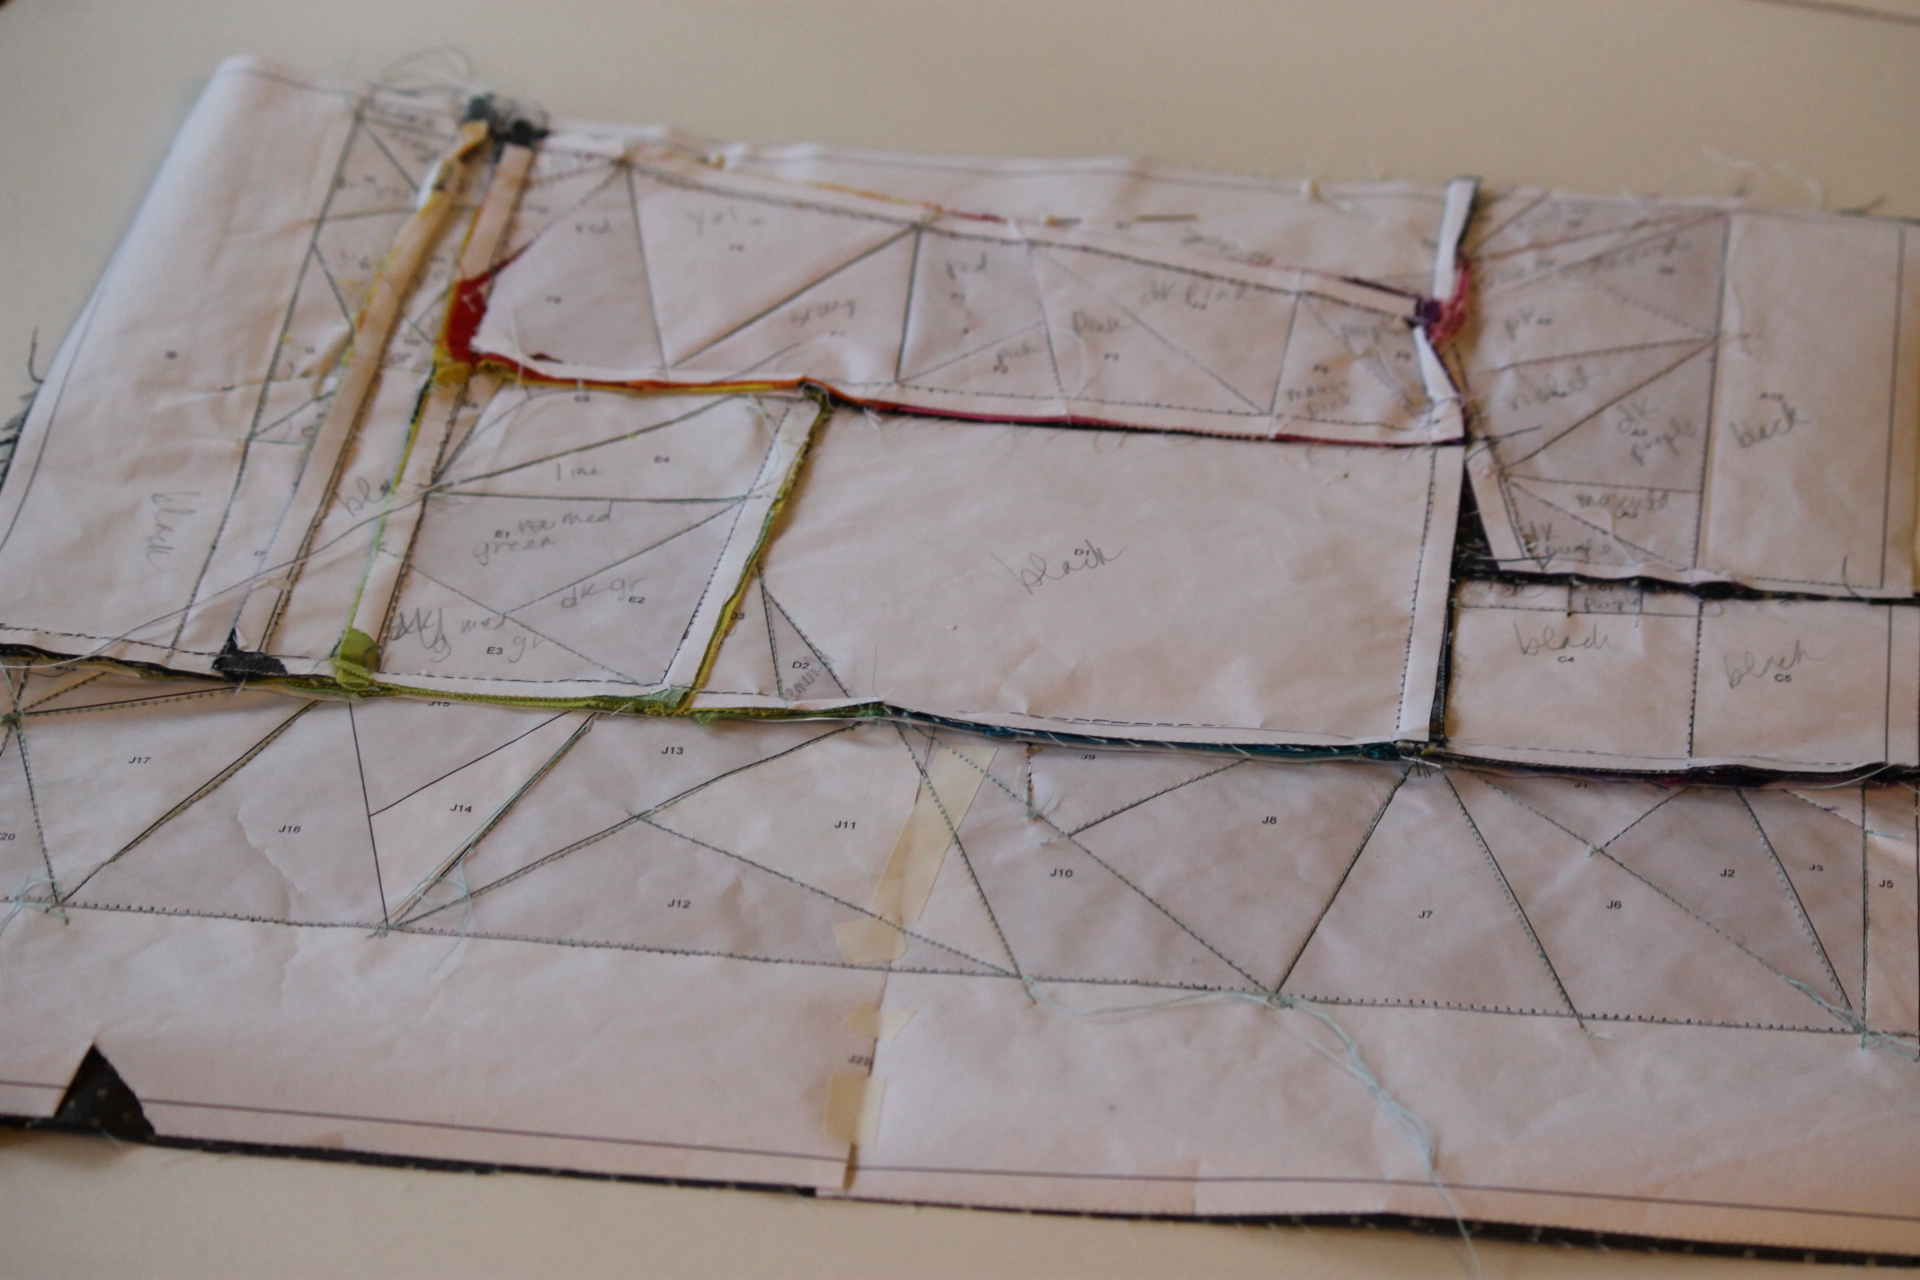
 There’s nothing like the satisfying feeling of finishing a pretty block! A while ago I also bought the MINI Sewing Machine block from Quiet Play, and I made it into a Filigree Double Zip Pouch pattern by Sew Sweetness. I made this one for a swap.
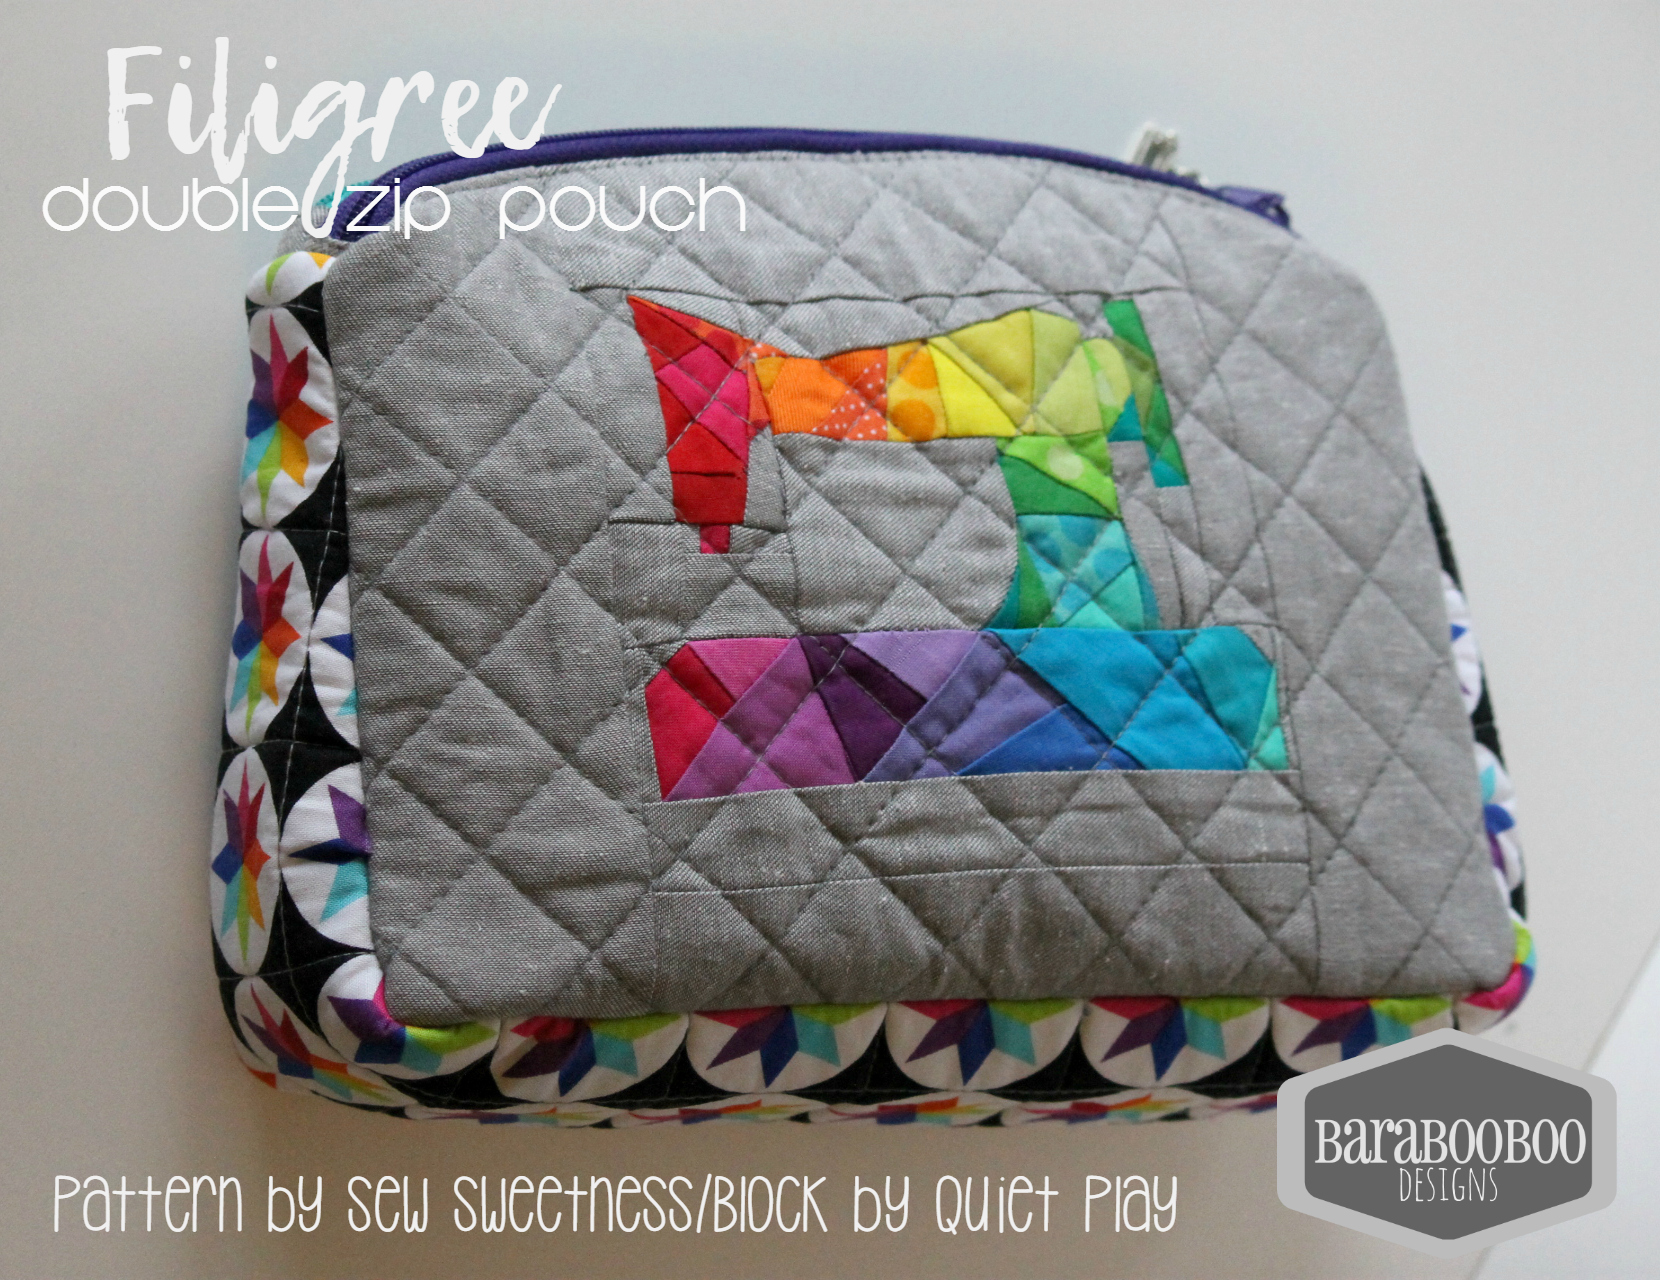
I hope this post will be a little brightness in your day, and inspire you to maybe give paper piecing a try. It really is easy and FUN! There are many, many FREE patterns out there, Quiet Play has several on Craftsy but if you search with their search engine you can find even more.
Sweet Pea!
(This post has affiliate links, I would be compensated if you purchased another pattern from the website, but this pattern is actually FREE!)
I think it’s fair to say we all love FREE stuff, right? I test patterns for Blue Calla Patterns and I tested this adorable little pattern a while ago. This is the Sweet Pea! It’s a FREE pattern. Isn’t it just so … sweet? My daughters love this size of bag, but it’s also a great size for adults too.
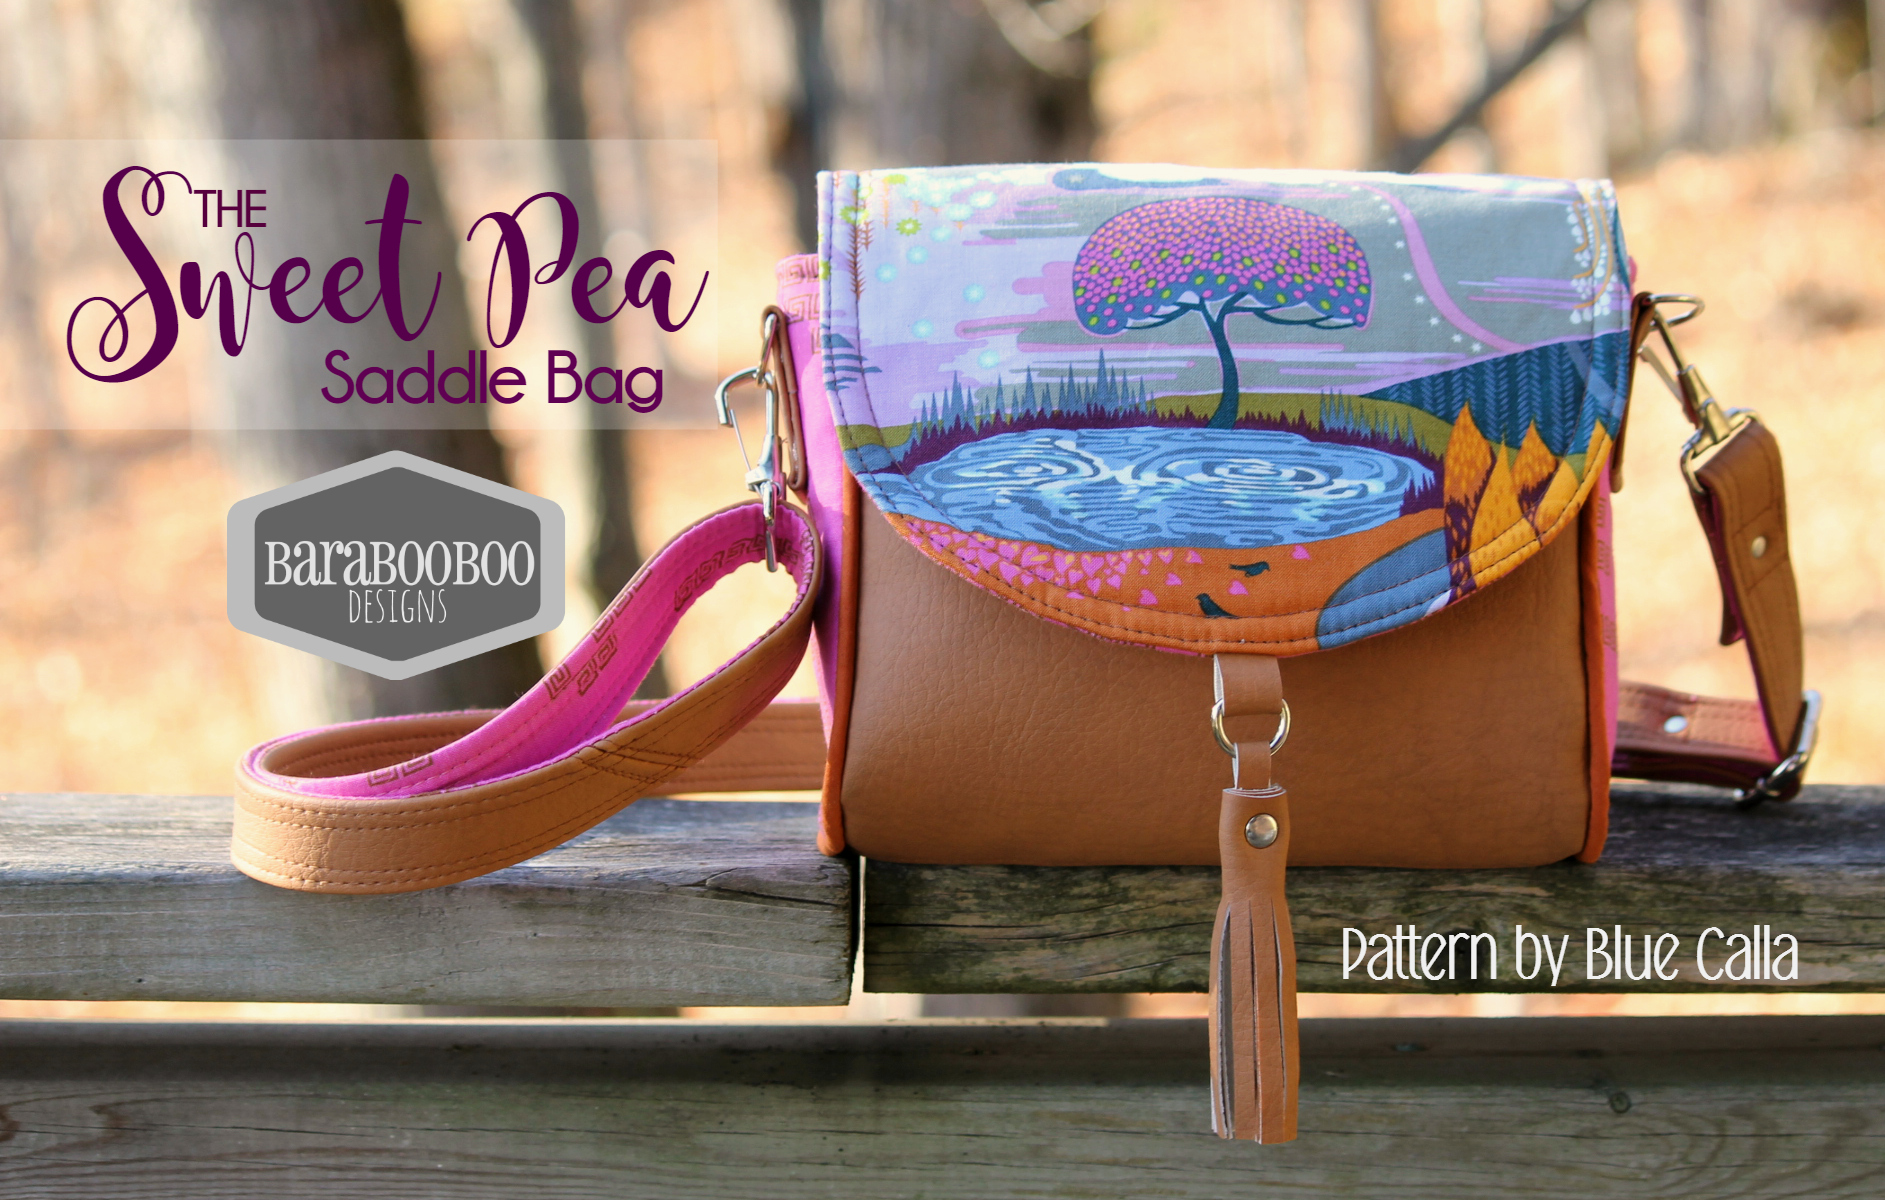
I used Anna Maria Horner’s Fibs and Fables combined with a cinnamon coloured faux leather on this one. It’s outlined in piping on the side panels, which by the way have a very refreshing silhouette.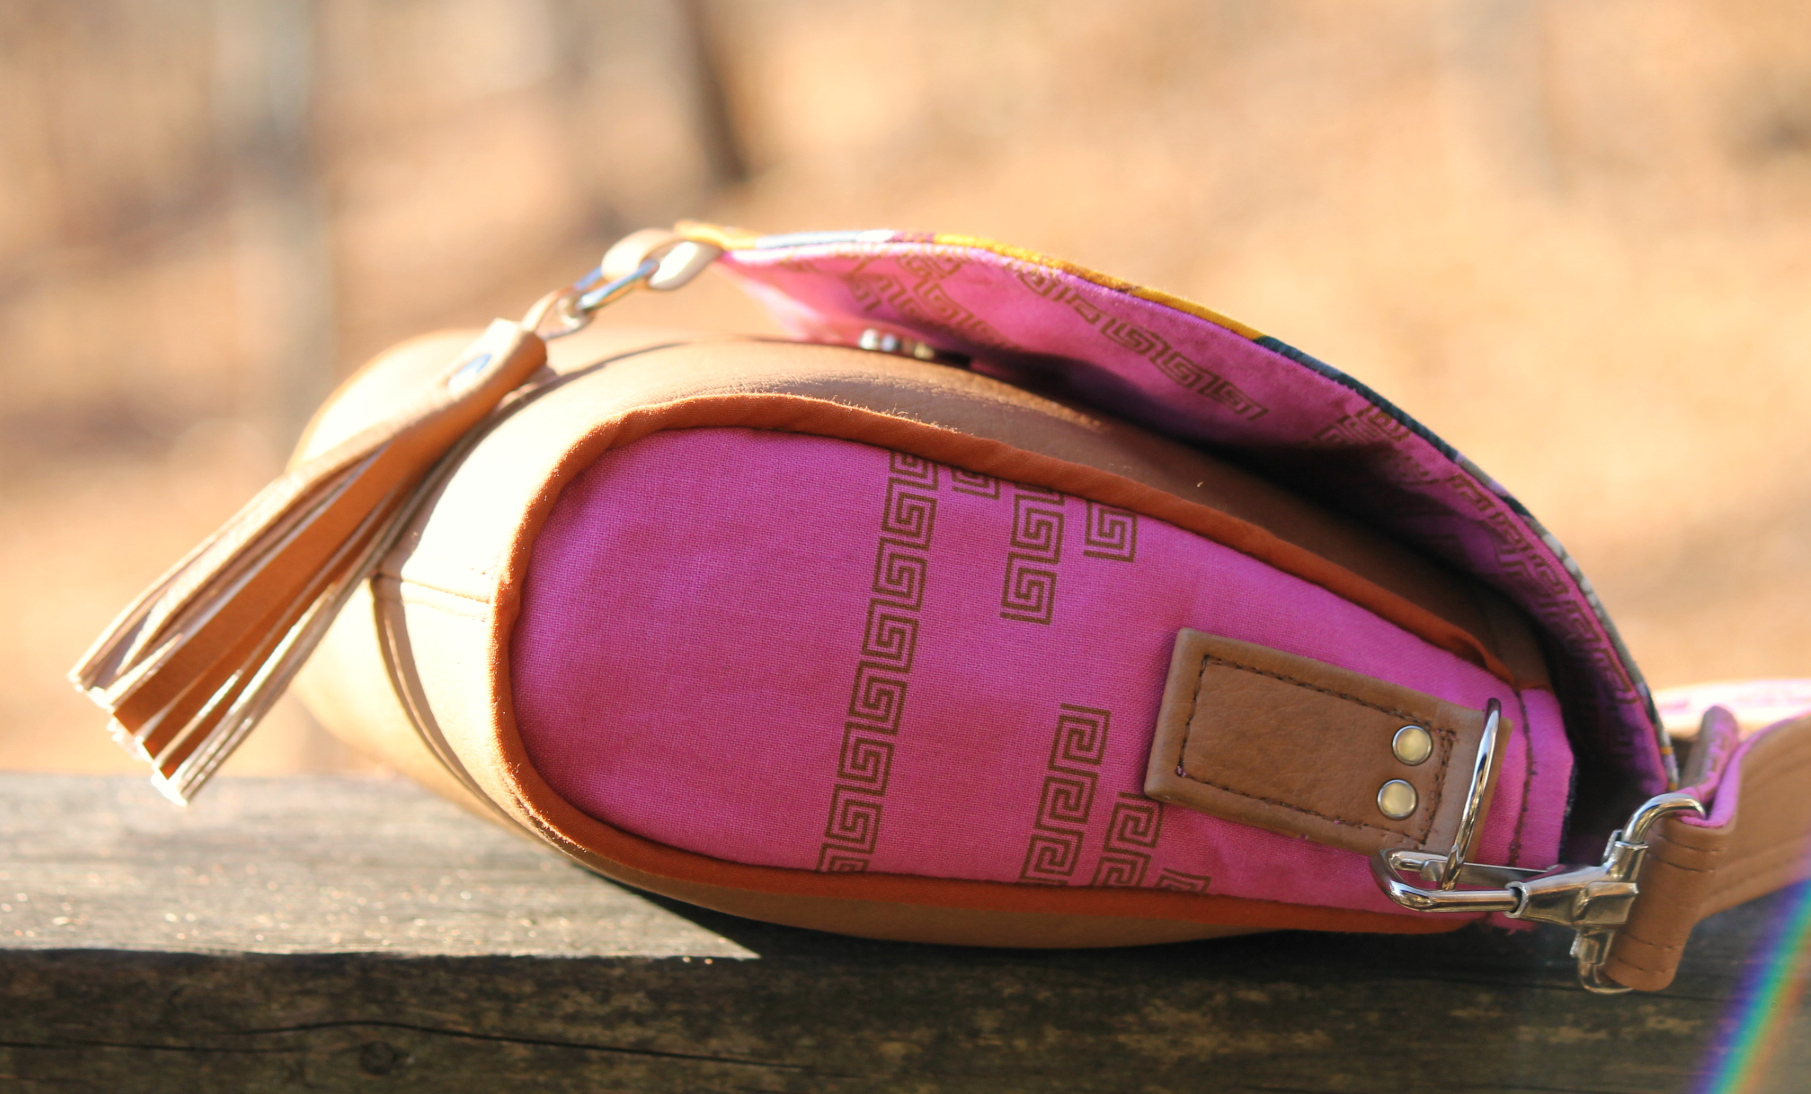
You also will learn how to make that little tassel yourself and can apply that to whatever bag you want!
This bag is fairly easy to make, and also quick, so it’s great for a quick birthday or teacher gift.
Enough already from me…go get your FREE pattern here. Come back and let me know what you think??
